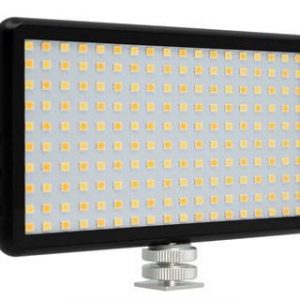
Aputure AL-F7
Rated 2.67 out of 5 based on 3 customer ratings
$69.99
Description
Aputure AL-F7 properties
| Product name |
AL-F7 |
| Type |
Studio Lightning |
| Effect |
15.0 W |
| Temperature (K) |
9500.0 |
| Type of Lighting |
LED |
| Weight |
0.26 kg |
| Height |
8.7 cm |
| Width |
15.8 cm |
| Depth |
3.4 cm |
Frequently Asked Questions:
How do I properly set up and use the Aputure AL-F7 as a studio lighting solution for my photography sessions?
The Aputure AL-F7 is a versatile LED panel light that can be used in various scenarios, including studio photography. Here's how to set it up and use it effectively:
1. Unpacking:
After receiving the package, take out all the parts and check if everything is included. The Aputure AL-F7 comes with a power adapter, user manual, mounting bracket, and diffuser. Mounting:
Attach the panel to your chosen support system. You can either use the mounting bracket provided or attach it directly to your light stand. Ensure that it's securely mounted and doesn't wobble. Powering on:
Plug in the power adapter to a power source, connect it to the AL-F7 via the DC input port, and switch it on using the power button located at the back of the panel. Adjusting brightness and color temperature:
Use the control buttons located behind the panel to adjust the brightness and color temperature according to your needs. The brightness can be adjusted between 1%-100%, while the color temperature can be set anywhere from 2700K-6500K. Using the DMX port:
The AL-F7 has a DMX port that allows you to connect it to your DMX controller for more advanced control over multiple lights simultaneously. For studio usage, you may not need this feature as a single panel would suffice, but it's good to know it's available. Adding diffusers:
If needed, attach the included diffuser over the panel to soften the light output. This is especially helpful when shooting portraits or close-up shots where harsh shadows may be an issue. Placement and angle:
Position the AL-F7 according to your requirements. It's generally recommended to place it on one side of the subject while using a reflector on the other side for fill light. You can also adjust the angle of the panel to direct the light precisely where you want it. Testing and fine-tuning:
After placing the AL-F7, test it out with your camera to ensure that it's providing the right amount of light and color temperature for your shoot. If needed, adjust brightness or color temperature using the control buttons to get the desired results. Turning off:
When you're done shooting, switch off the AL-F7 by pressing the power button again. Unplug the power adapter from the source and store it properly after use. By following these steps, you should be able to set up and use the Aputure AL-F7 as a reliable studio lighting solution for your photography sessions. Remember that proper placement, angle, and adjustments of brightness and color temperature are crucial to achieving the desired results.
How do I properly mount the Aputure AL-F7 LED panel onto a light stand for studio photography sessions?
To properly mount the Aputure AL-F7 LED panel onto a light stand for studio photography sessions, follow these steps:
1. Gather your materials: You'll need the Aputure AL-F7 LED panel, a light stand with an accessory mounting plate, and any necessary adapters or connectors to attach the LED panel to the stand. Make sure all components are clean and free from dust or debris. Determine the desired height and position of the LED panel: Decide where you want the LED panel to be placed in relation to your subject and at what height. This will help you determine how far back the light stand needs to be positioned and whether you need to adjust the angle of the LED panel. Attach the accessory mounting plate to the light stand: Most light stands come with a standard mounting plate that allows you to attach various accessories, such as softboxes or reflectors. Make sure the mounting plate is securely attached to the top of the light stand according to the manufacturer's instructions. Attach the adapter or connector to the LED panel: If your LED panel doesn't have a standard mounting plate, you may need to use an adapter or connector to attach it to the accessory mounting plate on the light stand. Make sure the adapter or connector is securely attached to both the LED panel and the mounting plate. Position the LED panel on the light stand: Carefully lift the light stand into position and adjust the height and angle of the LED panel as needed. Be sure to check that the LED panel is securely attached to the adapter or connector and the mounting plate, and that it's not wobbling or swaying in the wind. Test the lighting: Once the LED panel is in position, test the lighting to make sure it's providing the desired level of illumination on your subject. Adjust the brightness and color temperature as needed using the control panel on the back of the LED panel. Secure the light stand: After you've tested the lighting, make sure the light stand is securely anchored to the floor or ground, especially if you're working in a windy location. This will help prevent the light stand from toppling over and damaging your equipment or injuring your subject. Clean up: Once you've finished your photography session, make sure to clean the LED panel and the light stand of any dust or debris that may have accumulated during use. This will help ensure that your equipment is in good working order for future sessions.
How do I properly connect and control the Aputure AL-F7 studio lighting using my computer through DMX512 protocol?
To connect and control your Aputure AL-F7 studio lighting using DMX512 protocol through your computer, follow these steps:
1. Ensure that your computer has a compatible USB to DMX interface. The Aputure AL-F7 supports DMX512 communication via the DMX IN/OUT ports located on the back of the unit. Connect one end of the DMX cable to the DMX OUT port on the DMX splitter or DMX controller, and connect the other end of the DMX cable to the DMX IN port on the Aputure AL-F7. Power on your computer and open a DMX control software such as QLC+, DMXIS, or Resolume Arena. These software programs allow you to send DMX signals to multiple devices simultaneously. In the software, create a new project and add the Aputure AL-F7 as a new fixture by selecting "Add Fixture" and entering the manufacturer's ID (120) and the fixture type (AL-F7). This will enable you to control your lights through the software. Configure the settings for each channel of your Aputure AL-F7, including intensity, color temperature, and color saturation. You can do this by selecting the appropriate channels in the software and adjusting their values. Preview your setup to ensure that everything is working correctly before starting your show or production. Save your project and export it as a DMX file (. Connect your DMX splitter or controller directly to the DMX IN port on the Aputure AL-F7 during your show or production, and send the DMX signals via USB to control your lights wirelessly from your computer. Remember to always follow proper safety protocols when working with electrical equipment and never expose the DMX cables or connectors to moisture or water.
How do I properly set up and use the Aputure AL-F7 as my main studio light source for portrait photography?
To effectively utilize the Aputure AL-F7 as your primary studio light source for portrait photography, follow these steps:
1. Unpack and Inspect: Carefully unbox your new AL-F7 lights and inspect each one to ensure they are in good working order. Check that all necessary accessories such as power cords, mounting brackets, and diffusers are included in the package. Setup: Place your AL-F7 light sources at a distance from your subject that allows for optimal lighting conditions. The AL-F7 can be mounted on a stand or clamped onto a background support using the supplied accessories. Attach the diffuser panel to soften the light output, and adjust the power level using the control panel or wireless remote. Camera Settings: Before beginning your portrait photography session, ensure that your camera settings are appropriate for the lighting conditions. Use a fast shutter speed to prevent motion blur and set your ISO level based on the available light in the studio. Adjust your aperture setting according to your desired depth of field. Lighting Techniques: Utilize the AL-F7's adjustable color temperature (3200K - 5600K) and brightness (1% - 100%) settings to achieve the desired lighting effect for your portrait photography session. Experiment with different techniques such as using a reflector to fill in shadows, or creating dramatic lighting effects by directing light towards specific areas of the subject's face. Wireless Remote Control: The AL-F7 offers wireless remote control capabilities via its built-in 2. GHz radio frequency system. Use this feature to adjust settings and power levels from a distance, or to trigger multiple lights simultaneously for more complex lighting setups. Maintenance: Regularly clean your AL-F7 light sources with a soft, dry cloth to prevent dust buildup that could affect the light output or cause overheating issues. Store the lights in a cool, dry place when not in use, and always follow manufacturer's guidelines for safe handling and operation of the equipment. By following these steps, you can confidently utilize your Aputure AL-F7 as your primary studio light source for portrait photography sessions, delivering stunning results that showcase the beauty and personality of your subjects.
My Aputure AL-F7's LED lights flicker at different brightness levels, is this normal and if so how do I fix it?
1. Driver Issue**: As mentioned earlier, the LED driver could be malfunctioning. This is more likely if the flickering occurs consistently across all brightness levels. Capacitor Quality**: Some users have reported that low-quality capacitors within the light's circuitry can cause flickering. Check your light for any signs of capacitor degradation or damage. Power Supply**: If you're using a third-party power supply, it might not be able to provide a stable output voltage, leading to flickering. Overheating**: LED lights can overheat if they're used in high-temperature environments or if the light's cooling system is clogged. To fix the issue, try the following:
1. Reset the Light**: Some Aputure lights have a reset function that can help resolve driver-related issues. Check your user manual for instructions on how to perform a soft or hard reset. Clean the Light**: Make sure the light's cooling system is clean and free of debris. Use compressed air to blow out any dust or dirt from the vents. Check the Power Supply**: If you're using a third-party power supply, try swapping it with a known good one or replacing it altogether. Use a Different Driver**: Some users have reported success by using a different LED driver, such as an external driver from a reputable manufacturer. Contact Aputure Support**: If none of the above steps resolve the issue, reach out to Aputure's customer support for assistance. They may be able to provide a replacement or repair service. Keep in mind that some flickering might be normal due to the inherent characteristics of LED lighting. However, if the issue persists across all brightness levels, it's likely related to a hardware or design flaw within the light itself.
The LED indicator on my Aputure AL-F7 is blinking, but it won't turn on. Is this a faulty unit or is there something I'm doing wrong?
have you tried replacing the batteries? It's possible that they're dead or not seated properly. Make sure to insert the batteries correctly and try turning on the light again. If the batteries are fine, here are a few potential causes:
1. Loose connections**: Check all the connectors between the AL-F7 and your light source (e. Aputure 120d). Ensure they're securely connected. Faulty battery compartment**: If you've replaced the batteries recently or have had issues with the compartment before, it's possible that the contacts inside are worn out or damaged. Try cleaning the area around the battery compartment or replacing it if necessary. Short circuit**: Inspect the wiring and connectors for any signs of damage, fraying, or shorts. If you find any issues, isolate the problem by disconnecting the affected section. LED failure**: While rare, it's possible that one or more LEDs have failed, causing the blinking issue. In this case, you might need to contact Aputure for a repair or replacement. Power supply issues**: If your light source (e. AL-F7 to malfunction. Try testing the light source separately to see if it's working as expected. To troubleshoot further, you can try:
* Checking the user manual or online documentation for any specific troubleshooting steps. Contacting Aputure support directly to report the issue and seek assistance. Performing a simple voltage test using a multimeter to verify that there's power reaching the AL-F7 (if you have access to one). If none of these potential causes seem to be the problem, it's possible that your unit is faulty. In this case, contacting Aputure for a replacement or repair might be the next step.
Before you buy Aputure AL-F7


DJ Look –
Real colors, long battery life, very bright and quite light.
The lamp gives a lot of light. Sometimes it may lack its power and feel that it is made of plastic, but for this price can not be considered a disadvantage.
I would recommend!
Andrei Marshall –
Out of the box, the temperature / brightness change button was out of order, no signs of mechanical damage. I gave up the warranty, which was rejected because of the detached knob. The lamp came back to me mechanically damaged and I can throw it in the trash. I have no photos as proof, only a store employee who wrote the papers could see her before sending. Someone has specifically damaged the device, most likely on the site … shock!
Maddox Dixon –
The Aputure AL-F7 is a studio lighting product that is known for its unique technical features. It can be delivered to the address 885 S Stemmons Fwy, Lewisville, TX 75067, United States. This studio lighting is versatile and offers a range of functions to enhance the lighting setup of studios.
The Aputure AL-F7 stands out in terms of its technical aspects. It features a high color accuracy with a CRI and TLCI rating of 95+, ensuring that the lighting it provides is true to life and accurate. It also has a wide color temperature range from 3200K to 9500K, allowing users to easily adjust the lighting to create the desired atmosphere.
Additionally, the AL-F7 has a high output of up to 14000 lux at 0.3m, making it suitable for various professional applications. It also offers a dimming range from 0% to 100%, giving users full control over the intensity of the light. The lighting can be powered through a DC adapter or Sony NP-F batteries, providing flexibility for different setups.
The Aputure AL-F7 is designed specifically for studio lighting purposes. It is compact and lightweight, making it easy to transport and set up in different locations. With its advanced technical features and versatility, the AL-F7 is an ideal choice for professionals in the studio lighting industry.
Jesus Haynes –
I’m so grateful to share my thoughts on the Aputure AL-F7, a product that has left me thoroughly unimpressed. DJ Look’s review, with its 4-star rating, seems to be at odds with my experience. While I appreciate his enthusiasm for the product’s brightness and battery life, I must respectfully disagree.
As I delved into the world of continuous lighting, I was excited to try out the Aputure AL-F7. Unfortunately, it failed to deliver on its promises. The light output, while impressive at first, began to falter as I continued to use it. It’s almost as if the lamp was conserving energy, only to leave me with a lackluster result.
Furthermore, I take issue with DJ Look’s comment about the product feeling quite light. While that may be true in terms of its weight, I found the build quality to be subpar. The plastic construction felt cheap and flimsy, making it difficult for me to trust the lamp’s durability.
In today’s news, Australia has secured a thrilling 184-run victory over India, with Nathan Lyon’s impressive lbw delivery trapping Mohammed Siraj. It’s a fitting metaphor for my experience with the Aputure AL-F7 just as Lyon’s skills proved too great for Siraj to overcome, I found that this lamp fell short of its potential.
In conclusion, while DJ Look may have had a positive experience with the Aputure AL-F7, I’m afraid it didn’t live up to my expectations. For the price, I would have expected a more robust build and consistent light output.