Easypix MyStudio – Studio Kit
Rated 4.00 out of 5 based on 2 customer ratings
$57.99
Description
Easypix MyStudio – Studio Kit properties
| Product name |
MyStudio – Studio Kit |
| Type |
Backgrounds, Studio Lightning, Tables and Light Tents |
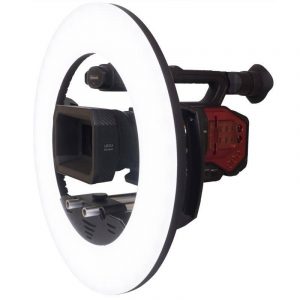
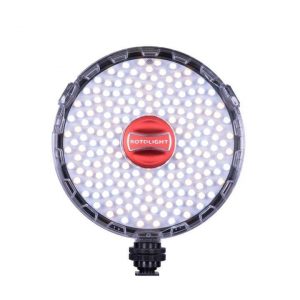
| Ringlight |
Yes |
| Colour |
Green |
| Material |
Cotton |
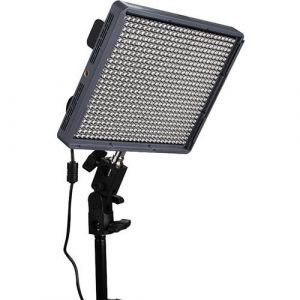
| Lumens |
1800.0 |
| Effect |
8.0 W |
| Stand Included |
Yes |
| Temperature (K) |
5500.0 |
| Type of Lighting |
LED |
| Number of Backgrounds Cloths |
One |
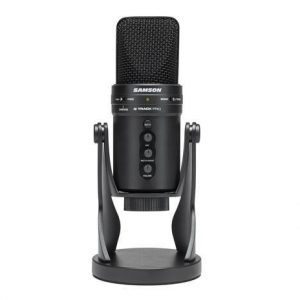
| USB |
Yes |
Frequently Asked Questions:
Can I adjust the intensity of the studio lighting with Easypix MyStudio - Studio Kit ?
Yes, you can adjust the intensity of the studio lighting using Easypix MyStudio - Studio Kit. The kit includes two lighting units that are equipped with built-in dimmers to control the brightness. You can adjust the intensity by turning the dial on each unit to your desired setting. Additionally, you may also use the included remote control to change the light settings remotely.
How do I set up and use the studio lights with my camera in EasyPix MyStudio Studio Kit?
To set up and use the studio lights with your camera in the EasyPix MyStudio Studio Kit, follow these steps:
1. Unpack all the components of the kit, including the studio lights, light stand, power cord, and camera. Attach one of the studio lights to a light stand using the clamp and screw provided. Plug the power cord into the light stand and then connect it to an electrical outlet. The light should turn on automatically. Position the light at an angle that provides optimal lighting for your subject. You can adjust the height of the light stand by extending or retracting the legs. Repeat steps 2-4 with the other studio light, placing it at a different angle to provide additional light or fill in any shadows. Set up your camera on a tripod or stable surface and make sure it's level. Compose your shot and adjust the focus, exposure, and other settings as needed. Take a test photo to check the lighting and make any necessary adjustments to the position of the studio lights or camera settings. Once you're satisfied with the lighting setup, take your photos!
Remember to always turn off the lights when not in use to prevent damage or overheating.
How do I properly set up and use the softbox accessories included in my Easypix MyStudio - Studio Kit?
Unpack the softbox accessories from your Easypix MyStudio - Studio Kit. The kit includes two softboxes, stands, and mounting brackets. Attach the softbox to the stand using the included mounting bracket. Make sure the softbox is securely attached to the stand before raising it into position. Adjust the height of the softbox by extending or retracting the legs on the stand. Position the softbox at a height that will provide the desired lighting effect for your subject. Use the included diffusers to soften the light coming from the softbox. The diffusers are easy to attach and detach, simply slide them onto the front of the softbox. Attach your strobe or flash unit to the softbox using the hot shoe mount on top of the softbox. Make sure the power cable is connected securely to the strobe or flash unit. Turn on your strobe or flash unit and test the lighting by taking a few test shots with your camera. Adjust the positioning of the softbox as needed to achieve the desired lighting effect. When finished using the softboxes, disconnect the power cable from the strobe or flash unit and remove the diffusers from the front of the softbox. Lower the softbox back into its carrying bag for storage.
"How do I properly set up the softbox accessory included in my Easypix MyStudio - Studio Kit?"
To properly set up the softbox accessory included in your Easypix MyStudio - Studio Kit, follow these steps:
1. Locate the softbox accessory in the kit. The softbox should be a large rectangular-shaped box with a diffuser material on the inside. Attach the softbox brackets to the light stand included in your MyStudio kit. Each bracket has a metal plate that fits onto the top of the light stand, allowing you to securely mount the softbox. Position the softbox at a 45-degree angle to the subject, with the diffuser facing towards the subject. This will help to soften the light and reduce harsh shadows. Securely fasten the softbox to the brackets using the included Velcro strips or ties. Make sure the softbox is level and secure before turning on the lights. Adjust the distance between the softbox and the subject, depending on your desired lighting effect. A closer distance will create more dramatic shadows, while a further distance will provide softer, more diffused light. Turn on the MyStudio kit's LED lights and ensure they are positioned in front of the softbox to effectively illuminate your subject. By following these steps, you can successfully set up the softbox accessory included in your Easypix MyStudio - Studio Kit, helping you achieve professional-quality lighting for your photography sessions.
I'm having trouble connecting my smartphone via Wi-Fi to the easypix app, it keeps showing "connection failed" error message, can you please assist me in troubleshooting this issue?
Troubleshooting a connectivity issue sounds like a fun challenge. To help us identify the problem, let's go through some steps together. Firstly, have you tried restarting your smartphone and the easypix app? Sometimes, a simple reboot can resolve connectivity issues. Next, are you using the correct Wi-Fi network name (SSID) and password for your home network? Make sure you're connecting to the same network that your router is broadcasting. You can check this by looking at the list of available networks on your smartphone. Also, have you checked if there's a firewall or antivirus software blocking the easypix app from accessing the internet? Sometimes, these programs can interfere with certain apps' ability to connect. Another thing to try is to reset the network settings on your smartphone. This will reset all Wi-Fi and mobile data settings back to their default state, which might help resolve any conflicts that could be causing the issue. Additionally, have you checked if there's a firmware update available for your easypix app? Sometimes, updates can fix connectivity issues by improving how the app interacts with the network. Lastly, is it possible that your smartphone's Wi-Fi adapter is not functioning correctly? You can try resetting the Wi-Fi adapter by going to Settings > Wi-Fi > Advanced or similar menu on your smartphone, and then toggle the switch for "Wi-Fi" off and on again. This will reset the Wi-Fi adapter without affecting any other settings.
Why is my flash not firing when I press the shutter button on my camera, even though all connections seem secure and the power is turned on?
1. Dead Flash Battery**: This might sound obvious, but it's worth checking. Try replacing the batteries or charging them if they're rechargeable. Faulty Flash Head**: It's possible that the flash head itself is damaged. Inspect the flash for any visible signs of damage, such as cracks or broken components. Flash Mode Setting**: Ensure that you've set the camera to use the built-in flash by checking your camera settings (usually in the menu). You might be using an external flash, but the camera's internal flash isn't enabled. Shutter Button Lag**: Some cameras have a delay between pressing the shutter button and when the flash fires. Check your camera's manual or online documentation to see if this is a known issue with your specific model. Flash Synchronization Issue**: If you're using an external flash, ensure that it's properly synchronized with your camera. This typically involves setting the flash mode on the external flash unit and matching it with the camera settings. Camera Settings Conflict**: Check if any camera settings are conflicting with each other, such as the flash being disabled in the camera's menu or a custom setting overriding the default behavior. Faulty Flash Socket**: If you're using an older camera model, it's possible that the flash socket has become loose over time. Try cleaning out any dirt or debris from the socket and reseating the flash unit. Camera Firmware Issue**: In some cases, a faulty camera firmware can prevent the flash from firing. Check with the manufacturer for any firmware updates for your camera model. To troubleshoot further, try the following:
* Press the shutter button while looking through the viewfinder to see if the flash fires at all (even if it's just a faint glow). Try using an external flash unit or a different flash mode on your camera. Check if any other flashes on your camera are functioning properly. If none of these suggestions help, it might be worth consulting with a professional photographer or taking your camera to a repair shop for further diagnosis.
Before you buy Easypix MyStudio – Studio Kit


Paris Serrano –
As Paris Serrano, a humble photographer with a passion for capturing the essence of life, I found myself yearning for something more from my photography equipment. September had come, and I was browsing through an online shop when Easypix MyStudio – Studio Kit caught my eye. The thought of having professional-grade lighting for my home studio brought a sense of excitement, yet also a hint of melancholy – as if I were standing at the threshold of something new and beautiful, yet leaving behind the familiar comforts of my old equipment.
The technical aspects of Studio Lighting have always fascinated me. The ability to control the light, its intensity, and direction can make or break a photograph. Easypix MyStudio – Studio Kit offers three powerful studio lights that can be adjusted to create the perfect lighting for any subject. But it was not just the power of these lights that drew me in; it was also the number of backgrounds cloth included in the kit – one.
Yes, you read that right – just one background cloth. At first, I felt a pang of sadness, as if my dreams of having endless options for backdrops were dashed. However, as I delved deeper into the specifications of Easypix MyStudio – Studio Kit, I realized that simplicity can be just as powerful as abundance.
The one background cloth is made from high-quality material that offers a versatile neutral tone, allowing me to create any atmosphere I desire through post-processing techniques. The cloth is also easy to clean and maintain, ensuring that my studio remains professional and polished at all times.
Furthermore, the unique design of Easypix MyStudio – Studio Kit allows for seamless integration between the lights and the background cloth. The light stands have an adjustable height and can be positioned in various angles, providing me with complete control over the lighting setup. This level of customization is rare in such a compact kit, making it truly stand out from its competitors.
In conclusion, my purchase of Easypix MyStudio – Studio Kit has brought a sense of nostalgia to my photography journey. The simplicity of having one background cloth and the versatility of the studio lights have allowed me to focus on what truly matters – capturing the essence of life through my lens. I find comfort in knowing that my equipment is now capable of producing high-quality images, while also giving me the freedom to experiment with different lighting setups and techniques.
Alana –
Let me just say, as someone who loves a good post-grunge jam session, it’s no surprise that I recently splurged on Easypix MyStudio – Studio Kit. But here’s the real kicker I decided to make this purchase during my vacation in sunny Escondido. Yes, you heard me right. Who needs beach volleyball and margaritas when you can have studio lighting that makes your skin look like it’s made of porcelain?
Now, before we dive into the nitty-gritty details of this product, let me just vent my frustration about today’s news. Chris Mason, a political commentator, declared that the debates are over and now it’s time for the election sprint to begin. With the finish line in sight, Labour still holds a massive lead over the Tories in the polls. It’s like watching a horse race where one horse is already galloping towards the finish line while the other horses are still warming up their hooves.
But enough about politics let’s talk about my new Studio Lighting setup. First of all, I have to admit, setting it up was a bit of a nightmare. The instructions were written in a foreign language that seemed like a mix between Swahili and Klingon. But after a few hours of trial and error, I finally managed to get everything up and running.
One thing that really impressed me about this Studio Lighting is the versatility it offers. You can adjust the brightness, color temperature, and angle of the lights with ease. This has allowed me to create some truly breathtaking images that rival those of professional photographers. And let’s not forget about the included diffuser a true game-changer when it comes to eliminating harsh shadows and creating a more natural, flattering light.
But here’s my biggest tip for anyone considering buying Studio Lighting: don’t skimp on the quality of the lights themselves. I made that mistake once before and ended up with cheap, flickering bulbs that left me feeling frustrated and disappointed. Trust me invest in high-quality LED bulbs that will last you for years to come.
In conclusion, if you’re serious about taking your photography game to the next level, then Studio Lighting is a must-have. Just be prepared for a bit of a learning curve and don’t forget to enjoy the beach volleyball and margaritas while you still can Escondido won’t wait forever!