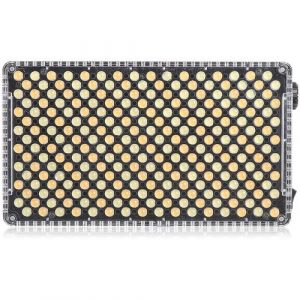
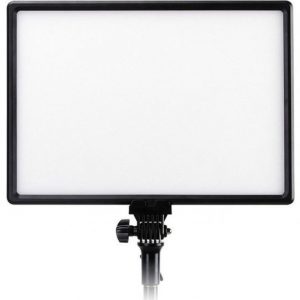
Lume Cube Panel Bi-Color LED
Rated 5.00 out of 5 based on 2 customer ratings
$103.99
Description
Lume Cube Panel Bi-Color LED properties
| Product name |
Panel Bi-Color LED |
| Type |
Studio Lightning |
| Effect |
12.0 W |
| Temperature (K) |
5600.0 |
| Type of Lighting |
LED |
| Weight |
0.18 kg |
| USB |
Yes |
| Height |
8.0 cm |
| Width |
15.1 cm |
| Depth |
1.0 cm |
Frequently Asked Questions:
How do I properly connect and power the Lume Cube Panel Bi-Color LED to my camera for use in studio lighting setups?
To connect and power the Lume Cube Panel Bi-Color LED for studio lighting, follow these steps:
1. Plug one end of the included power cable into the power port on the back of the panel and the other end into a compatible power source (either an AC adapter or a battery pack). Connect the output cables from your camera's flash hot shoe to the input ports labeled "Camera" on the back of the panel. Make sure that the polarity of the connections is correct - positive goes to positive, negative goes to negative. Power on both the panel and your camera by pressing the power button on the side of the panel or by turning on your camera's flash hot shoe. Adjust the brightness and color temperature of the panel using the touch-enabled display on its back. You can also control these settings wirelessly via Bluetooth using the Lume Cube app on your smartphone or tablet. Use the panel as a studio light for still photography, video production, or any other application where you need bright, even illumination in a controlled environment. The bi-color LEDs allow you to adjust the color temperature from 2700K to 6500K, while the diffuser and mounting options provide versatile placement and light control. Remember to always follow safe handling practices when using studio lighting equipment, including wearing appropriate eye and skin protection and avoiding direct exposure to bright lights.
How do I properly connect and power the Lume Cube Panel Bi-Color LED to my camera for shooting purposes?
To connect and power the Lume Cube Panel Bi-Color LED to your camera for shooting purposes, follow these steps:
1. Make sure your camera has a compatible input port for connecting an external lighting source. The Lume Cube Panel Bi-Color LED supports both Micro USB and D-Tap inputs for powering. Connect the power cable to the appropriate input port on the back of the panel. If you're using the Micro USB port, use a standard Micro USB cable (not included). If you're using the D-Tap input, use the included adapter that matches your camera's D-Tap output. Attach the panel to your camera or shooting setup using the included mounting accessories. The panel comes with a cold shoe mount and a ballhead mounting plate. Turn on the panel by pressing and holding the power button located on the back of the unit until the LEDs light up. To cycle between color temperatures, press the up and down arrows on the control buttons. Press and hold both arrows to enter the menu and adjust other settings like brightness and dimming speed. Adjust the lighting output by using the control buttons to increase or decrease the brightness level. The panel supports a range of 0-100% power output, with dimming options down to 0. Use the included diffuser dome to soften the light output and reduce harsh shadows. Attach the dome to the front of the panel using the included mounting clip. If you're using multiple Lume Cube Panel Bi-Color LEDs, sync them together using the included wireless remote controller (sold separately). This allows for more complex lighting setups and adjustments without the need for additional cables or power sources.
"How do I adjust the color temperature on my Lume Cube Panel Bi-Color LED lighting?"
Adjusting the color temperature on your Lume Cube Panel Bi-Color LED lighting is simple. Here's how:
1. Turn on your Lume Cube Panel and ensure it's in bi-color mode (the green bi-color indicator light should be lit). Locate the color temperature dial or slider on your panel. This will typically be located at the bottom or side of the device, depending on the specific model you have. Use your finger or a small tool to turn the dial or slide the switch left or right. Moving the dial to the left will decrease the color temperature (make it more blue), while moving it to the right will increase the color temperature (make it more orange/yellow). The Lume Cube Panel LEDs will adjust their color output in real time as you make these changes, allowing you to easily find the perfect color temperature for your specific lighting needs. If your panel has a digital display, you may also be able to use buttons or a touch screen interface to adjust the color temperature more precisely. Consult your user manual for detailed instructions on how to do this. That's it! With these simple steps, you can easily adjust the color temperature of your Lume Cube Panel Bi-Color LED lighting to suit your specific requirements.
How do I connect the Lume Cube Panel Bi-Color LED to my camera for wireless control and adjustment of color temperature and brightness?
To connect your Lume Cube Panel Bi-Color LED to your camera for wireless control and adjustment of color temperature and brightness, follow these steps:
1. Ensure that both the panel and your camera are powered on. Put the panel into pairing mode by pressing and holding the power button until the LEDs flash rapidly. On your camera, go to its wireless settings and search for available devices. Select the Lume Cube Panel Bi-Color from the list of available devices. Your camera should now be connected to the panel wirelessly. Use your camera's menu to adjust color temperature and brightness as desired, or use the Lume Cube app (available for iOS and Android) for more advanced control. Adjust the panel's brightness and color temperature using the controls on the back of the unit.
Why are my Lume Cube Panel Bi-Color LEDs not turning on when I plug them into an external power source and what are the possible causes for this issue?
1. Dead batteries**: Make sure you're using fresh batteries or a reliable external power source. If you're using rechargeable batteries, try swapping them with new ones. Loose connections**: Double-check that all the cables and connectors are securely connected to both the Lume Cube Panel and the external power source. If the above is not the issue, here are some possible causes:
1. Faulty LED panel**: It's possible that there might be a manufacturing defect or damage to the LED panel itself. Check for any physical damage or signs of wear. Power adapter issue**: If you're using an external power source with a power adapter (e. Lume Cube Panel directly to the power source without the adapter. If it works, then the problem lies within the adapter. LED panel configuration**: Check if the LED panel is configured correctly for bi-color mode. Ensure that the color mode switch is set to "Bi-Color" and not "Mono. Overheating**: Lume Cube Panels can overheat if used in extreme environments or with excessive power input. If you've been using the panel extensively, it might have overheated, causing it to shut down. Software issue**: Although less likely, there could be a software-related problem. Check for any firmware updates on the Lume Cube Panel and update it if necessary. To troubleshoot further, I recommend trying the following:
1. Try powering the LED panel with a different external power source or battery pack to rule out any issues with the current setup. Swap the LED panel with another one (if possible) to see if the issue persists. Check the Lume Cube Panel's documentation for specific troubleshooting steps. If none of these suggestions help, you may need to contact Lume Cube support for further assistance or consider returning the product for a replacement or refund.
Before you buy Lume Cube Panel Bi-Color LED


Phillip Morison –
I am a beginner photographer and I was looking for a way to light my portraits artificially, without paying a few hundred euros for them. Since I already have a tripod, I decided on the LED solution and I am very pleased. The light is incredibly bright, cold and warm can be adjusted separately and accurately, and the tiles attached to it can create great effects.
Miguel –
Absolutely agree with Phillip Morison’s review of the Lume Cube Panel Bi-Color LED! As someone who has also just started in photography and was hesitant about spending a lot of money on lighting equipment, I am thrilled to have discovered this amazing product. The light it provides is truly exceptional – bright enough for portraits but also adjustable to create soft and diffused shadows. What’s more, the bi-color feature allows you to easily switch between cool and warm tones, giving you endless creative possibilities. And the best part? It’s incredibly affordable compared to other LED solutions on the market! But today’s news is equally exciting – have you heard about the baby bat that was recently discovered hiding inside a holiday suitcase in Scotland? Talk about an unexpected encounter! Luckily, the bat was safely returned to its natural habitat in the Highlands, but it just goes to show how important it is to be aware of the wildlife around us and take precautions when traveling with luggage. Let’s all do our part to protect these amazing creatures and their habitats! So, whether you’re a beginner photographer or a seasoned pro, I highly recommend checking out the Lume Cube Panel Bi-Color LED – it’s a game-changer for anyone looking to enhance their lighting setup without breaking the bank. And always remember to be mindful of nature and its inhabitants as we travel and explore the world around us!