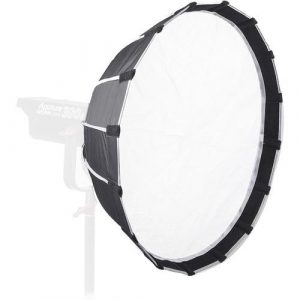
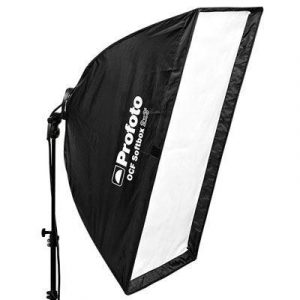
Profoto RFi Softbox 3′ Octa
$167.99
Description
Profoto RFi Softbox 3′ Octa properties
| Product name |
RFi Softbox 3′ Octa |
| Type |
Studio Lightning |
| Softbox |
Yes |
| Effect |
2400.0 W |
| Stand Included |
Yes |
| Weight |
1.6 kg |
| Width |
90.0 cm |
| Depth |
40.0 cm |
Frequently Asked Questions:
"How should I properly attach the Profoto RFi Softbox 3' Octa to my studio lighting setup for optimal results with beginner-level expertise?"
To properly attach the Profoto RFi Softbox 3' Octa to your studio lighting setup and achieve optimal results as a beginner, follow these steps:
1. Ensure that your Profoto lighting system supports RFi technology. If you're not sure, check the manufacturer's website or contact their support team for confirmation. Open the softbox and lay it flat on the ground with the speedring facing upwards. The speedring is a metal ring located at the top of the softbox that connects to your lighting unit. Attach your Profoto lighting head to the speedring using the included RFi bracket. Make sure the head is securely fastened and properly aligned with the softbox's center point. Adjust the softbox's spreader bars to shape the light output according to your desired effect. The spreader bars can be adjusted independently or simultaneously, depending on the lighting situation. Position your subject under the softbox and adjust the height of the lighting head accordingly. For optimal results, place your subject at a distance that allows for even illumination without any harsh shadows. Adjust the brightness and color temperature of your lighting unit using the onboard controls or an external controller, depending on your setup. Beginners should start with lower power settings to avoid overexposure and gradually increase the intensity as they become more comfortable with the system. Use a reflector or diffuser to further shape the light output and achieve specific effects. Profoto offers a range of accessories that can be easily attached to the softbox for added versatility. Remember, practice makes perfect! As you gain experience using your Profoto RFi Softbox 3' Octa, you'll become more confident in your abilities and discover new techniques and creative possibilities.
"How should I properly attach the Profoto RFi Softbox 3' Octa to my studio lighting setup for optimal results?"
To properly attach the Profoto RFi Softbox 3' Octa to your studio lighting setup for optimal results, follow these steps:
1. Ensure that you have a compatible Profoto head, such as the B1 or D2, and connect it to an Air Remote (such as the TTL-600 AirR or the RFi Speedlight). Attach the included mounting bracket onto your light stand using the provided screws. Position the softbox frame over the mounting bracket, aligning the Velcro strips on the frame with those on the bracket. Press the frame firmly into place to secure it. Attach the diffusion fabric (white or translucent) to the inside of the softbox using the included Velcro strips. Make sure the fabric is smooth and taut. Insert your Profoto head into the softbox, making sure it's centered and level. Tighten the locking knob on the side of the softbox to secure it in place. Adjust the position and angle of your light stand as needed to achieve your desired lighting setup. For optimal results, consider using a diffuser (such as the included Profoto Diffusor Panel) to further soften the light and reduce harsh shadows. Attach it to the front of the softbox using the provided clips. Finally, make any necessary adjustments to your camera settings and start shooting! The Profoto RFi Softbox 3' Octa is designed to provide beautiful, even lighting for a variety of subjects and applications.
How do I properly set up and use the Profoto RFi Softbox 3' Octa for my studio photography sessions as a beginner user?
Here are some basic steps to help you get started with using the Profoto RFi Softbox 3' Octa:
1. Unpack the softbox and all its components, making sure you have all the necessary pieces (the softbox itself, diffusers, speed rings, etc. Assemble the softbox by attaching the speed rings to the frame, then inserting the diffuser into the center of the frame. You can use the included fabric cover as an additional outer layer for more diffusion if needed. Attach the softbox to your Profoto RFi Speedring using the speed rings. Make sure it's securely fastened and centered over your subject. Set up your Profoto RFi lights according to your studio setup, following the instructions provided in the user manual. You can use multiple RFi lights and softboxes for more complex setups, but as a beginner, it's best to start with just one light and softbox. Adjust the intensity of the light using the Profoto RFi remote or the on-camera controller, depending on your setup. You can also adjust the color balance if needed by switching between daylight and tungsten modes. Position your subject under the softbox, making sure they're evenly lit and that no harsh shadows are cast. Use a reflector or other light source to fill in any shadows as needed. Take test shots and review them on your camera's display to check for proper exposure, color balance, and overall lighting quality. Adjust the settings as needed until you achieve the desired effect. When you're satisfied with your results, pack up the softbox and its components and store them in a safe, easily accessible place for future use. Remember to always follow the manufacturer's instructions and safety guidelines when using any photography equipment, and don't hesitate to seek out additional resources or support if needed.
How do I properly attach and use the Profoto RFi Softbox 3' Octa for studio lighting purposes?
To properly attach and use the Profoto RFi Softbox 3' Octa for studio lighting purposes, follow these steps:
1. Ensure that you have a Profoto Air Remote (sold separately) to connect your camera's hotshoe to the RFi Softbox 3' Octa. Begin by assembling the softbox according to the manufacturer's instructions. The Octa consists of eight fabric panels attached to a metal frame, which can be folded for easy transport and storage. Once assembled, attach the softbox to your Profoto strobe head using the included speedring and stud mount. Make sure that the softbox is securely fastened to the strobe head. Position the strobe head in your desired location, ensuring that it is level and that there are no obstructions between the subject and the softbox. Adjust the height of the strobe head using the included boom arm or stand. This will allow you to direct light towards your subject from a variety of angles. Use the Profoto Air Remote to adjust the intensity, color temperature, and other settings for your lighting setup. This can be done wirelessly, allowing you to make adjustments without physically moving the strobe head or softbox. Take test shots to ensure that the light is evenly distributed across your subject's face and body. Adjust the position of the strobe head or softbox as needed to achieve the desired lighting effect. To pack up and transport the RFi Softbox 3' Octa, carefully disassemble it and fold it flat for storage in its carrying bag. Remember to always prioritize safety when working with studio lighting equipment. Keep a safe distance between the strobe head and any reflective surfaces, and never aim the light directly at your subject's eyes. With proper use and care, the Profoto RFi Softbox 3' Octa can help you achieve stunning, professional-quality images in your studio or on location.
Can you explain why my Profoto RFi Softbox 3' Octa is not producing a uniform soft light, and what adjustments I can make to achieve a more even lighting output?
1. Misaligned Softbox**: Make sure the Softbox is properly attached to the Profoto RFi head and that it's aligned with the lamp. If the Softbox is not centered, the light will not be evenly distributed. Uneven Reflector Positioning**: The reflector inside the Softbox should be positioned directly behind the diffuser (the soft white surface). Check if the reflector is properly seated and if there are any gaps or misalignments that could cause hotspots or uneven lighting. Diffuser Misalignment**: Double-check that the diffuser is properly aligned with the reflector. If it's not, you may get hotspots or areas of overexposure. Lamp Positioning**: The Profoto RFi head should be positioned directly above the Softbox, and the lamp should be centered within the Softbox. Make sure there are no obstructions between the lamp and the Softbox that could cause uneven lighting. Softbox Age and Condition**: As with any light modifier, over time, the Softbox may develop imperfections, such as yellowing or a buildup of dust, which can affect the evenness of the light output. Now, let's talk about adjustments you can make to achieve a more even lighting output:
1. Rotate the Softbox**: Try rotating the Softbox 90 degrees (in either direction) while keeping it aligned with the lamp and reflector. This can help distribute the light more evenly. Adjust the Diffuser**: You can try adjusting the diffuser to see if that improves the evenness of the light output. Make sure not to push too hard, as you don't want to damage the diffuser. Use a Light Modifier Stand or Arm**: If you're using a softbox with a long cord, consider investing in a stand or arm. This can help you adjust the position and angle of the Softbox more easily, which may improve the evenness of the light output. Clean the Softbox**: Regularly clean the Softbox to prevent dust buildup and maintain its performance. In summary, check for any misalignments or obstructions that could be causing uneven lighting. Make adjustments as needed, and if you're still experiencing issues, consider consulting Profoto's technical support team or a professional photographer who has experience with your specific setup.
Before you buy Profoto RFi Softbox 3′ Octa


Reviews
There are no reviews yet.