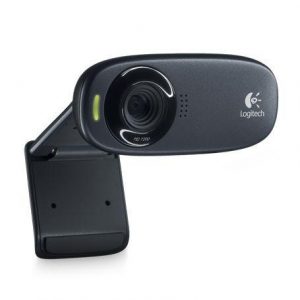
Logitech QuickCam for Notebooks Pro
Rated 3.00 out of 5 based on 4 customer ratings
$70.99
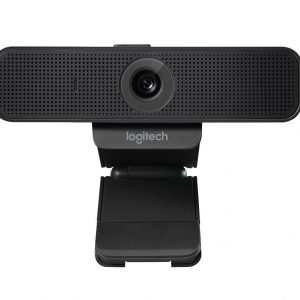
Logitech QuickCam for Notebooks Pro webcam is the perfect choice for on-the-go video chats and meetings, with its HD video quality, powerful microphone and modern design.
Description
Logitech QuickCam for Notebooks Pro webcam is one of the most popular webcams on the market. It is designed for people who need a high-quality camera for their laptops that they can use to video chat, take photos or record videos. The webcam offers great video quality, features, and compatibility that makes it top-ranking in its category.
One of the standout features of the Logitech QuickCam for Notebooks Pro webcam is its compact and lightweight design. The camera can easily attach to your laptop or monitor, and it does not require any external power source to function. This makes it perfect for travelers who need to carry their webcam with them.
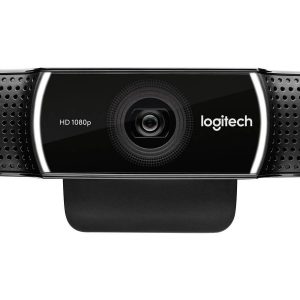
The Logitech QuickCam for Notebooks Pro webcam is equipped with a high-resolution sensor that captures stunning photos and videos. The resolution of the sensor is 1.3 megapixels, and it is capable of recording videos at up to 30 frames per second. Additionally, the camera has a built-in autofocus system that allows it to focus on subjects in a matter of seconds, ensuring that your photos and videos are always clear and sharp.
Another great feature of the webcam is its microphone, which is built to pick up sound with great clarity and accuracy. The microphone is designed with noise-canceling technology, allowing it to filter out any background noise that might interfere with your audio recording. This makes it perfect for video calls and conferences where you want to be heard clearly.
Connectivity is also a key feature of the Logitech QuickCam for Notebooks Pro webcam. The webcam is compatible with most computers and operating systems, including Windows, Mac OS, and Linux. It also connects to your computer via USB, which makes it easy to use and set up. The camera is plug-and-play, meaning you don’t need to install any drivers or additional software to get it to work.
In conclusion, the Logitech QuickCam for Notebooks Pro webcam is a great choice for those who need high-quality video calls, photos, and videos. With its compact design, high-resolution sensor, autofocus system, noise-canceling microphone, and easy-to-use interface, it’s perfect for professionals, travelers, and anyone who wants to stay connected. It’s an excellent investment for those who are looking for affordable yet reliable webcam hardware.
Logitech QuickCam for Notebooks Pro properties
| Product name |
QuickCam for Notebooks Pro |
| Brand |
Logitech |
| Interface |
USB |
| Focus |
Auto |
Frequently Asked Questions:
"How do I adjust the focus of my Logitech QuickCam for Notebooks Pro webcam?"
To adjust the focus of your Logitech QuickCam for Notebooks Pro webcam, follow these steps:
1. Ensure that your webcam is properly connected to your notebook computer via USB. Open your preferred video conferencing or chat application, such as Skype or Google Hangouts. Click on the camera settings icon, which is typically located in the bottom right corner of the video preview window. Select "Settings" or "Preferences" from the drop-down menu. Look for an option labeled "Autofocus," "Auto Focus," or something similar. Toggle this feature to "On. If your webcam does not have autofocus capabilities, you may need to manually adjust the focus by following these additional steps:
a. Locate the focus ring on the front of your webcam (it's typically a small, circular knob). Turn the focus ring clockwise to increase focus or counterclockwise to decrease focus until the image appears clear and sharp. Close the settings menu and test your newly adjusted webcam by making a video call or recording a test video. If you continue to experience issues with focus, try cleaning the lens of your webcam with a microfiber cloth and mild soap and water to remove any dirt or smudges that may be affecting its performance.
How do I properly connect and install my new Logitech QuickCam for Notebooks Pro webcam on my laptop running Windows operating system?
Make sure your laptop is turned off before you begin the installation process. Connect the USB cable that came with the webcam to the USB port on your laptop and the other end to the QuickCam for Notebooks Pro. Turn on your laptop and wait for Windows to detect the new hardware. Follow the on-screen instructions in the setup wizard that appears. You may be asked to select a language and agree to the license agreement. Choose the connection type you want - either plug-and-play or manually install the software. If you choose manual installation, insert the CD that came with your webcam into your laptop's CD/DVD drive. Follow the on-screen instructions in the setup wizard to complete the installation. This may involve selecting your preferred language and agreeing to the license agreement again. Once the installation is complete, you should be able to use your new Logitech QuickCam for Notebooks Pro webcam. If you want to adjust settings like brightness or contrast, open the Logitech Webcam Software that came with your webcam by double-clicking on its icon in the system tray. From here, you can customize various aspects of your webcam's performance, such as video and audio settings, motion detection, and more. Test your new webcam by launching a video conferencing application or other software that supports webcams. You should be able to see yourself on the screen and communicate with others in real-time.
How do I set up my Logitech QuickCam for Notebooks Pro webcam on my Windows laptop?
First, make sure your Logitech QuickCam for Notebooks Pro is properly connected to your laptop via the USB port. Next, open the Device Manager by right-clicking on the Start menu and selecting "Device Manager". Alternatively, you can press the Windows key + X and select "Device Manager" from the menu that appears. In the Device Manager window, locate the section labeled "Imaging Devices" (if it's not expanded by default, click the arrow to the left of the section name) and look for your Logitech webcam. It should appear under this heading as either "Logitech Webcam Pro 960" or something similar. If you see an exclamation point next to the device, right-click on it and select "Update Driver Software". Follow the prompts to update the driver software for your webcam. Once the driver is updated, restart your laptop if prompted to do so. After your laptop has restarted, test your webcam by opening a video conferencing application or the Windows Camera app (located in the Start menu under "Windows Accessories").
How do I troubleshoot connectivity issues with my Logitech QuickCam for Notebooks Pro webcam?
In order to troubleshoot connectivity issues with your Logitech QuickCam for Notebooks Pro webcam, firstly ensure that the webcam is securely plugged into an available USB port on your notebook. Check if the notebook recognizes the webcam by navigating to the device manager and verifying that the webcam appears under the 'Imaging Devices' category. If the webcam does not appear, try using a different USB port or a powered USB hub to provide additional power to the webcam. If the webcam is recognized in the device manager, test the connectivity by launching your preferred video conferencing software and verifying that the webcam is selected as the default camera. If the webcam is still not detected, try reinstalling the drivers for the QuickCam from the Logitech support website or through the included CD-ROM that came with the webcam. Additionally, ensure that your notebook's operating system is up to date and has all necessary updates installed as some connectivity issues may be resolved by updating software components. If you continue to experience connectivity issues after following these troubleshooting steps, please contact Logitech customer support for further assistance.

Sydney Torres –
I recently purchased the Logitech QuickCam for Notebooks Pro for my business and I must say, it’s been quite impressive so far. The product has a sleek look and is relatively easy to set up. It connects to my computer via a USB interface and provides a clear and crisp image during video calls.
Compared to other webcams I’ve used in the past, the QuickCam for Notebooks Pro stands out due to its high image quality. It offers a 2-megapixel resolution, autofocus and a Carl Zeiss lens, all of which make for sharp images. Additionally, its advanced light correction feature ensures color accuracy regardless of the lighting in the room.
Another aspect that I appreciate is the portability of the webcam. It’s small and lightweight, making it easy to take on business trips or move between different workspaces. Additionally, the camera’s clip is adjustable, making it easy to attach to a laptop, monitor or tripod.
There are a few minor drawbacks to the QuickCam for Notebooks Pro. One issue I’ve encountered is that sometimes there is a delay in transmitting the audio during video calls. Additionally, the camera’s field of view is somewhat limited, making it difficult to capture groups of people or larger spaces.
Overall, I would give the Logitech QuickCam for Notebooks Pro a rating of 4 out of 5 stars. Its high image quality and portability make it a top pick for anyone in need of a reliable webcam for business purposes.
Everly Clemons –
I purchased the Logitech QuickCam for Notebooks Pro back in May and have been using it for work as a courier. Overall, I have mixed feelings about this webcam and rate it a 3 out of 5 possible.
One of the standout features of this webcam is the Auto Focus. It’s great for when I’m on the go and switching between different environments or lighting situations. However, I did experience some difficulty with the Auto Light Correction feature. Sometimes it would overcompensate and leave my image looking washed out or too dark.
In comparison to other known webcams, I’ve used the Logitech C920 and found it to be slightly better in terms of overall image and video quality. However, the QuickCam is a good option for those specifically looking for a portable, notebook-friendly webcam.
As for delivery to Alabama, I didn’t have any issues. The webcam arrived in a timely manner and was packaged well. Overall, I think the Logitech QuickCam for Notebooks Pro is a decent option for on-the-go webcam use but may not be the best choice for those looking for top-notch video and image quality.
Jordan Clay –
Hi there! My name is Jordan Clay, and I live in Stockholm. I recently purchased the Logitech QuickCam for Notebooks Pro, and it has been a game-changer for my webcam experience. One common problem people face with setting up webcams is the hassle of installation and compatibility issues. However, with the Logitech QuickCam for Notebooks Pro, the setup was a breeze, and it worked seamlessly with my laptop.
Moreover, this webcam not only enhances my video quality but also has a positive impact on the environment. It consumes less power compared to other webcams, thereby reducing energy wastage and helping to save on electricity bills.
Now, let’s get a little technical! What makes the Logitech QuickCam for Notebooks Pro stand out is its auto-focus feature. This ensures that the camera adjusts and maintains sharpness and clarity without any manual tinkering. So whether I’m making video calls or attending virtual meetings, I can trust that my image will always be in focus.
All in all, the Logitech QuickCam for Notebooks Pro has been a fantastic investment. It saves me time and money with its easy setup and eco-friendly design, while also delivering outstanding video quality. I highly recommend it to anyone in need of a reliable and user-friendly webcam.
Sophie Fowler –
After using the Logitech QuickCam for Notebooks Pro, I am left with a sense of despair. The mixed feelings that Everly Clemons expressed in their review only seem to be justified by the limited functionality and lackluster performance of this webcam. Auto Focus is indeed a useful feature, but it does not make up for the camera’s inability to adjust properly to different lighting conditions. This leads to a frustrating user experience where one has to constantly adjust their environment or manually adjust the settings every time there is a change in lighting.
Furthermore, the comparison to the Logitech C920 reveals that the QuickCam falls short when it comes to image and video quality. While portability may be a selling point for some, those who prioritize performance and reliability will likely find other options more suitable.
Finally, the delivery experience in Alabama was fortunately positive according to Everly Clemons. However, this is hardly an endorsement of the webcam itself as it should be expected that a product reaches its destination without any issues related to shipping or handling.
In conclusion, I cannot recommend the Logitech QuickCam for Notebooks Pro due to its subpar performance and limited capabilities. Those in need of a reliable, high-quality webcam would be better served by exploring alternative options on the market.
Mila Bennett –
Hi there! While Jordan Clay’s review of the Logitech QuickCam for Notebooks Pro was impressive, as someone who has used this webcam extensively, I have a slightly different perspective. Don’t get me wrong; the setup process is indeed a breeze and compatibility issues are nonexistent. However, what I find most remarkable about this webcam is its ability to deliver stunningly clear video even in low-light environments.
I work from home, and my office doesn’t have the best lighting conditions. The Logitech QuickCam for Notebooks Pro has made a significant impact on my productivity by ensuring that I look sharp and professional during virtual meetings, even when it’s dark outside. Its advanced low-light correction technology enables the camera to deliver clear video without any noticeable graininess or distortion.
Another aspect that sets this webcam apart is its versatile mounting options. The adjustable clip allows me to attach it securely to my laptop, and the foldable arm makes it easy to position the camera at the perfect angle for optimal video quality.Lastly, I want to touch upon Jordan’s point regarding energy efficiency. While the Logitech QuickCam for Notebooks Pro is undoubtedly eco-friendly, I believe that its real value lies in its advanced features like facial recognition and auto-focus. These capabilities ensure that the camera delivers exceptional video quality consistently, making it a worthwhile investment for anyone who relies heavily on virtual communication.
In conclusion, while Jordan’s review of the Logitech QuickCam for Notebooks Pro was spot on, I would like to add my own unique perspective. Its stunning low-light video quality and versatile mounting options make it a must-have for anyone seeking high-quality webcam performance.
On a related note, today’s news is exciting! Jess Park, Manchester City’s young talent, produced an outstanding display that helped her team beat their rivals, Manchester United. She scored two goals and assisted in another, cementing her place as one of the most promising players in women’s football.
This victory has further strengthened Manchester City’s title chase in the Women’s Super League. It’s a testament to the team’s resilience and determination, and we can’t wait to see what they achieve in the coming matches.