Sony PlayStation Eye
Rated 3.00 out of 5 based on 1 customer rating
$16.99
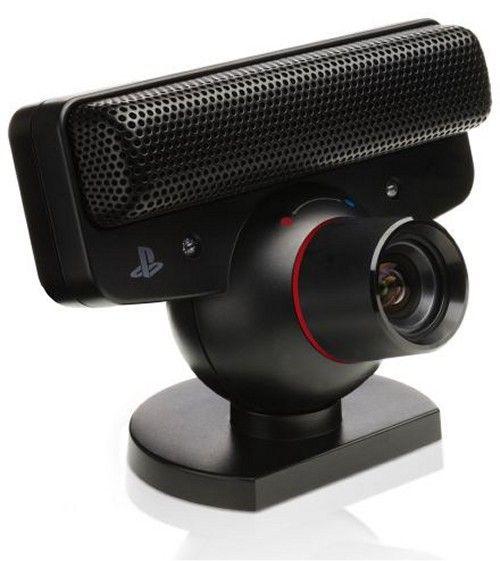
Experience immersive gaming with the Sony PlayStation Eye webcam, providing you with an unparalleled level of control and a highly engaging online experience.
Description
The Sony PlayStation Eye webcam is a powerful camera designed specifically for the Sony PlayStation gaming consoles. It was first introduced to the market back in 2007 and continues to be a popular accessory for gamers worldwide.
The PlayStation Eye webcam features a sleek and stylish design that blends seamlessly with the PlayStation console. The camera comes with a built-in microphone that allows gamers to communicate with their friends while playing their favorite games. Additionally, the camera is equipped with a motion sensor that enables it to track the movement of gamers, which is particularly useful for motion-sensitive games.
One of the most exciting features of the PlayStation Eye webcam is its ability to capture high-quality video and images. The camera can record video in 640×480 resolution and capture images in 640×480 or 320×240 resolution. This makes it the perfect accessory for online gaming enthusiasts who want to stream their gameplay sessions or capture screenshots to share with their friends.
The PlayStation Eye webcam also features advanced face-tracking technology that allows it to recognize and track individual players. The camera can identify up to four players simultaneously, making it perfect for multiplayer games. The face-tracking technology also allows gamers to interact with games using their facial expressions and body movements, adding a new level of immersion to their gaming experience.
Another great feature of the PlayStation Eye webcam is its compatibility with a wide range of games. Many popular games, such as The Eye of Judgment, Sports Champions, and Little Big Planet, require the use of the camera to play. The camera’s motion sensing and face-tracking technology also work with other games, creating an even more immersive experience for gamers.
Overall, the Sony PlayStation Eye webcam is an essential accessory for any PlayStation gamer. Its advanced features, sleek design, and compatibility with a wide range of games make it a must-have for anyone looking to enhance their gaming experience. Whether you are a casual gamer or a hardcore enthusiast, the PlayStation Eye webcam is sure to meet all your gaming needs.
Sony PlayStation Eye properties
| Product name |
PlayStation Eye |
| Brand |
Sony |
| Interface |
USB |
| Max Video Resolution |
640×480 pixels |
| Max Frame Rate |
120 fps |
| Software included |
Yes |
Frequently Asked Questions:
What are the steps to set up and calibrate the Sony PlayStation Eye camera for use on my gaming console?
Here are the steps to set up and calibrate the Sony PlayStation Eye camera for use on your gaming console:
1. Connect the Sony PlayStation Eye camera to your gaming console: Plug one end of the USB cable into the back of your gaming console, and the other end into the Sony PlayStation Eye camera.
2. Power up your Sony PlayStation Eye camera: Turn on your gaming console and wait for it to boot up completely.
3. Install the EyeToy software: If you haven't already, install the EyeToy software that came with your Sony PlayStation Eye camera onto your computer or laptop. You can also download it from the official Sony website.
4. Launch the EyeToy software: Once installed, launch the EyeToy software on your computer or laptop.
5. Connect the EyeToy software to your gaming console: Follow the instructions on the screen to connect the EyeToy software to your gaming console using the provided USB cable.
6. Calibrate the Sony PlayStation Eye camera: The EyeToy software will guide you through a calibration process where you'll need to follow specific instructions and move your body accordingly. Make sure the camera is properly positioned and pointing towards your face or body depending on the game you are playing.
7. Adjust the camera settings if necessary: If needed, you can adjust the camera settings within the EyeToy software to optimize the camera's performance for different games and activities.
8. Test the Sony PlayStation Eye camera: Once calibration is complete, test the camera by launching a game that supports the Sony PlayStation Eye camera. You should be able to see yourself or your surroundings on the screen as you move and interact with the game.
9. Have fun gaming! Now that everything is set up and calibrated, you can enjoy playing games that support the Sony PlayStation Eye camera.
"Why isn't my Sony PlayStation Eye camera detecting or working properly in the PlayStation application?"
There are several reasons why your Sony PlayStation Eye camera may not be detected or working properly in the PlayStation application. Here are some troubleshooting steps you can try to resolve the issue:
1. Check the USB connection: Make sure that the camera is connected securely to the USB port of your PlayStation console. Try using a different USB port or a new USB cable if necessary.
2. Update the firmware: Go to the Sony PlayStation website and download the latest firmware for your PlayStation Eye camera. Follow the instructions on the website to install the update.
3. Restart your console: Turn off your PlayStation console, unplug the camera, wait for a few minutes, plug in the camera again, and turn on your console.
4. Check the camera settings: Go to the Settings menu in the PlayStation application and select "Device Management." Make sure that the PlayStation Eye camera is listed as a connected device and that its settings are correct.
5. Check for software updates: Go to the Settings menu and select "System Software Update" to check for any available software updates for your console and the PlayStation Eye camera.
6. Reset the camera: Press and hold the power button on the front of the camera until it turns off, then unplug it from the USB port. Wait for a few minutes, plug it back in, and turn it on again.
7. Contact Sony support: If none of the above steps work, contact Sony support for further assistance. They may be able to provide additional troubleshooting steps or offer a replacement if necessary.
"How do I connect my Sony PlayStation Eye camera to my PS3 console using USB?"
Firstly, ensure that your Sony PlayStation Eye camera and PS3 console are both powered on. Locate the USB port at the back of your PS3 console. It is usually located near the power cable connection. Connect one end of a USB cable to the USB port on your PS3 console and the other end to the Sony PlayStation Eye camera. Press the "PS" button on your PlayStation controller to wake up your console. Navigate to the "Settings" menu by pressing the "Start" button on your controller and selecting "Settings". Select "Accessory Settings" from the list of options, then choose "USB Connection Settings". From the new screen, select "Enable USB Storage Devices" or "Enable USB Peripherals" (depending on your PS3 model) to allow your Sony PlayStation Eye camera to be recognized by your console. Once you have saved this setting, your PS3 should now detect the Sony PlayStation Eye camera connected via USB. You can check this by navigating back to the "Accessory Settings" menu and seeing if the camera appears in the list of connected devices. You may also need to set up the Sony PlayStation Eye camera for specific applications such as gaming or video conferencing, depending on your intended use. Consult the documentation that came with your specific device for more information on setup instructions.
How do I connect my Sony PlayStation Eye camera to my PlayStation console and what software do I need to install for it to work properly?
To connect your Sony PlayStation Eye camera to your PlayStation console, follow these steps:
1. Make sure your PlayStation Eye camera is turned on by pressing the power button located in the center of the camera's base. The green light on the front of the camera should start flashing. Connect one end of an USB cable to the back of the PlayStation Eye camera and the other end to a USB port on your PlayStation console. Turn on your PlayStation console and navigate to the "Settings" menu. Select "Accessory Settings," then choose "USB Connection Settings. Make sure that "USB Storage Device" and "USB Camera" are both set to "Enabled. Return to the main "Settings" menu and select "Sound and Screen. Choose "Video Output Settings" and make sure that your TV or monitor is connected via HDMI. Select "Video Output Information" and confirm that your console is displaying video through an external source such as your TV or monitor. Restart your PlayStation console to ensure all changes have been saved. Finally, launch a game or application that supports the PlayStation Eye camera, and you should now be able to use it for various functions such as taking screenshots, recording gameplay footage, or even chatting with friends via PlayStation Camera. Note: To ensure proper functionality of your PlayStation Eye camera, it's recommended to update the system software on your console periodically via the Internet Connection Settings menu. This will install any necessary updates for your camera and other connected accessories as well.
My webcam is not detecting my face when I'm wearing glasses, is this a normal issue with the Sony PlayStation Eye or is there a setting that I need to adjust?
1. Clean the lens**: Make sure the lens of your webcam is clean and free from any debris or smudges. This will help ensure that the camera can capture clear images. Adjust the IR filter**: Some cameras have an adjustable IR filter, which can be moved to a position where it blocks more or less of the IR light. However, this setting isn't available on most webcams, including the PS Eye. Position yourself correctly**: Experiment with different angles and positions in front of the camera to see if you can find one that works better for detecting your face while wearing glasses. Use a different lighting setup**: Try adjusting the lighting around you to see if it improves the camera's ability to detect your face. This might mean moving away from direct light sources or using softer, more diffused lighting. It's worth noting that this issue is not unique to the PS Eye and can occur with other cameras as well.


Claire Colon –
If you’re someone who loves to connect with the people you care about through video calls or streaming your favorite content online, then you already know the importance of a reliable webcam. And when it comes to finding the perfect webcam that meets all your requirements, Sony PlayStation Eye is an excellent choice.
Firstly, the Max Video Resolution of this webcam is 640×480 pixels, which ensures crystal-clear video quality during your calls or streaming sessions. This resolution is more than enough to capture all the details and make sure that you look your best on camera. Additionally, the webcam comes with a built-in microphone that picks up your voice clearly without any background noise interference.
One of the things that sets Sony PlayStation Eye apart from other webcams in the market is its compatibility with various devices. Whether you’re using a PC, Mac, or PS3, this webcam will work seamlessly with all these platforms. You can easily connect it to your device via USB cable and start using it right away.
Another great feature of Sony PlayStation Eye is its compact design that makes it easy to carry around wherever you go. You can pack it in your backpack or laptop bag, and it won’t take up much space at all. This portability makes it an ideal choice for people who travel frequently or work from different locations.
But what truly sets Sony PlayStation Eye apart is its compatibility with the popular gaming console PS3. This webcam allows you to enjoy playing games like ‘Eye of Judgment’ and ‘EyePet’ that require a camera to function. The webcam also comes with built-in software that lets you capture still images, record videos, or edit your footage.
In conclusion, Sony PlayStation Eye is an exceptional webcam that combines style, functionality, and versatility. Its compact design, compatibility with multiple devices, and advanced features make it a top choice for anyone looking to enhance their video communication experience. So why wait? Get yourself a Sony PlayStation Eye today and take your video calls and streaming sessions to the next level!
As for the latest news in the tech world, Foxconn, the largest contract electronics manufacturer in the world, has reiterated its expectation of revenue growth in Q2 driven by strong demand for AI servers and a shift between old and new products. The company reported record sales of $15.83bn in April, which represented an on-year rise of 19%. This news is significant as it highlights the growing trend towards AI and its increasing importance in various industries. As Foxconn continues to innovate and adapt to these changing demands, we can expect even more exciting developments from this leading player in the tech world.
So what are you waiting for? Upgrade your webcam game today with Sony PlayStation Eye and stay ahead of the curve in the rapidly evolving world of technology!