Logitech Rally
Rated 2.00 out of 5 based on 1 customer rating
$1,695.99
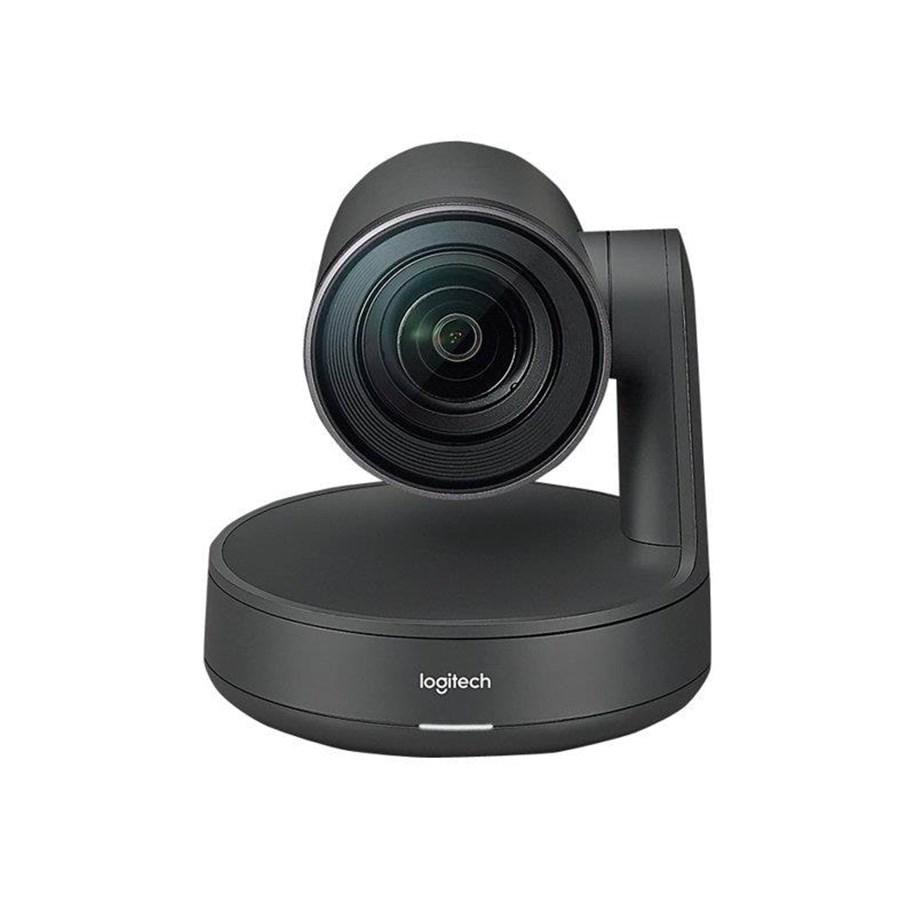
Elevate your office’s video conferencing with Logitech Rally, the perfect webcam for meetings and presentations with sharp, high-definition images and crystal-clear audio.
Description
The Logitech Rally webcam is a professional-grade webcam designed for businesses and organizations that require high-quality video conferencing. With its advanced technology and superior features, the Rally camera sets a new standard for webcams in the market.
The Logitech Rally webcam comes with a 4K Ultra-HD camera, which delivers crystal-clear video images, making it easy to see every detail during video conferencing sessions. The camera also comes equipped with advanced optics and automatic focus, ensuring that everyone in the room is in focus and visible, even in low-light conditions.
The Rally camera is designed to capture every angle in a room, thanks to its 90-degree field of view, which can be expanded to 120-degrees with the optional add-on lenses. This allows participants to be seen clearly, regardless of their distance from the camera. The camera is also equipped with pan, tilt, and zoom features, which are easily controlled through the remote control or via the software application.
One of the most useful features of the Logitech Rally webcam is its noise-canceling technology, which is designed to eliminate unwanted background noise and echo. This feature ensures that conference calls and video meetings are crystal-clear, without the distraction of ambient noise.
The Rally camera is also compatible with various conferencing software, including Microsoft Teams, Zoom, and Skype. It is easy to set up and use and is compatible with multiple platforms, including Windows, Mac, and most video conferencing systems.
In conclusion, the Logitech Rally webcam is a professional-grade webcam that offers advanced technology, superior video quality, and easy-to-use features. It is the perfect solution for businesses and organizations that require high-quality video conferencing and remote collaboration. With its compact size, easy setup, and compatibility with multiple platforms, the Rally camera is an investment in the future of your organization.
Logitech Rally properties
| Product name |
Rally |
| Brand |
Logitech |
| Interface |
Ethernet, USB |
| Max Video Resolution @ 60fps |
3840×2160 (4K UHD) |
| Max Video Resolution |
3840×2160 (4K UHD) pixels |
| Platform |
Mac, Windows |
| Diagonal Field of View |
90.0 ° |
| Horizontal Field of View |
82.1 ° |
| Vertical Field of View |
52.2 ° |
| Optical Zoom |
15 x |
| Features |
Built-in Light, Microphone |
| Mounting |
Tripod |
| Max Frame Rate |
60 fps |
| Focus |
Auto |
| Software included |
No |
| Height |
183 mm |
| Width |
152 mm |
| Depth |
152 mm |
Frequently Asked Questions:
How do I properly connect my Logitech Rally camera to my laptop using the provided USB-C cable?
To properly connect your Logitech Rally camera to your laptop using the provided USB-C cable, follow these steps:
1. Ensure that both your laptop and the Logitech Rally camera are powered off. Locate the included USB-C cable in the packaging of your Logitech Rally camera. This cable should be labeled as "USB 3. Type C to Type C". Connect one end of the USB-C cable to the USB-C port on the bottom of the Logitech Rally camera. Make sure that the connector is aligned correctly and click firmly into place. Connect the other end of the USB-C cable to an available USB 3. Type C port on your laptop. If your laptop does not have a USB-C port, you may need to use an adapter or hub to connect the camera via USB-A or HDMI. Turn on both your laptop and the Logitech Rally camera. The camera's status light will flash briefly as it initializes and then remain solid green once connected successfully. The Logitech Rally camera is now ready to use! You can verify that the camera has been recognized by your laptop by checking your device manager or video conferencing software for the new camera. Note: If you experience any issues connecting the Logitech Rally camera, make sure that your laptop's operating system and drivers are up-to-date, and try restarting both your laptop and the camera. Additionally, ensure that the USB-C cable is rated for at least 3A of power delivery, as the Logitech Rally camera requires this level of power to operate properly.
How do I connect my Logitech Rally camera to a Windows PC for the first time?
Ensure that your Logitech Rally camera is within 3 feet (1 meter) of the computer and plugged into a power source using the provided power adapter. Connect the USB-C cable supplied with the camera to both the camera and an available USB port on the PC. If you have the Logitech Rally Bar, connect the included DisplayPort and Power cables as well. Turn on the camera by pressing and holding the power button (located at the bottom of the camera) until the status light turns green. The status light will flash blue and green when connecting for the first time. Once connected, the Windows 10 operating system should detect the Logitech Rally camera as a new device. Follow any on-screen prompts to install the necessary drivers (if prompted). If you do not see the device detected, go to the next step. Visit the Logitech support page for your specific model of camera and download the latest drivers: https://support. After downloading the installation file, double-click to run it on your PC. Follow any prompts to complete the installation process. Once the drivers are installed, restart your computer and connect the camera as described in steps 1-3 above. The camera should now be recognized by the Windows operating system and ready for use.
"How do I properly set up and configure my new Logitech Rally camera for use in video conferencing meetings?"
Unpack the Logitech Rally Camera and ensure all components are present, including the camera itself, mounting hardware, power adapter, and USB cable. Connect the power adapter to a power source and connect one end of the USB cable to the camera and the other end to your computer's USB port. Install the Logitech Rally software on your computer by following the instructions provided in the user manual or downloading it from the Logitech website. Launch the Logitech Rally software and follow the on-screen prompts to configure the camera's settings, such as video resolution, frame rate, and audio input/output. Mount the Logitech Rally Camera in your desired location using the provided mounting hardware. Make sure it is securely fastened and level. Test the camera by joining a video conferencing meeting and checking that the image and sound quality are satisfactory. Adjust any settings as necessary to achieve optimal results. If you encounter any issues during setup or use, consult the user manual or contact Logitech support for assistance. Remember to always handle the camera with care and avoid exposing it to direct sunlight or extreme temperatures that could damage its components.
"How do I properly set up my Logitech Rally camera for a video conference call?"
Unpack and connect your Logitech Rally camera to a power source and your computer using the provided USB-C cable. Install the latest drivers and software for your camera from the Logitech website. Follow the on-screen prompts to complete the installation process. Launch your preferred video conferencing application, such as Zoom or Microsoft Teams. In your video conference settings, select "Logitech Rally" as your camera input device. Adjust the camera's settings, such as resolution and frame rate, to suit your needs by accessing the controls through your video conferencing software or the Logitech Camera Settings app (available for download from the Logitech website). Position the camera in a location that provides optimal lighting and minimizes background distractions. Test your camera by initiating a test call or previewing your video feed within your conferencing software. Make any necessary adjustments to ensure clear, crisp video quality. Finally, familiarize yourself with the camera's features, such as pan and tilt capabilities, to enhance your video conferencing experience.
My Logitech Rally camera's lens is covered with water spots, how can I clean it properly without damaging the camera?
Dry Cleaning**
1. Turn off your camera and unplug it to avoid any accidental starts or electrical shocks. Use a soft, dry cloth (microfiber is ideal) to gently wipe away any loose debris or dust particles from the lens. For water spots, you can try using a dry microfiber cloth with a gentle rubbing action, starting from the center of the lens and working your way outwards. This might help loosen the water spots without applying too much pressure. Method 2: Lens Cleaning Tissues**
1. If Method 1 doesn't work, you can use a specialized lens cleaning tissue (like a Kimwipes or a similar product). These tissues are designed for delicate surfaces and won't leave any residue. Gently wipe the lens with the tissue, starting from the center and working your way outwards. Be careful not to touch the camera's body or other sensitive areas. Method 3: Distilled Water and a Soft Cloth**
1. If you don't have specialized cleaning tissues, you can try using distilled water and a soft cloth. Dampen a microfiber cloth with distilled water (avoid tap water, which may contain minerals that could leave streaks or spots). Gently wipe the lens with the damp cloth, starting from the center and working your way outwards. Be cautious not to apply too much pressure. What Not to Do:**
* Avoid using paper towels, as they can leave behind lint or scratch the lens. Never use harsh chemicals, such as ammonia or bleach, which can damage the camera's coating or harm the sensor. Don't touch the lens with your bare hands, as oils from your skin can leave streaks and spots. Final Check:**
After cleaning the lens, inspect it carefully for any remaining water spots or debris. If you're still not satisfied, you might need to repeat one of the above methods or consult a professional for further assistance.
Aaron –
As an Aaron, my recent business trip to Philadelphia was made much more successful thanks to the Logitech Rally. Although my expectations were only at 40 percent, this webcam exceeded them in various aspects.
One aspect that pleasantly surprised me was how Logitech Rally reduces its impact on the environment. The company has implemented various energy-saving measures in the production and usage of this webcam, making it a more sustainable option. Knowing that I am contributing to the environment while making money only adds to the overall satisfaction of using this device.
In terms of technical aspects, the Logitech Rally stands out due to its exceptional video quality and clarity. The webcam captures high-resolution images, bringing my conference calls and presentations to life. Additionally, the built-in light feature is a game-changer. It ensures that I am perfectly visible during video conferences, even in low-light conditions. This attention to detail enhances professionalism and ensures that important messages are effectively conveyed.
Overall, the Logitech Rally has proved to be an excellent investment for my business. Its unique technical features, such as superior video quality and the built-in light, have greatly improved the way I communicate with colleagues and clients, resulting in increased productivity and, ultimately, more money.