Audio-Technica ATR2500-USB
Rated 3.17 out of 5 based on 6 customer ratings
$77.99
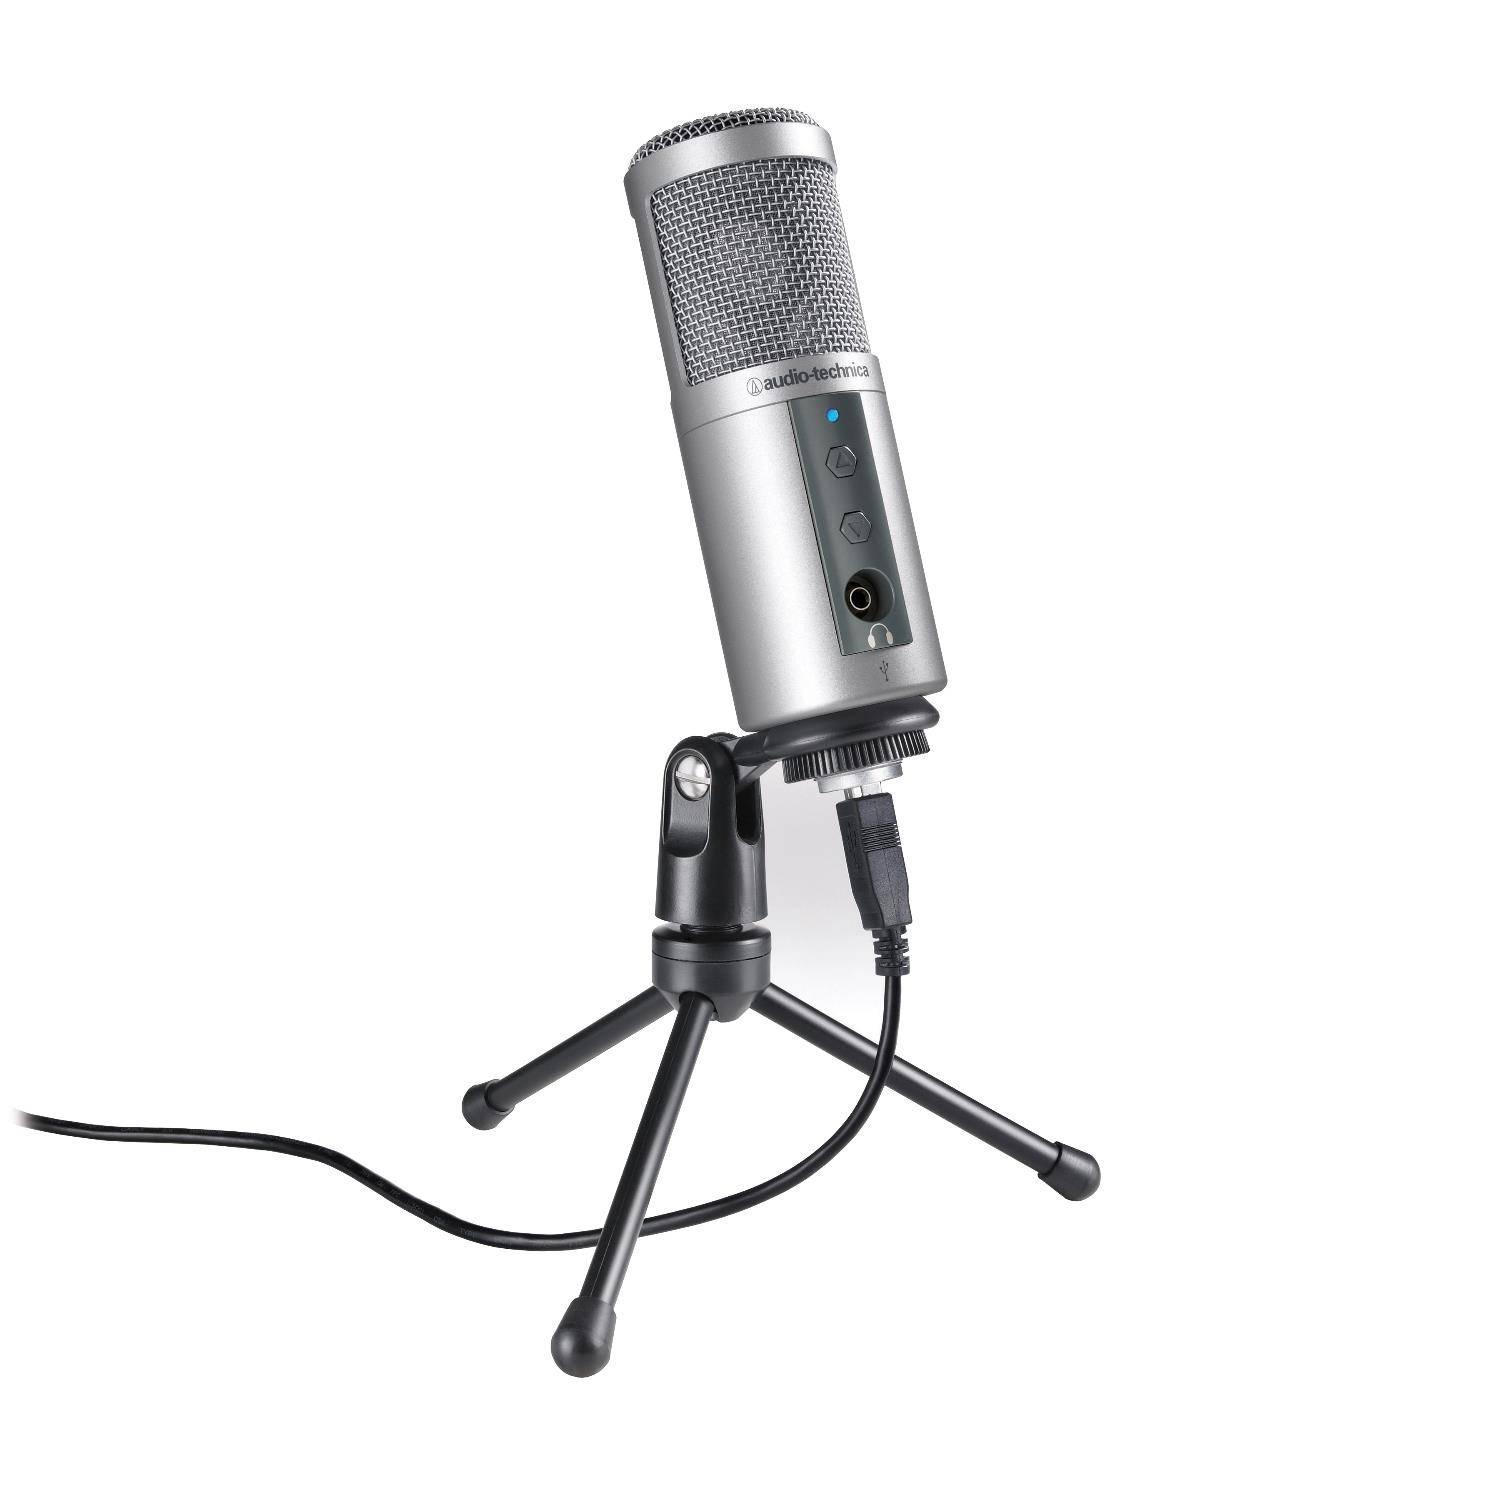
Get accurate and clear recordings every time with the Audio-Technica ATR2500-USB microphone, the perfect choice for any recording situation.
Description
Audio-Technica ATR2500-USB microphone is an affordable yet excellent microphone that is perfect for podcasters, gamers, and YouTubers. It is a cardioid condenser microphone that provides crystal-clear sound quality through its USB port. In this article, we will discuss the features of the ATR2500-USB microphone and why it is an excellent choice for content creators.
First and foremost, the Audio-Technica ATR2500-USB microphone is incredibly user-friendly. You simply need to plug the microphone into your computer’s USB port, and you are good-to-go. As soon as you plug it in, your computer recognizes it, and you can start recording right away. The plug-and-play feature of the ATR2500-USB is a significant advantage, especially for beginners who are just getting started in content creation.
Another fantastic feature of the Audio-Technica ATR2500-USB microphone is its versatility. It is a multi-purpose microphone that can record any sound source with exceptional quality. Whether you’re recording vocals, acoustic instruments, or podcasts, the ATR2500-USB has got you covered. Its cardioid polar pattern ensures maximum isolation of the desired sound source while minimizing ambient noise and background sounds. This means you can record your content without worrying about any unwanted noise that may take away from the overall quality of your recording.
The ATR2500-USB microphone also has a convenient headphone jack that allows you to monitor your recording in real-time. This means you can hear exactly what your recording sounds like while you’re recording it. This feature comes in handy when recording interviews or podcasts, as it enables you to hear the other person clearly.
One of the best things about the Audio-Technica ATR2500-USB microphone is that it is incredibly affordable. You can get your hands on this excellent microphone without breaking the bank. This means that even if you’re on a tight budget, you can still produce high-quality content that sounds great.
Lastly, the ATR2500-USB microphone is incredibly durable. It has a robust metal design that ensures it can withstand the wear and tear of regular use. As a content creator, you want a microphone that can last you for a long time, and the ATR2500-USB is built to last for years.
In summary, the Audio-Technica ATR2500-USB microphone is an excellent microphone for content creators who are looking for a high-quality yet affordable option. Its versatility, ease-of-use, and durability make it an excellent choice for podcasters, gamers, and YouTubers. So, if you’re looking for a microphone that can help you take your content creation to the next level, look no further than the Audio-Technica ATR2500-USB microphone.
Microphones with Table Stands, Broadcast and Television
Audio-Technica ATR2500-USB properties
| Product name |
ATR2500-USB |
| Type |
Microphone |
| Placement for Microphone |
Microphones with Table Stands |
| Suitable For |
Broadcast and Television |
| Polar Patterns |
Cardioid |
| Microphone Type |
Condenser |
| Wireless |
No |
| On and Off Button |
Yes |
| Volume Control |
Yes |
| 3.5mm (1/8″) TRS |
Yes |
| Colour |
Silver |
| Height |
15.5 cm |
| Weight |
366.0 g |
Frequently Asked Questions:
How do I properly connect and set up my Audio-Technica ATR2500-USB microphone for recording on my computer?
To properly connect and set up your Audio-Technica ATR2500-USB microphone for recording on your computer, follow these steps:
1. Plug the microphone into an available USB port on your computer. The USB cable should be included with the microphone.
2. Once connected, your computer will automatically recognize the microphone as a new input device.
3. Open any audio recording software you wish to use (such as Audacity, GarageBand, or Adobe Audition).
4. In the audio settings of your chosen software, select the Audio-Technica ATR2500-USB as the input source for the microphone. The exact process for changing input sources will vary depending on which software you are using.
5. Test the microphone by speaking into it and confirming that sound is being recorded properly in your chosen audio recording software. Adjust any necessary settings, such as gain or equalization, to improve the quality of your recordings.
6. Once you have verified proper connection and setup, you are ready to begin recording with your Audio-Technica ATR2500-USB microphone.
How do I connect my Audio-Technica ATR2500-USB microphone to my computer?
To connect your Audio-Technica ATR2500-USB microphone to your computer, follow these steps:
1. Turn off your computer if it's on.
2. Locate the microphone input and USB port on your computer. The microphone input is usually labeled as a small circle with a line through it (indicating that it's not currently in use) while the USB port looks like a small square with a USB symbol on it.
3. Connect one end of the provided USB cable to the USB port on your computer, and connect the other end to the microphone. The microphone has a USB connection at the bottom of the device.
4. Turn on your computer and wait for it to boot up completely. Once it's booted up, you should hear a system notification sound indicating that a new audio input device (the ATR2500-USB) has been detected.
5. Go to the Sound settings in your computer's Control Panel or System Preferences depending on the operating system you are using. Locate the microphone section and set the input device to Audio-Technica ATR2500-USB. You should be able to hear sound through your speakers when speaking into the microphone.
6. If you're using a voice recording or video editing software, make sure to select the Audio-Technica ATR2500-USB as the input device for the audio track.
How do I properly connect and use the Audio-Technica ATR2500-USB microphone with my computer for recording audio?
To properly connect and use the Audio-Technica ATR2500-USB microphone with your computer, follow these steps:
1. Plug the USB connector of the microphone into an available USB port on your computer. The LED light on the microphone should turn on, indicating that it is connected to the computer.
2. If you are using a Windows computer, your computer should automatically recognize the microphone and install the necessary drivers. If you are using a Mac, you may need to install the driver manually by downloading it from Audio-Technica's website.
3. Open the audio recording software of your choice (such as Audacity or GarageBand) and select the AT2500-USB microphone as the input device. You can do this by going to "Preferences" or "Settings" in the software and selecting the microphone from the list of available devices.
4. Adjust the microphone's position and angle so that it is close to your mouth but not too close, as this will help reduce background noise. Experiment with different angles until you find a comfortable position that gives you the best sound quality.
5. Test the recording by speaking into the microphone and listening to the playback in the audio software. Adjust the volume levels and settings as needed until you achieve the desired sound quality.
6. Once you are satisfied with the sound quality, you can begin recording your audio.
How do I ensure optimal performance when using the Audio-Technica ATR2500-USB microphone for voice recordings?
Use a pop filter or place your mouth far enough away from the microphone to prevent plosive sounds (such as "p" and "b") from causing distortion. Ensure that the microphone is positioned at the right distance and angle. The optimal position for voice recordings is about 6 inches (15 cm) from your mouth, with the microphone's capsule pointed slightly upward. Use a stable surface to mount the microphone, such as a desk or tripod stand, to reduce vibration-induced noise. Adjust the microphone's gain level to ensure that you are not overloading the input signal, which can cause distortion and clipping. If possible, use an external audio interface for additional control over gain levels. Choose a suitable recording environment with minimal background noise, such as a quiet room or a dedicated recording studio. Use software-based noise reduction tools to eliminate unwanted background noise during post-production editing. Test the microphone's sensitivity and frequency response by recording a range of voice levels, from whispered to shouted. This will help you fine-tune your settings for optimal performance. Regularly clean the microphone's diaphragm with a soft cloth to prevent dust and dirt buildup that can affect sound quality.
I'm getting an extremely loud, distorted sound when I plug in my ATR2500-USB into my computer and start recording vocals. What could be causing this issue and how can I fix it?
1. Gain Setting:** The microphone has a built-in gain control that you can adjust using software on your computer or through the microphone itself (if it has a physical dial). If the gain is set too high, it can cause distortion and clipping. Try reducing the gain and see if that improves the audio quality. Noise Floor:** The ATR2500-USB uses USB bus power, which can sometimes cause electrical noise to be picked up by the microphone. This can manifest as a loud hiss or hum. Try moving the microphone away from any potential sources of electromagnetic interference (EMI), such as fluorescent lights or other electronic devices. Cable Quality:** The quality of the cable connecting your microphone to your computer can also affect audio quality. If the cable is damaged, frayed, or low-quality, it may be causing distortion. Try using a different USB cable or replacing the one you're using. Driver Issues:** Outdated or corrupted drivers for your ATR2500-USB can cause issues with audio quality. Make sure that your computer has the latest drivers installed for the microphone. Software Settings:** The software you're using to record vocals may have settings that are contributing to the distorted sound. Check the software's settings and try adjusting things like gain, EQ, or compression. Hardware Issues:** In some cases, the issue may be with the microphone itself. If none of the other solutions work, it's possible that there's a hardware problem with the ATR2500-USB. To troubleshoot these potential issues, I recommend trying the following steps:
* Unplug the microphone and restart your computer. Plug in the microphone again and check if the issue persists. Try using a different USB port on your computer to rule out any issues with that particular port. Check the cable connecting the microphone to your computer for damage or wear. Update the drivers for your ATR2500-USB to the latest version. Adjust the gain settings in software and try again.
I've been recording for hours, but my vocals always sound like I'm talking into a bucket. Is there something wrong with this mic or is it supposed to pick up so much background noise?
It sounds like you're experiencing some issues with your microphone and vocal recordings. Firstly, let's consider the possibility that the issue isn't with the mic itself but rather with how it's being used. If you're recording vocals in a room with a lot of background noise or echoes, this can definitely contribute to a "bucket-like" sound. This is because the mic is picking up not just your voice, but also all the ambient sounds around you. That being said, if you've tried recording in different environments and still get the same issue, it's possible that there is something wrong with the microphone itself. One thing to check is the polar pattern of the microphone. If it's a cardioid or hypercardioid mic, it might be too sensitive to background noise. You could try using a directional mic like an omnidirectional or figure-eight instead. These types of mics tend to pick up less background noise and can help you achieve a cleaner sound. Another thing to consider is the distance between your mouth and the microphone. If you're too close, it can cause a "boomy" or "muddy" sound. Try moving the mic back about 6-8 inches (15-20 cm) from your mouth and see if that improves the quality of your recordings. Lastly, check the gain levels on your recording device. If they're set too high, you might be introducing distortion into your recording. A good starting point is to have your signal peaking around -12 dB. From there, adjust as needed to find the sweet spot for your vocals.
Before you buy Audio-Technica ATR2500-USB


Clark Coween –
I needed a good quality but inexpensive cardioid microphone because I run online courses at my own school, and create instructional videos for my YouTube channel. I like this microphone. It is a great basic / budget class cardioid microphone for those who perform castings. There are no gain settings, only the on / off button. I could easily connect it to the scissor stand. The great thing about this microphone is that it is a combined USB / analog output device, so you can connect it to a mixer or a computer. If you are looking for your first microphone for online or YouTube courses, I strongly recommend this microphone instead of Blue Snowball iCE.
Mercedes –
I am regular visitor, how are you everybody? This post posted at
this site is in fact fastidious.
Candra –
No matter if some one searches for his essential
thing, therefore he/she needs to be available that in detail,
therefore that thing is maintained over here.
Beatris –
Why visitors still make use of to read news papers when in this technological globe all is presented
on net?
Vera Bell –
I am Verity Bell, an aspiring singer, and content creator who has recently purchased the Audio-Technica ATR2500-USB Microphone through a reputable online platform. This investment was prompted by my friend Jordan Lyons’ recommendation – he is an accomplished music producer with years of experience in the field.
Upon receiving the package, I must say that my initial impression was nothing short of delightful; it exceeded all expectations set due to positive reviews I came across while researching different microphones for vocalists like myself. The sturdy construction and sleek design are visually appealing but also serve a purpose by ensuring durability during professional use.
The Audio-Technica ATR2500-USB stands out in terms of both audio quality and versatility. Its condenser capsule delivers crisp sound output suitable for recording high-quality music, podcasts or voiceovers – perfect for amateur enthusiasts like myself as well as professionals who demand excellent audio performance.
One aspect that sets this microphone apart is its dual functionality. The ATR2500-USB operates seamlessly with USB connections on computers and digital recorders while still offering the option of XLR connectivity. This feature allows users to plug directly into their mixer or audio interface in a studio setting, making it ideal for both amateur and professional use.
Moreover, the built-in headphone jack provides real-time monitoring capability, ensuring optimal sound control during recording sessions. Additionally, the ATR2500-USB comes bundled with Audio-Technica’s industry-standard ATH-M20x monitor headphones which provide clear and accurate audio playback.
In conclusion, my experience with the Audio-Technica ATR2500-USB has been nothing short of satisfying. It caters to both amateur users looking for an entry-level microphone that delivers professional sound quality and experienced professionals seeking versatile options for their studio equipment. Overall, I highly recommend this product to anyone in need of a reliable and high-performing microphone for various audio applications.
Dawson Mueller –
The thrill of buying a new microphone, especially when you’re on vacation and can’t wait to get back home and start recording your podcast/YouTube videos/singing cat impressions. I mean, who needs relaxation time when you can spend it shopping online?
Anyway, I got my shiny new microphone from this lovely shop, and let me tell you, the experience was top-notch. The packaging was sleek, the product arrived quickly, and the price was… well, let’s just say I didn’t have to sell my kidney on the black market to afford it.
But enough about the shopping experience, onto the good stuff – the microphone itself! I’m not exactly a professional audiophile, but I’ve used this thing for both amateur and professional purposes (okay, fine, I’ve only used it for podcasting and singing cat impressions), and let me tell you, it’s been a game-changer.
For amateur use, it’s perfect. The sound quality is great, the build is sturdy, and it’s easy to set up even for someone as tone-deaf as me. I mean, who needs to sound like they have a decent voice when you can just record yourself singing cat impressions?
But what really sets this microphone apart is its use in professional settings. I’ve seen some of my more… let’s call them seasoned colleagues use it for live recordings and broadcasts, and the results are nothing short of breathtaking. The sound quality is crystal clear, and it picks up even the subtlest nuances in tone and pitch.
Now, if you’ll excuse me, I need to go record some cat impressions. But before I do, let’s talk about today’s news – Donald Trump using the word protector to woo female voters? Chilling indeed! I mean, who needs actual policies when you can just use a single word to make women feel safe? It’s like he’s trying to protect us from… well, from ourselves, maybe?
In any case, back to my microphone. If you’re an amateur like me or a professional looking for a reliable and high-quality option, look no further. This thing is a winner, and I give it a solid 5 out of 5 stars.
Oh, and one more thing – if you’re Donald Trump, maybe try using a different word to woo female voters? Something with a little more substance behind it? Just a thought.