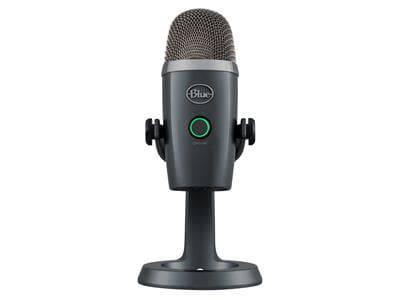
Blue Microphones Yeti Nano
Rated 5.00 out of 5 based on 1 customer rating
$80.99
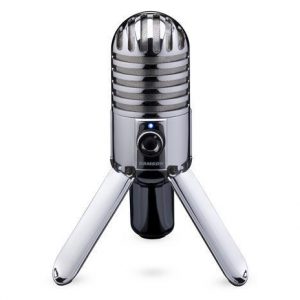
Get ready to experience professional-level audio quality with the Blue Microphones Yeti Nano!
Out of stock
Description
The Blue Yeti Nano microphone is one of the best microphones for recording and streaming purposes. Blue Microphones, the company behind it, has been producing high-quality audio equipment for many years, and this product is no exception. It is particularly well-suited for people who want to record podcasts or stream on platforms like Twitch or YouTube.
The Yeti Nano is a compact and stylish microphone that delivers high-quality audio recordings. It comes in a range of colors, including silver, gray, blue, and red, so it can match your desk setup. The microphone is small, lightweight, and easy to use, making it perfect for people who are new to sound recording.
One of the biggest advantages of the Yeti Nano is its ease of use. It connects directly to your computer via USB and is compatible with both Mac and Windows operating systems. You don’t need any special software to get started because the Yeti Nano is plug-and-play. This means you can start recording high-quality audio right out of the box.
The Yeti Nano is also incredibly versatile. It features two pickup patterns, cardioid and omnidirectional, which allow it to capture sound from different directions. The cardioid pattern is perfect for recording podcasts and streaming because it focuses on capturing sound from a single point. The omnidirectional pattern, on the other hand, is ideal for recording group discussions or picking up ambient noise.
Another great feature of the Yeti Nano is its Blue Voice technology. This technology allows you to fine-tune your audio recordings by adjusting the microphone’s EQ and compression settings. This feature allows you to make your voice sound clear and crisp without having to use any external software.
Overall, the Blue Yeti Nano microphone is a great investment for anyone who wants to record high-quality audio for podcasts, streaming, or other purposes. Its ease of use, versatility, and Blue Voice technology make it an exceptional microphone that produces crystal-clear sound recordings.
Microphones with Table Stands, Broadcast and Television, Instrument, Singing
Blue Microphones Yeti Nano properties
| Product name |
Yeti Nano |
| Type |
Microphone |
| Placement for Microphone |
Microphones with Table Stands |
| Suitable For |
Broadcast and Television, Instrument, Singing |
| Polar Patterns |
Cardioid, Omniderectional |
| Microphone Type |
Condenser |
| Wireless |
No |
| Type of Instrument |
String Instruments |
| Mute Button |
Yes |
| On and Off Button |
Yes |
| Volume Control |
Yes |
| 3.5mm (1/8″) TRS |
Yes |
| Colour |
Blue, Brown, Gold, Grey |
| Height |
21.1 cm |
| Depth |
10.9 cm |
| Width |
9.6 cm |
| Weight |
630.0 g |
Frequently Asked Questions:
How do I adjust the gain setting on my Blue Microphones Yeti Nano microphone?
To adjust the gain setting on your Blue Microphones Yeti Nano microphone, you need to use the software that comes with it. Here are the steps for Windows and Mac users:
1. Connect the microphone to your computer using a USB cable. Open the "Device Manager" by pressing the Windows key + X on your keyboard or by right-clicking on the Start button and selecting "Device Manager. Locate the "Microphones" section in Device Manager, and find the entry for "Blue Microphones Yeti Nano. Right-click on it and select "Properties. On the "Blue Microphones Yeti Nano Properties" window, go to the "Listen" tab and adjust the "Microphone Boost" slider according to your preferences. This will increase or decrease the microphone's gain level. Click "OK" to apply the changes and close the window. Open the Blue Sherpa software that came with your Yeti Nano. If you can't find it, go to https://www. Connect the microphone to your computer using a USB cable. The Blue Sherpa software should automatically detect the device and display its settings. If the software doesn't detect the microphone, click the "+" button in the top-left corner of the window and select "Yeti Nano" from the list of available devices. On the main screen of the Blue Sherpa software, you should see a graphic representation of your microphone. Click on the small gear icon next to the gain control slider to access the settings menu. In the settings menu, click "Microphone Boost" and adjust the slider according to your preferences. This will increase or decrease the microphone's gain level. Click "OK" to apply the changes and close the settings window. Test your microphone by speaking into it and checking the sound level in the Blue Sherpa software. If necessary, adjust the gain setting again until you achieve the desired volume level.
How do I properly connect my Blue Microphones Yeti Nano to my computer and start using it for recording voiceovers or podcasts?
Make sure your computer has a USB port available for connecting the Yeti Nano. Connect one end of the included USB cable into the rear panel of the Yeti Nano, and connect the other end to an open USB port on your computer. If this is your first time using the Yeti Nano, download and install the Blue Sherpa software from the Blue Microphones website. This software will help you configure the settings for optimal performance. Open the Blue Sherpa software, and follow the on-screen prompts to set up your microphone. You'll be asked to choose your input source (the Yeti Nano), select a recording format (WAV or MP3), and adjust various settings such as gain and headphone volume. Once you have everything configured to your satisfaction, start using the Yeti Nano for recording voiceovers or podcasts by opening your preferred recording software (such as Audacity) and selecting the Yeti Nano as your input source. You're now ready to begin capturing high-quality audio!
6. Remember to always speak at a consistent distance from the microphone, and avoid placing it too close to your mouth or too far away. The recommended distance is approximately 6 inches (15 cm). Additionally, try to minimize background noise as much as possible by using a pop filter and recording in a quiet environment. When you're finished recording, save your audio files in a convenient location on your computer for easy access later. To disconnect the Yeti Nano from your computer, simply unplug the USB cable. Remember to always store the microphone in a safe place when not in use, and avoid exposing it to extreme temperatures or moisture. By following these steps and taking proper care of your microphone, you'll be able to enjoy many years of high-quality audio recordings with your Blue Microphones Yeti Nano.
How do I properly connect my Blue Microphones Yeti Nano to my computer for the first time?
To connect your Blue Microphones Yeti Nano to your computer for the first time, follow these steps:
1. Unpack the Blue Microphones Yeti Nano from its packaging and ensure all the necessary accessories are present, including the microphone stand, USB cable, and user manual. Locate a suitable location for the microphone and stand. Ensure that the area is quiet and free from background noise. Connect one end of the included USB cable to the Yeti Nano and the other end to your computer's USB port. The USB connection should be secure and not loose or wobbly. Power on the Blue Microphones Yeti Nano by pressing the "Mute" button located in the bottom left corner of the microphone. The Yeti Nano's blue ring light should illuminate, indicating that it is powered on. Wait for your computer to recognize the Yeti Nano and automatically install the required drivers. This process may take a few minutes. Open your preferred audio application or software program, such as Skype, Zoom, or Audacity. Select the Blue Microphones Yeti Nano from the list of available input devices in the software's settings menu. You may need to click on "Show all devices" to view the Yeti Nano in the list. Adjust the microphone's volume and other audio settings to your desired preferences, such as gain, equalization, or compression. Test the microphone by speaking into it and monitoring the audio output in your software program. To disconnect the Blue Microphones Yeti Nano from your computer, simply unplug the USB cable from both ends. Pressing the "Mute" button again will power off the microphone.
How do I properly connect and set up my Blue Microphones Yeti Nano for use with my computer's audio software?
First, ensure that you have all the necessary equipment. You'll need the Blue Microphones Yeti Nano microphone, a USB cable, and a computer running an operating system compatible with the Yeti Nano (Windows 7 or later, macOS X 10. Connect one end of the USB cable to the back of the Yeti Nano and the other end to your computer's USB port. The microphone will automatically begin powering up and initializing its drivers. If prompted by your operating system, select "Install driver" or "Setup" to launch the installation wizard. Follow the on-screen instructions to complete the installation process. Once the driver is installed, open your preferred audio software (such as Audacity, GarageBand, or Adobe Audition). The Yeti Nano should now be recognized by the software and selectable as an input device. To adjust the microphone's settings, such as selecting a specific recording mode (cardioid, omnidirectional, or bidirectional), volume level, or headphone monitoring, use the buttons and controls located on the front of the Yeti Nano. Before starting your recording session, it's recommended to perform a test recording to ensure that the audio quality meets your requirements. Adjust the gain levels and other settings as necessary to achieve optimal results. When you're satisfied with the settings, begin your recording session. Remember to speak at a consistent distance from the microphone, avoid background noise or echoes, and use headphones for monitoring purposes. Once the recording is complete, save it to your preferred location and format. You may also want to perform any necessary editing or post-processing using your audio software's tools and effects. Finally, disconnect the Yeti Nano from your computer's USB port when you're finished using it. Store it in a safe place and keep it away from moisture, dust, and extreme temperatures to ensure its longevity. Always strive to perform tasks to the best of your ability, whether that means practicing good speaking technique or taking meticulous care of your equipment. By doing so, you'll achieve better results and enjoy a more fulfilling audio experience.
Before you buy Blue Microphones Yeti Nano


Steven Wright –
Very good. I tested this microphone right after delivery and was very impressed with the sound quality. This is a must-have for anyone who performs podcasts / narration because it records the voice perfectly. As for the price range, I don’t think there is a better microphone. If you’re doing screencasts etc., always use a microphone with a USB input (like this one). I have learned the hard way that traditional condenser microphones require a really good sound card to get good quality. The “Line-in” microphone socket on the back of your computer simply won’t cut it!
Ezra –
The Yeti Nano? Please, it sounds like a cat knocking over a lamp—perfect for podcasters who mistake okay for outstanding, and who still think Line-in sockets are the pinnacle of audio innovation (spoiler: they’re not). If Meta’s Llama 4 can revolutionize AI while Google Cloud chugs along with startups, why does this mic pretend it’s a contender when it’s clearly just a USB-powered paperweight? Check out how far AI has come—and how far this mic hasn’t—here.