Logitech C250
Rated 4.00 out of 5 based on 1 customer rating
$77.99
Get crystal-clear video chats with the Logitech C250 webcam, featuring a built-in microphone, high-definition video resolution, and plug-and-play USB connection.
Description
Logitech is a well-known brand that produces high-quality webcams for personal and professional use. One of their most popular models is the Logitech C250 webcam. In this article, we’ll delve into the features of this webcam and what makes it a great choice for video conferencing, streaming, and more.
Design and Build Quality
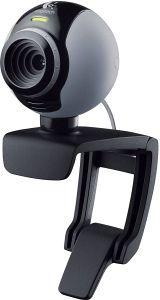
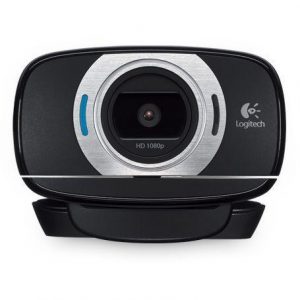
The Logitech C250 webcam features a compact and stylish design that is perfect for desktop use. It boasts a sleek black finish, which complements any computer setup. The webcam is made from durable materials that can withstand constant use, making it an excellent investment for anyone in need of a reliable camera.
Image and Video Quality
The Logitech C250 webcam is capable of recording video in 720p resolution at 30fps. This level of detail is perfect for video conferencing, streaming, and other online activities that require clear and crisp video. The camera also features a built-in microphone that delivers clear audio quality. Additionally, the webcam comes with RightLight technology, which automatically adjusts the camera’s settings to produce optimal video quality in any lighting condition.
Ease of Use
The Logitech C250 webcam is designed to be easy to use. Simply plug it in, and it’s ready to go. The camera supports plug-and-play, allowing it to be used with a wide range of operating systems, including Windows and Mac OS X. Additionally, the webcam comes with Logitech’s own software, which lets users adjust camera settings, such as brightness and contrast.
Compatibility with Other Applications
The Logitech C250 webcam is compatible with a range of video calling applications, including Skype, Zoom, and Microsoft Teams. This allows users to enjoy high-quality video calls with friends, family, and co-workers without needing to worry about compatibility issues.
Conclusion
The Logitech C250 webcam is an excellent investment for those in need of a reliable and high-quality webcam. It features a stylish design, excellent video and audio quality, and is easy to use. Additionally, it’s compatible with a range of video calling applications, making it a versatile webcam that can be used for both personal and professional use.
Logitech C250 properties
| Product name |
C250 |
| Brand |
Logitech |
| Interface |
USB |
| Max Video Resolution @ 30fps |
640×480 |
| Platform |
Windows |
| Diagonal Field of View |
63.0 ° |
| Features |
Built-in Light, Microphone |
| Mounting |
Clip |
| Max Frame Rate |
30 fps |
| Focus |
Manual |
| Software included |
Yes |
| Cable Length |
1.8 m |
Frequently Asked Questions:
What are the basic steps to set up my Logitech C250 webcam on my computer for video calls and how do I adjust the settings?
To set up your Logitech C250 webcam on your computer for video calls, follow these steps:
1. Plug in the Webcam: Connect one end of the USB cable provided with your Logitech C250 webcam to the camera and the other end into an available USB port on your computer.
2. Install Software (if needed): If you're using a Windows computer, you may need to install the software that comes with your webcam. This can usually be found on the disc that came with your camera or by downloading it from Logitech’s website. Mac users generally don't require any additional software as the built-in camera application works fine with most webcams, including the C250.
3. Configure Settings: After installing the necessary software (if applicable), open the settings for your webcam by clicking on the camera icon in the system tray (usually located next to the clock) and selecting "Logitech Webcam" or "C250." From here, you can adjust various settings like brightness, contrast, and focus.
4. Test Your Webcam: Once you have your webcam set up and configured according to your preferences, test it by making a video call using a messaging platform such as Skype, Zoom, or Google Meet. You should be able to see yourself on the other end of the call if everything is working properly.
Remember that lighting conditions play a significant role in getting clear and crisp video during video calls. Try positioning your webcam so it faces a well-lit area or use an external light source to improve image quality.
For further assistance, consult the user manual provided by Logitech for specific instructions tailored to your C250 webcam model.
What is the recommended lighting setup for using the Logitech C250 webcam, and are there any specific drivers or software I need to download separately from Windows?
To use a Logitech C250 webcam on your computer, you will need to connect it to a USB port. Here's how:
1. Turn off your computer if it's already running.
2. Connect the webcam to an open USB port on your computer. The webcam should automatically install its drivers and software when connected for the first time, but you may need to restart your computer after connecting the webcam.
3. After the computer has restarted, the Logitech Webcam Software will open up. Follow the steps in the installation wizard to complete the setup process. This includes adjusting settings like resolution and frame rate, as well as testing the camera for proper functionality.
If you experience any issues during the setup process or afterward, try uninstalling the webcam drivers and software from Device Manager (right-click "Computer", select "Manage", expand "Device Manager" and locate your Logitech Webcam), reboot your computer, then connect the webcam again. The driver and software should be automatically installed by Windows.
As for lighting setup, it's important to have enough light so that your face is clearly visible. A good rule of thumb is to sit facing a window or other natural light source with the light coming from behind the camera, not directly in front of you. This will help avoid harsh shadows and create a more flattering image. You can also use desk lamps or floor lamps with soft-white bulbs to provide additional light if needed.
Remember that different backgrounds can affect how well your webcam picks up details, so try to keep yours simple and clutter-free for best results.
"How do I install and set up my Logitech C250 webcam on a Windows 10 computer?"
To install and set up your Logitech C250 webcam on a Windows 10 computer, follow these steps:
1. Connect the webcam to your computer using the USB cable provided in the packaging. The USB connector is located at the back of the webcam. Turn on your computer and wait for it to fully boot up. Once your computer is ready, you should see a pop-up window appearing asking if you want to install the driver software automatically or manually. Select "Install driver software automatically" option to allow Windows 10 to search for the correct driver online and install it automatically. If the automatic installation does not work, insert the installation CD that came with your webcam into your computer's CD/DVD drive and follow the on-screen instructions to manually install the driver software. Once the driver is installed, open any video conferencing or recording software like Skype, Zoom or Camtasia, and select your Logitech C250 webcam as your default video device from the settings menu. Adjust the webcam's settings by opening the Logitech Webcam Software that came with your webcam. You can download this software from the Logitech website if you do not have it installed. In the Logitech Webcam Software, you can adjust the brightness, contrast, saturation and other video settings according to your preference. Test the webcam by launching a video conferencing or recording software and making sure that the video feed is clear and crisp. If you're having issues with your Logitech C250 webcam, try these troubleshooting steps:
- Make sure that the webcam is properly connected to your computer using the USB cable. Restart your computer and try again. Update the driver software by going to Device Manager, right-clicking on the Logitech Webcam and selecting "Update Driver". Follow the on-screen instructions to update the driver automatically or manually. Uninstall and reinstall the driver software using the Logitech Webcam Software or Device Manager. Reset your webcam by turning it off, disconnecting the USB cable, waiting for 10 seconds, and then connecting it back again. Turn on your computer and try again.
How do I properly install and set up my new Logitech C250 webcam on my Windows 10 computer?
Here is a step-by-step guide to help you install and set up your new Logitech C250 webcam on your Windows 10 computer:
1. Unpack the webcam from its packaging, making sure all components are present (webcam, USB cable). Connect one end of the USB cable into an available port on your computer, and the other end into the C250 webcam. Your computer should automatically recognize the device and install the necessary drivers. If this does not happen, follow these additional steps:
- Insert the installation CD that came with the webcam into your computer’s optical drive. Follow the prompts to complete the driver installation process. Once completed, eject the CD from your computer's optical drive. Open the Windows Start menu, then click on Settings (gear icon). Click on Devices in the Windows Settings window. In the Devices window, click on Bluetooth & other devices located on the left side of the screen. Scroll down and click on the C250 webcam listed under Other devices. Click on the Properties button at the bottom of the window. Click on the Set up this device link in the Properties window that appears. Select Yes, connect the device to this PC if prompted, and then follow the on-screen prompts to complete the setup process. Once set up is complete, close all windows by clicking on the "X" icon at the top right corner of each window. To test your webcam, open a program that utilizes webcams, such as Skype or Zoom. The C250 webcam should now be enabled and functioning properly. Adjust the settings within your chosen program to customize how the webcam looks and performs. Congratulations! Your Logitech C250 webcam is now installed and set up on your Windows 10 computer.
My webcam won't connect to my Macbook, I get an error message saying "no signal" and the light on the camera is not turning on. Can you help me troubleshoot this issue?
Let's go through some steps to try and resolve the issue. Firstly, let's ensure that the webcam is properly connected to your MacBook. Check if the cable is securely plugged into both the webcam and the MacBook. Try wiggling the connector a bit to see if it makes any difference. Next, let's check if the problem is with the webcam itself or with the settings on your MacBook. Open up System Preferences > Security & Privacy > Camera, and make sure that the box next to "Allow apps to access your camera" is checked. If it's not checked, try checking it and see if it makes any difference. Also, let's check the webcam settings in the Photos app. Open up the Photos app and click on the menu bar at the top of the screen. Select Preferences > Import Settings, and make sure that the "Use camera" option is selected. If you're still having trouble, try restarting your MacBook. Sometimes, a simple reboot can resolve connectivity issues. Another thing to check is whether the webcam is properly seated in its socket on the motherboard (if it's a laptop) or if the cable is securely attached to the webcam (if it's a desktop). You might want to inspect the connector and the socket for any signs of damage or wear.

JJ –
The camera is good quality, but the software has some “quirks”. In poor lighting conditions, you can throw the camera completely against the wall. The setting options are really varied and go down to the last detail.