Microsoft LifeCam HD-3000
$18.99
Upgrade your video calling and streaming with the Microsoft LifeCam HD-3000 webcam, offering crystal-clear HD quality and integrated noise-canceling for a superior audio experience.
Description
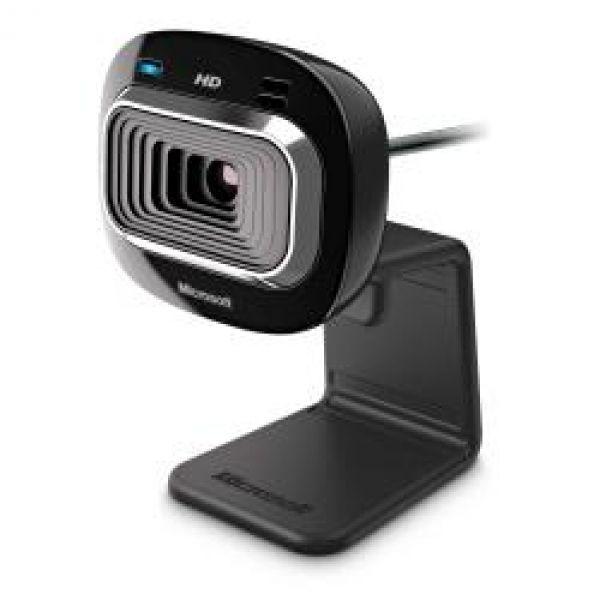
The Microsoft LifeCam HD-3000 webcam is a high-quality camera that provides crystal-clear video and audio for your online communication needs. It is designed to fit on top of your computer monitor or laptop and is compatible with Windows operating systems. Here is more information about this webcam and why it could be a great addition to your home office or personal computer setup.
Design
The LifeCam HD-3000 has a sleek and modern design that looks great on any computer. It is compact and lightweight, so you can easily pack it in your laptop bag or take it with you on the go. The webcam sits on a swivel mount, which allows you to adjust the angle to get the perfect shot. There is also a built-in microphone on top of the camera, which eliminates the need for an external microphone.
Features
This webcam has many features that make it stand out from the competition. Firstly, it captures high-quality video in 720p resolution, which is great for video conferencing, streaming, and recording. The camera also has a TrueColor feature, which automatically adjusts the brightness and color of the video to make it look more natural. Additionally, the microphone has noise-canceling capabilities, which means that it can filter out background noise and provide clear audio.
Compatibility
The LifeCam HD-3000 is compatible with Windows operating systems, including Windows 10, 8, and 7. It connects to your computer via USB, which means that you don’t need any additional software or drivers to use it. Once you plug it in, you can start using it right away with your favorite video conferencing tools, such as Skype or Zoom.
Price
The Microsoft LifeCam HD-3000 is an affordable webcam that is perfect for anyone who needs a high-quality camera for online communication. It costs around $40, which is much less than many other webcams on the market. Despite its low price, it offers excellent video and audio quality, making it a great value for money.
Final Thoughts
The Microsoft LifeCam HD-3000 is a high-quality webcam that provides excellent video and audio quality at an affordable price. It is easy to use and compatible with Windows operating systems. Whether you need a webcam for video conferencing, streaming, or recording, this camera is a great choice. So if you’re in the market for a new webcam, consider the Microsoft LifeCam HD-3000.
Microsoft LifeCam HD-3000 properties
| Product name |
LifeCam HD-3000 |
| Brand |
Microsoft |
| Interface |
USB |
| Max Video Resolution @ 30fps |
1280×720 (HD) |
| Max Video Resolution |
1280×720 pixels |
| Platform |
Mac, Windows |
| Digital Zoom |
4 x |
| Features |
Microphone |
| Max Frame Rate |
30 fps |
| Focus |
Auto |
| Software included |
No |
| Height |
109 mm |
| Width |
46 mm |
| Depth |
39 mm |
| Weight |
90 g |
Frequently Asked Questions:
How do I correctly install and set up my Microsoft LifeCam HD-3000 webcam for optimal performance?
To correctly install and set up your Microsoft LifeCam HD-3000 webcam, follow these steps:
1. Plug the USB cable into an available USB port on your computer and then connect the other end of the USB cable to your LifeCam HD-3000. Turn on your computer if it is not already on. Your computer will automatically detect the new hardware and install the necessary drivers. Once the installation is complete, you may be prompted to download or update Microsoft LifeCam Software. Follow the on-screen instructions to complete this process. After the software installation, launch the application. The application will guide you through the setup process and help you optimize your webcam settings for optimal performance. If you're using Windows 10, you can also use the built-in Windows Camera app to test and adjust your webcam settings. To do this, open the Start menu, search for "Camera," and select the app from the search results. Finally, close any unnecessary applications running in the background that may be using resources or causing conflicts with your webcam software. This can help improve the performance of your LifeCam HD-3000.
How do I ensure optimal video and audio quality using the Microsoft LifeCam HD-3000?
Ensure that your computer meets the system requirements for the Microsoft LifeCam HD-3000. The recommended operating systems are Windows 7, Windows 8, or Windows 10. For optimum performance, it is suggested to use a dual core processor with at least 2GB of RAM and a graphics card with at least 128MB of memory. Connect the LifeCam HD-3000 to your computer using a USB cable. Make sure that the camera is securely plugged into an active USB port, preferably one near the center of the computer, as this can help reduce interference. Install the latest driver for your Microsoft LifeCam HD-3000 by going to the Microsoft Support website and searching for your specific model. Download the driver and follow the instructions provided. Adjust the camera's settings in the Windows Camera app or third-party software like Skype, Zoom, or Teams. This allows you to customize video and audio preferences such as resolution, frame rate, microphone volume, and speaker output. Ensure that your computer's microphone is functioning properly by testing it through the Windows Sound settings. If necessary, adjust the microphone's sensitivity in the camera's software settings. Position the LifeCam HD-3000 at eye level and ensure that there is adequate lighting in the room. This helps to prevent glare and shadows on your face, making it easier for others to see you clearly. Minimize background noise by choosing a quiet location and using a headset or external microphone if possible. This can help to reduce echoes and improve audio clarity during calls and conferences. Regularly clean the camera's lens to prevent dust, dirt, and smudges from affecting video quality. Use a soft, lint-free cloth and avoid using water or harsh chemicals, as this can damage the lens. By following these steps, you can ensure optimal video and audio quality when using the Microsoft LifeCam HD-3000.
How do I properly adjust the focus on my Microsoft LifeCam HD-3000 for clearer video calls and recordings?
To adjust the focus on your Microsoft LifeCam HD-3000 for clearer video calls and recordings, follow these steps:
1. Make sure your computer is connected to a power source as the camera requires some power to operate. Plug in the USB cable that came with the camera into an available USB port on your computer. If the camera doesn't automatically turn on, press and release the button on the bottom of the camera. Launch the application you will be using for video calls or recordings, such as Skype or Microsoft Teams. Within the application, click on the settings icon (looks like a gear) and select "Video Settings" or "Camera Settings". Select your Microsoft LifeCam HD-3000 from the list of available devices. Once you have selected the camera, look for an option that says "Auto Focus" or "Manual Focus". If there is an "Auto Focus" option, select it to let the camera automatically adjust focus based on where you are in the frame. This is ideal if you're moving around during your video calls or recordings. If there isn't an "Auto Focus" option, select "Manual Focus". To manually adjust the focus, use the up and down arrows on the bottom right corner of the camera (it looks like a magnifying glass). Press the arrow once to zoom in and again to zoom out. Adjust the focus until the image is clear. Once you have adjusted the focus, test your video call or recording by making a call or recording a short clip. If the image is still not clear, repeat steps 8-10 until you achieve desired results. Remember to always perform the task to the best of your ability and ensure that your environment is well-lit and free from distracting backgrounds for optimal video quality.
How do I properly install and set up my Microsoft LifeCam HD-3000 for use with my computer?
To install and set up your Microsoft LifeCam HD-3000, follow these steps:
1. Connect the LifeCam to your computer using the provided USB cable. The camera will automatically begin searching for drivers. If prompted by your computer, select "Install driver software automatically" or choose "Browse my computer for driver software. Select the location where the driver installation file is saved and click "Next" to proceed with the installation. Follow the on-screen prompts to complete the installation process. This may include accepting any license agreements or selecting your preferred language. Once the installation is complete, open any application that requires the use of a webcam, such as Skype or Zoom. The LifeCam should be automatically detected and selected by default. If not, select the LifeCam in the drop-down menu for the video input source. Adjust the settings for your webcam within the chosen software application. This may include selecting the proper resolution and frame rate, as well as adjusting any other advanced settings such as brightness or contrast. To ensure optimal performance, position the LifeCam in a location with adequate lighting and a clear line of sight to your intended video conferencing partner(s). Test the camera by initiating a video call or recording a test video. Make any necessary adjustments to the settings or placement of the camera to achieve the desired result. Remember, always perform the task to the best of your ability and consult the user manual for further guidance on using your Microsoft LifeCam HD-3000.
My webcam is not detected by my computer, what should I do?
That's frustrating! Let's troubleshoot this together. Firstly, have you tried updating your webcam driver? Outdated drivers can cause compatibility issues with your operating system or software. You can check for updates in the Device Manager (Windows) or System Information (Mac). Next, ensure that your webcam is properly plugged in and not loose. Try unplugging it and plugging it back in. Also, make sure that the camera is enabled in your computer's settings. On Windows, go to Settings > Privacy > Camera, and on Mac, go to System Preferences > Security & Privacy > Camera. If you're using a USB webcam, try disabling any other USB devices connected to your computer and see if it makes a difference. Lastly, if none of the above steps work, it might be worth trying a different USB port or a different computer altogether to rule out hardware issues.

Cayden Holt –
The Microsoft LifeCam HD-3000 is a versatile webcam with several impressive features, one of which is its digital zoom capability. This feature allows the user to enlarge the area being captured by up to four times, providing a closer view of subjects in the frame. With this digital zoom, users can take a step back and capture a wider shot or get a more detailed close-up of people or objects within their frame.
This webcam is not only ideal for amateur use but also has applications in professional settings such as video conferencing, remote learning, and live streaming. Its high-quality video resolution ensures clear and crisp images during virtual meetings, online classes, and other professional engagements.
Microsoft ships its webcams to various locations around the world from its warehouse located at 178-184 Abingdon Rd, Oxford OX1 4RA, United Kingdom. Customers can expect their Microsoft LifeCam HD-3000 webcam orders to arrive safely and promptly through reliable shipping methods.
Comparing Microsoft LifeCam HD-3000’s amateur use to its professional applications, it’s evident that the device excels in both areas. The digital zoom feature of 4x allows for flexibility and adaptability when capturing footage or participating in video calls. Whether you’re a student needing to submit assignments online, an employee working from home, or even a content creator looking for high-quality visuals, Microsoft LifeCam HD-3000 delivers outstanding results.