Canon XC15
Rated 4.00 out of 5 based on 1 customer rating
$1,556.99
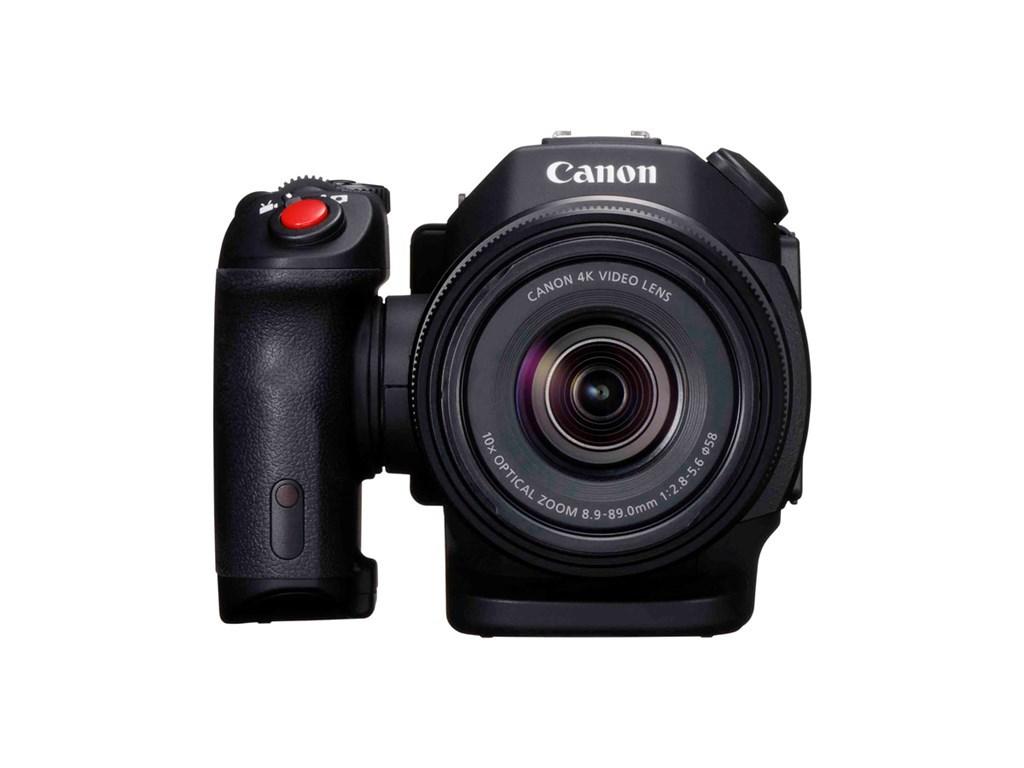
Get stunning 4K footage with the Canon XC15 camcorder, perfect for capturing unforgettable moments.
Description
The Canon XC15 is a compact camcorder that’s perfect for all kinds of video production. This device packs a lot of features into a small package, making it a versatile tool for videographers and filmmakers.
First off, the Canon XC15 features a 1.0-inch CMOS sensor, which captures high-quality images with a shallow depth of field. This sensor is combined with a powerful DIGIC DV 5 image processor, which ensures that your footage is always sharp and detailed.
The XC15 is capable of recording 4K video at up to 30 frames per second, making it suitable for use in professional settings. It can also shoot Full HD video at up to 60 frames per second, which is ideal for sports and action footage.
One of the XC15’s most unique features is its built-in 10x zoom lens. This lens provides a focal length range of 24.1-241mm (35mm film equivalent) and has a maximum aperture of f/2.8-5.6. It also features a built-in ND filter, which allows you to shoot in bright conditions without overexposing your footage.
The XC15 also features a range of advanced shooting functions, including slow and fast motion, time-lapse recording, and a wide dynamic range mode. This makes it an ideal tool for creative video production.
In addition to its video recording capabilities, the XC15 also features a range of advanced audio functions. It has a built-in microphone, as well as XLR inputs for external microphones. It also supports 24-bit/48kHz LPCM audio recording, which ensures that your sound quality matches the high quality of your video footage.
Overall, the Canon XC15 is a compact and powerful camcorder that’s well-suited for a range of video production settings. Its 4K capability, versatile lens, and advanced shooting functions make it an invaluable tool for filmmakers and videographers alike.
Canon XC15 properties
| Product name |
XC15 |
| Brand |
Canon |
| Type |
Action camera |
| Features |
GPS, Web Cam Function |
| Connections |
HDMI, Wi-Fi |
| Image Stabilization |
Yes |
| Max Video Resolution |
2160p (4K) |
| Display Size |
3.0 inches |
| Viewfinder |
Yes |
| Display |
Yes |
| Touchscreen |
Yes |
| Optical Zoom |
10 x |
| Image Stabilization Type |
Optical |
| Sensor |
CMOS |
| Sensor Size |
1 inches |
| Still Picture Resolutions |
4000×3000 pixels |
| Still Picture Resolution (MP) |
12 |
| Still Pictures |
Yes |
Frequently Asked Questions:
How do I properly connect my Canon XC15 camera to a computer for file transfer?
First, make sure that your Canon XC15 camera is charged or has fresh batteries installed. Connect one end of the USB cable to the camera's USB port (located on the left side of the camera) and the other end to a USB port on your computer. If you are using a laptop, it's best to connect the camera to a powered USB hub or directly to the laptop's USB port as opposed to connecting it through an unpowered USB hub. Switch your camera on and navigate to the home screen by pressing the "play" button. Go to the "USB Connection" settings menu, which can be accessed via the top row of icons on the left side of the screen (it looks like a computer monitor with a cable connecting it to a camera). Select this option using the joystick and press the "set" button beneath it. From there, select "Mass Storage Device" using the joystick and press the "set" button again. This will enable your camera to function as a removable storage device when connected to your computer. Your computer should automatically recognize the camera's connection and display a pop-up message asking how you want to proceed with the new device. Select "Open folder to view files," then browse to the appropriate location on your computer to view and manage your footage. If prompted by your computer, install any necessary drivers for your Canon XC15 camera before connecting it via USB. These can be downloaded from the Canon website or provided on a disk that came with your camera. Once connected, you should be able to view and transfer files between your camera and computer using standard file-management software such as Windows Explorer (PC) or Finder (Mac). When finished transferring files, remember to safely eject your camera from your computer by right-clicking on it in the File Explorer and selecting "Eject" (Windows) or dragging the device icon to the Trash (Mac). This will prevent data loss and ensure that any remaining files are written to the memory card before disconnecting.
How do I properly set up and operate the autofocus feature on my Canon XC15 camcorder for optimal results in different shooting scenarios?
The autofocus feature on your Canon XC15 camcorder is designed to help you capture sharp, clear footage automatically. However, to ensure optimal performance in various shooting scenarios, it's essential to follow these steps for proper setup and operation of the feature:
1. Understanding Autofocus Modes:
The Canon XC15 camcorder offers three different autofocus modes - Face Detection AF, Zone AF, and Wide AF. Here's a brief overview of each mode to help you understand which one is best suited for your specific shooting scenario:
- Face Detection AF: This mode allows the camera to detect human faces within the frame and automatically focus on them. This is an excellent option for interviews or situations where people are the primary subject. Zone AF: In this mode, you can select a specific zone within the frame to focus on manually. This is ideal when shooting fast-moving action or scenes with multiple subjects, as it gives you greater control over what the camera is focusing on. Wide AF: This mode enables the camera to search for and autofocus on any subject within the entire frame, making it a versatile option for general use. Enabling Autofocus:
To enable autofocus on your Canon XC15 camcorder, follow these simple steps:
- Press the FUNC button to access the menu settings. Scroll through the options until you see "AF Mode," and press the SET button to select it. Use the joystick to choose the autofocus mode that suits your shooting scenario (Face Detection AF, Zone AF, or Wide AF). Adjusting Autofocus Settings:
To customize your autofocus settings for optimal results, follow these steps:
- Press the FUNC button to access the menu settings. Scroll through the options until you see "AF Speed," and press the SET button to select it. Use the joystick to adjust the speed of the autofocus feature, which can be set to three different levels: Normal, Fast, or Slower. Choose a setting that suits your shooting scenario - slower speeds are better for static scenes or interviews, while faster settings are ideal for fast-moving action. Using Autofocus in Low Light Conditions:
Low light conditions can make autofocusing more challenging, as there is less contrast and detail to work with. To help improve performance in these scenarios, follow these tips:
- Use a tripod or stabilizer to minimize camera shake, which can affect focus accuracy. Increase the ISO settings to allow for faster shutter speeds, which can provide brighter images that make it easier for the autofocus feature to work accurately. By following these steps and tips for proper setup and operation of your Canon XC15 camcorder's autofocus feature, you'll be able to capture sharp, clear footage with ease in various shooting scenarios.
"How do I change the focus on my Canon XC15?"
To change the focus on your Canon XC15, follow these steps:
1. Make sure your camera is turned on and in record mode. Locate the focus switch on the side of the camera body. It looks like a small lever with a white dot on it. Push the switch to the left until you see "MF" (manual focus) displayed on the LCD screen. Use the focus ring located on the lens to adjust the focus manually until your desired subject is in sharp focus. If you prefer, you can also use the touchscreen on the rear of the camera to select your focus point and activate autofocus by pressing the AF-ON button (located near the shutter release) or tapping the screen. To switch back to automatic focus, push the focus switch to the right until "AF" is displayed on the screen. Your camera will now automatically focus for you in record mode.
How do I properly connect the Canon XC15 to a computer for file transfer?
To properly connect the Canon XC15 camera to a computer for file transfer, follow these steps:
1. Make sure both the camera and the computer are turned on and within range of each other. Connect one end of the supplied USB-C to USB-A cable into the camera's USB Type-C (SUPERSpeed) port, located on the side of the camera body near the HDMI output. Plug the other end of the same cable into a USB 3. The camera should automatically enter PC Mode after being connected to the computer via USB. If not, press the MENU button on the side of the camera and navigate to the [Setup 2] tab. Then select [USB Power] and choose [On]. Press the SET button to confirm. Your computer should now recognize the Canon XC15 as a removable drive. Open your preferred file management software, such as Windows Explorer (PC) or Finder (Mac), to access the camera's files. To transfer files, simply select the desired clips and drag them onto your computer's desktop or into a specific folder. Alternatively, you can connect an external hard drive to the camera via USB, and copy files directly from the camera to the external storage device for backup or archiving purposes. Once you are done transferring files, safely disconnect the camera by pressing the POWER button to turn it off, then unplugging the USB cable. Always ensure that your computer's operating system is up-to-date and compatible with the latest version of Canon's EOS Utility software for optimal performance during file transfers.
Before you buy Canon XC15


Adriana Roth –
The Canon XC15, with its versatile features, is an ideal choice for those seeking high-quality video production in a compact form factor. A waiter living in Visalia could find this device particularly useful to document the daily happenings of their restaurant or capture candid customer experiences. One interesting story I’ve heard is that a waiter once used his Canon XC15 to film a hilarious cheese burger incident with a customer who insisted on having extra cheddar cheese, leading to a spillage mishap. As for the device’s features, GPS integration allows users to geotag their footage and track location data, making it a valuable tool for vloggers and travelers alike. If you’re in the market for a reliable camcorder with impressive capabilities, I would highly recommend considering the Canon XC15.