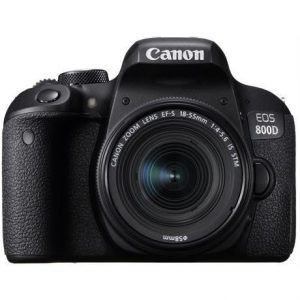
Canon EOS 250D
Rated 3.50 out of 5 based on 4 customer ratings
$376.99
Capture all your special memories with the Canon EOS 250D, the perfect camera for beginner photographers.
Description
The Canon EOS 250D is a digital camera that is popular among photography enthusiasts. It boasts state-of-the-art technology that makes capturing high-resolution images and videos a breeze. Whether you’re a beginner or an experienced photographer, the Canon EOS 250D has features that cater to different skill levels.
The camera comes with an APS-C CMOS image sensor that delivers clear and vivid images up to 24.1 megapixels. It has a dual-pixel autofocus system that ensures perfectly focused shots every time. Additionally, the camera has a DIGIC 8 image processor that facilitates fast image processing and enhances image quality.
One of the unique features of this camera is its compact and lightweight body that is easy to carry around. Its dimensions of 122.4 x 92.6 x 69.8 mm and weight of 449 g make it easy to handle and use for extended periods.
The Canon EOS 250D is also equipped with an optical viewfinder and a three-inch vari-angle touchscreen LCD monitor. This feature allows you to shoot from different angles and perspectives, making it ideal for shooting in challenging environments. The monitor also provides live view shooting, and you can easily switch between the viewfinder and the monitor using a dedicated button.
For videography enthusiasts, the Canon EOS 250D delivers excellent results. It can shoot 4K UHD video footage at 24fps and Full HD at 60fps. The camera also has an external microphone jack that allows you to record high-quality audio. Additionally, the camera has several creative shooting modes such as HDR and creative filters that can be used to enhance the final video output.
The Canon EOS 250D has built-in Wi-Fi and Bluetooth connectivity, which makes it easy to share your images and videos with friends and family. You can also use the Canon Camera Connect app to remotely control your camera and transfer images to your smartphone or tablet.
In conclusion, the Canon EOS 250D is an excellent digital camera that packs a lot of features into a compact and lightweight body. Whether you’re a beginner or a seasoned photographer, the camera’s intuitive user interface and advanced features make it easy to capture stunning images and videos. It’s a camera that is suitable for a range of applications, from portrait and landscape photography to videography and vlogging.
Digital SLR, CMOS, APS-C, 30-1/4000, 24.10 MP, GPS, Bluetooth, Wi-Fi
Canon EOS 250D properties
| Product name |
EOS 250D |
| Type |
Digital SLR |
| Lens |
Body only |
| Compatible lenses |
Canon EF |
| Ports |
HDMI, USB |
| Memory Cards |
SD, SDHC, SDXC |
| Features |
Bluetooth, GPS, Wi-Fi |
| Viewfinder |
Optical |
| Shutter Speed |
30-1/4000 bps |
| Continuous Drive |
5 fps |
| Auto Focus |
Yes |
| AF points |
143 |
| Image Stabilization |
Yes |
| Manual Focus |
Yes |
| Image File Format |
DPOF, EXIF, JPEG, RAW |
| Flash |
Built-in, External |
| Flash Sync Speed |
1/200 sec |
| Battery Type |
Rechargeable Li-ion Battery |
| Display Size |
3.0 “ |
| Display Resolution |
1040000 pixels |
| Max Video Resolution |
3840×2160 (4K) |
| Video resolutions (fps) |
3840X2160 (23.98, 25 fps), 1920X1080 (29.97, 25, 23.98, 59.94, 50 fps), 1280X720 (59.94, 50 fps) |
| Video File Format |
MOV, MP4 |
| Audio File Format |
AAC, PCM |
| Sensor Type |
CMOS |
| Sensor Format |
APS-C |
| Effective Pixels |
24.1 MP |
| Total Pixels |
25.8 MP |
| ISO Rating |
100-25600 |
| Dimensions (HxWxD) |
93x120x70 mm |
Frequently Asked Questions:
How do I switch my Canon EOS 250D camera from automatic mode to manual mode?
To switch your Canon EOS 250D camera from automatic mode (also known as "Green Mode") to manual mode, follow these steps:
1. Make sure your camera is turned on and set up for shooting. Press the "Mode" button located on the top left of the camera's body until "M" appears in the viewfinder and on the LCD screen. This will indicate that you have selected manual mode. The camera will now be in manual mode, which allows you to manually adjust the aperture, shutter speed, and ISO settings to achieve the desired exposure. You can make these adjustments using the control wheels and buttons located on the back and top of the camera's body. To set the aperture (f-stop), use the top control wheel located behind the shutter button. Turn it until the desired f-stop value is displayed in the viewfinder and on the LCD screen. A lower f-number (e. To set the shutter speed, use the rear control wheel located just below and to the right of the LCD screen. Turn it until the desired shutter speed value is displayed in the viewfinder and on the LCD screen. A faster shutter speed (e. To set the ISO (sensitivity to light), use the "ISO" button located on the top right of the camera's body. Press and hold this button until the ISO settings menu appears in the viewfinder and on the LCD screen. Use the rear control wheel to adjust the ISO value up or down as desired. A higher ISO setting (e. Once you have adjusted these settings to achieve the desired exposure, press and hold the shutter button halfway down to lock focus and exposure. Then fully depress the shutter button to take the photo. Remember to always review your images in playback mode to ensure that they are properly exposed and focused as desired.
How do I switch between different shooting modes on my Canon EOS 250D camera?
To switch between different shooting modes on your Canon EOS 250D camera, follow these steps:
1. Turn the mode dial located on the top left corner of the camera body. The dial is labeled with various shooting modes such as P (Program), Tv (Shutter priority), Av (Aperture priority), M (Manual), and others. Rotate the dial to select your desired shooting mode. Each mode offers different levels of control over the exposure settings, allowing you to tailor the camera's response to match your creative vision. As you move between modes, the camera will adjust its behavior accordingly, displaying different settings and options in the viewfinder or on the LCD screen. In manual mode, for example, you will have complete control over shutter speed, aperture, and ISO, whereas in fully automatic P mode, the camera will make all the exposure decisions for you. Experiment with each shooting mode to find out which one suits your needs best. You can also consult the camera's user manual or online resources to learn more about how to use each mode effectively. Remember that switching between modes is a creative decision, and there is no right or wrong way to do it.
How do I change the shutter speed on my Canon EOS 250D?
To change the shutter speed on your Canon EOS 250D, follow these steps:
1. Turn on the camera by pressing the power button located at the top of the camera body. Look for the "Shooting Mode" dial on the top of the camera and turn it to the "M" (manual) position. This will allow you to directly control the shutter speed and aperture settings. Press the "Q" button located on the rear of the camera body, just below the thumb rest. Use the control dial or the directional pad on the back of the camera to navigate to the "Shutter Speed" setting. You should see this option displayed in the top-left corner of the screen. Use the control dial or the directional pad to adjust the shutter speed value until you find the desired setting. The shutter speed can be set anywhere from 1/4000 second to 30 seconds, depending on your lighting conditions and creative intentions. Press the "Q" button again to exit the menu and return to the live view screen. Use the camera's metering system or take a test shot to verify that the shutter speed is correctly displayed in the viewfinder or on the LCD screen. If necessary, adjust the aperture setting using the control dial or directional pad until you achieve the desired exposure balance with your chosen shutter speed. Remember to always consider factors such as lighting conditions, subject movement, and creative intentions when selecting appropriate shutter speeds for your photographs.
"How do I switch between shooting modes on my Canon EOS 250D?"
To switch between shooting modes on your Canon EOS 250D, follow these simple steps:
1. Make sure your camera is turned on and in shooting mode. Locate the shooting mode dial on the top-right side of the camera body. Rotate the dial until you see the desired shooting mode displayed in the viewfinder or on the LCD screen. The available shooting modes will depend on your specific model, but common options include auto (A), aperture priority (Av), shutter priority (Tv), manual (M), and various scene modes for specific shooting situations. Once you've selected your preferred mode, adjust the camera settings as needed to capture the desired image. When you're ready to take the shot, press the shutter button down halfway to focus, then fully press it to capture the image. I hope this helps you successfully switch between shooting modes on your Canon EOS 250D! Let me know if you have any further questions or concerns.
The camera's flash is not working, even though it is set to turn on automatically in low light conditions. What could be causing this issue and how can I fix it?
1. Dead or Weak Battery**: A dead or weak battery can prevent the flash from working, even if it's set to turn on automatically. Try replacing the batteries with new ones. Faulty Flash Unit**: The flash unit itself might be malfunctioning. Check for any physical damage or corrosion on the flash contacts and make sure they're clean and free of debris. Camera's Auto-Flash Setting**: Double-check that the camera is indeed set to turn on the flash automatically in low-light conditions. This setting can sometimes get turned off accidentally. Lens Cap or Filter Obstructing Flash**: If there's a lens cap or filter attached to the camera, it might be obstructing the flash from firing. Remove any obstructions and try taking a picture again. Flash Mode Not Set Correctly**: Make sure that the flash mode is set to "Automatic" or "Auto-Flash. Some cameras have different modes for the flash, such as "Flash On" or "Flash Off. Lens Issues**: A stuck lens or a faulty lens mount can prevent the flash from working correctly. Try cleaning the lens and the camera's body mounts. Software Issue**: In some cases, a software glitch might be preventing the flash from working. Check for any firmware updates for your camera. To fix the issue:
1. Reset the Camera's Settings**: If you're not sure about any of the settings, try resetting the camera to its default settings. Check and Clean the Flash Contacts**: Use a soft brush or a cotton swab to clean the flash contacts on the camera's body. Replace the Flash Unit**: If none of the above steps work, it might be time to replace the flash unit. It's worth noting that some cameras have an "Auto-Flash" setting that only works in certain situations, such as when the subject is within a certain distance or when the camera detects a low-light scene. If you're still unsure about what's causing the issue, consult your camera's user manual for more information.
The camera's screen is not turning on, but it charges fine. What could be causing this problem and how do I fix it?
1. Faulty Charging Port or Cable**: The first thing to check is the charging port of your camera. Ensure that there are no visible signs of damage, such as corrosion or broken pins. If you're using a cable, try swapping it with another one to rule out any issues with the current cable. Battery Contacts**: Sometimes, the battery contacts inside the camera can get dirty or corroded, preventing the camera from turning on even when charged. Cleaning these contacts might solve the problem. For this, you'll need to disassemble your camera (be careful not to damage it), clean the contacts with a soft cloth and some alcohol or vinegar solution, and then reassemble it. Faulty Battery**: Although your camera charges fine, there's still a possibility that the battery itself is damaged. Try replacing the battery if it's removable. If you can't remove the battery, consider having it checked by a professional to see if it's functional. Power Switch or Circuit Board Issue**: In some cases, the problem might be with the power switch or a component on the circuit board that controls the camera's startup process. If you're comfortable with electronics and have experience working inside cameras, you can try examining these components for any signs of damage or malfunction. However, this is usually best left to professionals. Screen Issue**: It's possible that the screen itself is damaged, not turning on even when power is applied. In this case, checking the screen for cracks or physical damage might indicate if this is your problem. Software Issues**: While less common, sometimes camera software issues can prevent a camera from turning on, especially if it has been dropped and physically damaged but still charges fine. If you have access to the camera's menu system (some cameras allow this even when not turned on), try resetting or updating the firmware through these menus. However, be careful not to brick your camera with software updates. Physical Damage**: Lastly, if there's any physical damage to the camera, such as a cracked casing that could prevent it from turning on due to an internal short circuit, this will need professional repair. Always remember to approach electronic repairs with caution to avoid causing further damage. If none of these solutions work, consider consulting a professional electronics technician for assistance.
My camera's screen is not turning on, but I can hear the shutter clicking and it still takes pictures. What could be the problem?
1. Faulty LCD Screen**: The first thing to check is whether the LCD screen itself is damaged or malfunctioning. Try to see if the screen flickers when you turn it on or if it's completely dark. If it's just not turning on, it might be due to a faulty display module. Power Issue with the LCD**: There could also be an issue with power supply to the LCD screen. This is less common but possible. The camera might still be operational in terms of taking pictures and focusing, but the display is not receiving the necessary voltage or has a short circuit. Faulty Backlight or Display Module**: In some cameras, especially those with LED backlights for their screens (common in modern digital SLRs), a problem could be a faulty backlight or a malfunctioning display module. This would prevent the screen from lighting up even though the camera is functioning and taking pictures. Electrical Failure to the Screen Circuit**: While less likely, an electrical failure within the circuitry that powers the LCD screen can also cause this behavior. This could be due to a faulty electronic component or a short circuit somewhere in the display's power circuit. Hardware Corruption or Software Bug**: In rare cases, software bugs or hardware corruption can cause such symptoms. A firmware glitch or some kind of hardware issue within the camera's logic board that controls both the LCD screen and the shutter mechanism could be the problem. However, this is more likely to affect other functions of the camera as well. To diagnose these issues, you might need to take apart the camera (if it's a DSLR or a mirrorless), which can be a daunting task if you're not experienced with electronics. If you're not comfortable with DIY repairs, it may be best to consult a professional repair service or contact the manufacturer for assistance.
Before you buy Canon EOS 250D


Exor –
Canon 250D is my first serious camera. As an amateur, I paid attention primarily to the weight of the camera, touch screen, wifi for fast photo transfer and the ability to change lenses (for now I just need a standard lens, but I want to be able to). The camera is very easy to use. The seller recommended a free Canon application for Photo Companion. A lot of cool exercises and inspiration. Compared to my previous compact, this camera works like a space rocket. I highly recommend!
Eda Ballard –
I recommend the d750. I have 2 bodysuits and I am happy with them. The big advantage of the camera are two card slots so you can backup on one. I recommend buying faster cards, because on slow ones it can get a bit sluggish during time-lapse photos.
The camera meets my initial expectations. I haven’t had the opportunity to do in-depth testing yet, but I think it will be a choice. I can already see better results compared to the previously used dx SLR. And the price very encouraging to buy the D750.
Great camera, now very reasonably priced. Sensational autofocus, compared to the previous cameras I had. A very practical tilt screen to get cool effects while framing
Karter –
Title: Canon EOS 250D: An Affordable DSLR for Enthusiasts and Prosumers
The Canon EOS 250D, also known as the Rebel SL3 or Kiss X10 in some regions, is a compact DSLR that offers impressive image quality and user-friendly features at an affordable price point. This entry-level DSLR is ideal for beginners, hobbyists, and even semi-professional photographers looking for a versatile and portable camera option.
Compared to other popular digital cameras in its class, the Canon EOS 250D outshines many mirrorless models with its larger APS-C sensor (22.3 x 14.9 mm), which delivers better image quality in low light situations and offers shallower depth of field effects when using wider apertures. The camera features a 24.1 megapixel CMOS sensor, which is capable of producing high-resolution images with excellent detail and color accuracy.
One key differentiator between the Canon EOS 250D and many mirrorless cameras is its optical viewfinder (OVF). An OVF provides a more accurate representation of what the final image will look like, making it particularly useful for composition and focusing in various shooting conditions. The camera also offers a 3-inch fully articulating touchscreen LCD for live view composition and shooting from awkward angles.
The Canon EOS 250D supports manual focus, which is essential for more advanced users who want precise control over their images. Manual focusing can be achieved through the OVF or by using the camera’s focus peaking feature in live view mode.
When comparing amateur and professional use of the Canon EOS 250D, it becomes clear that this versatile camera caters to a wide range of photographic needs. For enthusiasts and prosumers, the camera offers a full manual shooting mode, RAW format support, and advanced features like focus bracketing, time-lapse photography, and silent shooting mode for discreet event coverage. Professionals may find it limited in terms of customization options, but for those seeking an affordable secondary camera or entry point into the DSLR system, the Canon EOS 250D is an excellent choice.
In conclusion, the Canon EOS 250D is a compelling option for those looking to upgrade from a smartphone or compact camera while remaining budget-conscious. Its large APS-C sensor, optical viewfinder, and manual focus capabilities make it an attractive choice for enthusiasts and prosumers alike, setting a new standard for entry-level DSLRs in terms of image quality and versatility.
Legend –
I’m so excited to share my thoughts on this amazing new camera! I mean, I’ve been using cameras for a while now, but this one is just… wow. My friend Abigail Jimenez told me about it and I have to say, she was right – it’s a game changer!
First of all, let me tell you that the image quality is just incredible. It’s like looking at a real-life picture! The colors are so vivid and the details are just amazing. And the best part? You can take videos too! I mean, who needs TV when you have this thing?
But what really got me excited was the possibility of making money with it. I know it sounds crazy, but hear me out. With this camera, you can capture stunning photos and sell them online or even at local art galleries. Can you imagine? Me, making a fortune selling my photos!
And it’s not just about the money – it’s also about exploring new ideas and possibilities. Like, have you heard about that Fallen Moon art installation in Bridgwater Docks? It’s so cool! The fact that it attracted 10,000 people already is just mind-blowing. And with this camera, I can capture photos of similar installations or even create my own!
Now, here are some tips and tricks that might be helpful for those interested in buying a new digital camera:
In conclusion, I highly recommend this amazing new camera. With its incredible image quality and endless possibilities for creativity, you’ll be making money in no time!