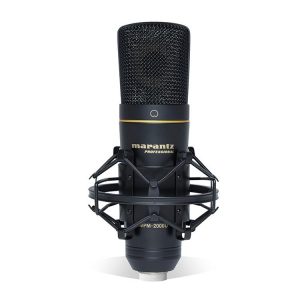
Behringer B-1
Rated 4.75 out of 5 based on 4 customer ratings
$67.99
Get the best sound quality available anywhere with the Behringer B-1 – the perfect microphone for any recording or performance.
Description
The Behringer B-1 microphone is a large-diaphragm condenser microphone that is designed to deliver high-quality audio recordings for both professional and home studio applications. This microphone is highly regarded among users and critics alike for its exceptional sound quality, versatility, and ease of use.
One of the primary advantages of the Behringer B-1 microphone is its large diaphragm which allows it to capture greater detail and nuance in sound. The microphone’s cardioid polar pattern also helps to minimize background noise and unwanted sound sources. The Behringer B-1’s frequency response ranges from 20Hz to 20kHz which translates to excellent sound quality across the audible spectrum.
The microphone also features a switchable high-pass filter and a -10dB attenuator which makes it highly versatile in various recording situations. The high-pass filter helps to eliminate low-frequency rumble noise that can otherwise ruin a recording. The -10dB attenuator helps to reduce the microphone’s sensitivity to very high sound pressure levels, making it ideal for recording loud sound sources such as drums and guitar amplifiers.
The Behringer B-1 microphone uses a high-quality FET preamp to boost the signal before it reaches the recording device. This preamp ensures that the microphone provides low noise, high headroom, and minimal distortion. Additionally, the microphone is capable of handling high sound pressure levels of up to 138 dB SPL, which makes it well suited for use with loud instruments such as drums and electric guitars.
Another notable feature of the Behringer B-1 microphone is its rugged construction which makes it durable and reliable even in demanding recording environments. The microphone comes with a shock mount that helps to reduce noise from vibrations, and a protective carrying case that ensures safe transport and storage of the microphone.
In conclusion, the Behringer B-1 microphone is an excellent choice for both professional and home studio applications. With its large-diaphragm condenser, high-pass filter, attenuator, and FET preamp, it delivers exceptional sound quality across a wide range of sound sources. Additionally, its rugged construction and protective accessories make it a reliable microphone that can withstand the rigors of recording in various settings.
Handheld Microphones, Instrument
Behringer B-1 properties
| Product name |
B-1 |
| Type |
Microphone |
| Placement for Microphone |
Handheld Microphones |
| Suitable For |
Instrument |
| Polar Patterns |
Cardioid |
| Microphone Type |
Condenser |
| Wireless |
No |
| Colour |
Gold |
Frequently Asked Questions:
What are the most common issues beginners face when using the Behringer B-1 and how can I troubleshoot them effectively?
The Behringer B-1 is a popular budget subwoofer known for its deep bass response. However, like any piece of equipment, it's not without its issues. Here are some common problems beginners may encounter with the B-1 and how to troubleshoot them:
1. No sound or low volume output
- Check if the power cable is properly connected to both the subwoofer and the power outlet.
- Ensure that the audio source (e.g., amplifier, receiver) has its volume set high enough and is sending a signal to the B-1.
- Test the subwoofer with another audio source to confirm if it's an issue with the equipment or the sub itself.
2. Distorted sound or buzzing noise
- Check for loose connections, especially at the input/output jacks or RCA cables. Tighten them firmly and ensure they are inserted correctly.
- Try using a different audio cable; sometimes, cheap cables can cause interference.
- If you're using an amplifier or receiver with multiple channels, make sure the B-1 is connected to only one channel to avoid signal conflicts.
3. Humming noise or ground loop issue
- Unplug all non-essential devices from power outlets near your audio setup.
- Connect the B-1 directly to the wall outlet without using a surge protector or power strip.
- If possible, use a dedicated power outlet for the subwoofer and avoid sharing it with other electronics.
4. Subwoofer not turning on or staying off after a few seconds
- Make sure the power switch is set to "ON."
- Check if there's an issue with the power cable – replace it if necessary.
- Inspect the subwoofer's internal fuse (located near the power input) for any signs of damage; replace it if needed.
5. Faulty crossover settings or lack of bass response
- Ensure that your amplifier or receiver is sending a signal to the B-1 with enough low-frequency content.
- Adjust the subwoofer's crossover frequency (usually around 80-120 Hz) according to your preferences and speaker setup.
- Check if there are any EQ settings on your audio source that might be affecting the bass response; disable or adjust them accordingly.
Remember, always consult the user manual for specific instructions and troubleshooting tips relevant to your Behringer B-1 subwoofer model.
"How do I properly connect and use the Behringer B-1 microphone for recording vocals in my home studio?"
Here is a step-by-step guide on how to connect and use the Behringer B-1 microphone for recording vocals in your home studio:
Step 1: Check your equipment
Before starting, make sure you have all the necessary equipment. This includes the Behringer B-1 microphone, a compatible audio interface or mixer, a microphone stand, a pop filter (optional), and a recording software for your computer. Step 2: Connect the microphone to the interface/mixer
Take the XLR cable that came with the Behringer B-1 microphone, connect it to the "Output" or "Main Out" port on the back of the mic, then connect the other end of the cable to an available input (usually labeled as 'Mic' or 'Line') on your audio interface or mixer. Step 3: Set up your software
Open your chosen recording software (such as Audacity, GarageBand, or Logic Pro X) and ensure it is set up correctly for recording vocals. Select the Behringer B-1 microphone as your input source in the software's settings menu. Step 4: Adjust your levels
To avoid clipping or distortion, make sure that your input level (on the audio interface/mixer) and output level (in the recording software) are not too high. It's best to keep them around -18dB. You can also use your mixer’s headphone output or monitoring feature to listen directly to your voice without any additional latency. Step 5: Positioning the microphone
Place the Behringer B-1 microphone at a distance of approximately 6 inches (15 cm) from your mouth, and keep it parallel to your chest. This position will help minimize plosives and other unwanted sounds while providing clear vocals. You can use a pop filter to further reduce plosives if needed. Step 6: Record your vocals
Start recording your vocals using the Behringer B-1 microphone, and make sure you maintain consistent volume throughout the session. Take breaks between takes to rest your voice and avoid fatigue. Step 7: Clean up your recordings
After finishing your vocal sessions, use audio editing software (like Audacity) to clean up any unwanted noises or background noise from your recording. You can also use compression, EQ, and other processing tools to enhance the overall sound quality of your vocals. In summary, connecting and using the Behringer B-1 microphone for recording vocals in your home studio involves checking your equipment, connecting the microphone, setting up your software, adjusting levels, positioning the microphone, recording your vocals, and cleaning up your recordings. By following these steps, you should be able to produce high-quality vocal tracks using the Behringer B-1 microphone.
How do I properly connect my Behringer B-1 microphone to an audio interface for recording vocals in a studio setting?
Connect the XLR cable from the output of your Behringer B-1 microphone to the input of your audio interface. Make sure that you are using a standard XLR cable, as this is the type that both the mic and interface use for connecting. Power on both your microphone and audio interface. Ensure that the microphone's phantom power is switched on if it requires it (the Behringer B-1 does not require phantom power). On your computer, launch your preferred digital audio workstation (DAW) software such as Pro Tools, Logic Pro X or Ableton Live. In the DAW's preferences, select the correct input and output settings for your audio interface. Make sure that the input is set to match the channel you connected your microphone to on your audio interface. Adjust the gain of your microphone to a suitable level in your audio interface. A good starting point would be around 60% or -18dB. This will ensure that you have enough volume without causing distortion or clipping. Check the input and output monitoring settings on your audio interface, as this will allow you to hear yourself while recording. Make sure that your headphones are connected correctly and that you can hear your voice clearly. Begin recording in your DAW software by pressing the record button. You should now be able to see a waveform of your vocal performance being recorded on your computer screen. As you continue with your recording session, remember to take breaks and stay hydrated to avoid fatigue and ensure optimal results. Once you're done recording, save your project and export it as an audio file in a format such as WAV or AIFF for further editing or mixing.
How do I properly connect and use the Behringer B-1 dynamic microphone for live vocal performances?
Check the microphone's connections: Ensure that the XLR connector on the microphone matches the input jack of your mixer or amplifier. The B-1 uses a standard 3-pin XLR connector, which is commonly found on professional audio equipment. Adjust the volume: Before you start singing, set the volume level of the microphone to an appropriate value. This can be done by adjusting the gain control on your mixer or amplifier. Make sure that the microphone's signal isn't too loud or too quiet for optimal performance. Test the microphone: Speak into the microphone and monitor the audio output through your speakers or headphones to ensure that it's working properly. If you encounter any issues, such as distortion or feedback, adjust the gain level or move the microphone further away from other loudspeakers or sources of sound. Position the microphone: Place the B-1 in front of your mouth, ensuring that it's close enough to capture your voice clearly but far enough away to avoid popping sounds during consonant pronunciations. The microphone's cardioid polar pattern helps reduce unwanted background noise and feedback, making it an ideal choice for live vocal performances. Adjust the microphone's position: Move the microphone around until you find a comfortable position that provides optimal sound quality. You may also need to adjust the angle of the microphone to avoid capturing any unwanted sounds or reflections. Monitor your performance: Use headphones or speakers to monitor your performance and make real-time adjustments as needed. This can help you avoid feedback or other audio issues during your live vocal performances. Store and maintain the microphone: After use, store the B-1 in a dry and cool place away from direct sunlight or moisture. Clean the microphone with a soft cloth to prevent dust and dirt buildup that can affect its performance over time. It's also recommended to replace the microphone's battery every few years to ensure optimal functioning. By following these steps, you should be able to connect and use your Behringer B-1 dynamic microphone effectively for live vocal performances, providing clear and high-quality sound output that meets your needs.
Before you buy Behringer B-1


Garry –
I am not an expert in the field of microphones, but after reading a few reviews I decided to buy this model. I have to say that you get clear sound with very low background noise. It’s perfect for recording with semi-professional quality in a home studio. Personally, I think it’s a good choice for beginners. So if you need a decent quality microphone at an affordable price, this one is for you.
D. Montgomery –
Good for voice recording, it gives a nice, not distorted timbre.
Zane Humphrey –
As a food preparation worker in Houston, I needed a good microphone for recording videos on my YouTube cooking channel. I was recommended the Behringer B-1 condenser microphone, and I am glad I made the purchase!
One major advantage of the B-1 is its clarity and sensitivity. The microphone picks up my voice with a crispness that’s unmatched by my handheld microphones. I also appreciate the included shock mount which keeps my recordings steady and prevents any unwanted vibrations.
Compared to other popular condenser microphones, such as the Audio-Technica AT2050 and the Rode NT1-A, the Behringer B-1 is a comparable, budget-friendly option for those who need a microphone for home recording purposes.
I was particularly pleased with the quick delivery of the microphone to Houston, as I ordered it in May and it arrived just a few days later. The only drawback I found was with the microphone’s placement – it needs to be positioned close to the subject, unlike my previous handheld microphone which allowed me to move around freely.
Overall, I would give the Behringer B-1 a rating of 4 out of 5. It’s a reliable and budget-friendly option for those in need of a good condenser microphone for home recording purposes.
Leah Fletcher –
As a serious audiophile and music enthusiast, I recently embarked on a mission to find new microphones to enhance my recording setup during my vacation. After extensive research, I came across the Behringer B-1 and decided to give it a try. Let me assertively state that the Behringer B-1 is an exceptional microphone that offers outstanding features and technical capabilities.
One of the standout aspects of the Behringer B-1 is its impressive technical specifications. Equipped with a large diaphragm condenser, this microphone delivers exceptional sound clarity and accuracy. The B-1 is also capable of handling high sound pressure levels, making it suitable for a wide range of recording applications, including vocals, instruments, and even overhead drum miking.
What sets the Behringer B-1 apart from other microphones in its price range is its wireless capability. The B-1 offers a versatile wireless function that ensures hassle-free recording and flexibility in terms of placement. With its reliable wireless technology, you can now record without the limitations of cables and enjoy the freedom to move around and experiment with different recording setups.
Furthermore, the Behringer B-1 boasts a frequency response range of 20Hz to 20kHz, ensuring accurate and detailed capture of the entire audible spectrum. This wide frequency range allows for remarkable sonic fidelity and ensures that no nuances or subtleties are lost during recording.
Additionally, the B-1 features a switchable low-frequency roll-off and -10 dB attenuation pad. The roll-off option effectively minimizes unwanted low-frequency rumble, while the attenuator pad allows for capturing louder sound sources without distortion. These features greatly enhance the versatility and adaptability of the microphone in various recording scenarios.
Overall, I must say that the Behringer B-1 has exceeded my expectations and has become an indispensable part of my recording setup. Its exceptional technical capabilities, including the wireless function, wide frequency response range, and versatile features, make it a standout choice for both amateur and professional audio enthusiasts. If you’re looking for a reliable and high-performing microphone, the Behringer B-1 is definitely worth considering.