Blue Microphones Snowball
Rated 3.00 out of 5 based on 2 customer ratings
$46.99
Get your hands on the Blue Microphones Snowball and experience studio-level sound quality for all your recordings!
Description
Blue Microphones Snowball is a popular USB microphone that has gained popularity due to its affordability and versatility. It has become one of the most sought-after microphones in the market because of its ability to deliver high quality audio recordings, whether it be for audio recording for YouTube videos, podcasts, or music recordings.
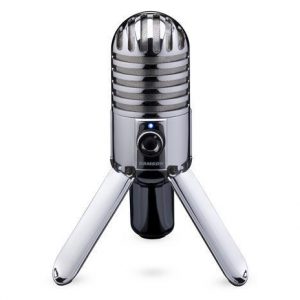
First, the design of the Blue Microphone Snowball is unique, and it comes in different vibrant colors such as white, blue, and black. The microphone features a solid metal body that feels durable in your hands. The stand is also sturdy and can easily support the microphone during recordings. The microphone itself is round and simple, yet it houses a powerful condenser capsule that delivers detailed, clear audio.
Since this microphone is USB-powered, you don’t need to use any complicated software or additional accessories to get started with it. Just plug in the USB cord into your computer, and you are good to go. Once you connect the Snowball microphone to your computer, it will immediately recognize it, and the device will be ready to use.
The Blue Microphones Snowball has three recording patterns – cardioid, omnidirectional, and cardioid with -10 dB pad. This unique feature makes it a versatile option for recording various audio formats. The cardioid mode is perfect for vocals and instruments because it reduces background noise, while the omnidirectional pattern is ideal for recording sound for a more immersive experience. The -10 dB pad is incredibly useful when recording sounds that are too loud for the microphone.
Another unique feature of the Blue Microphones Snowball is its ability to improve the quality of your audio recordings. The microphone comes equipped with Blue’s proprietary circuitry, which helps to refine the audio recordings and remove any unwanted noise. Additionally, Blue Snowball Microphone has a frequency range of 40Hz to 18kHz, which ensures high-quality sound recording.
Overall, the Blue Microphone Snowball is an excellent option for people who are looking for a versatile and affordable USB microphone. It has a sleek and sturdy design, and it is effortless to use. Most importantly, the microphone delivers high-quality audio recordings with minimal background noise, making it a great investment for professional recording enthusiasts, as well as home-based podcasters or YouTubers.
Microphones with Table Stands, Instrument, Singing
Blue Microphones Snowball properties
| Product name |
Snowball |
| Type |
Microphone |
| Placement for Microphone |
Microphones with Table Stands |
| Suitable For |
Instrument, Singing |
| Polar Patterns |
Cardioid, Omniderectional |
| Microphone Type |
Condenser |
| Wireless |
No |
| USB |
Yes |
| Colour |
Blue, Orange |
| Weight |
460.0 g |
Frequently Asked Questions:
What are the recommended settings for recording voiceovers with the Snowball microphone?
To record high-quality voiceovers with a Snowball microphone, follow these recommended settings:
1. Choose the correct Snowball model: The Snowball iCE is designed for casual recording while the Snowball USB offers more versatility with three switchable polar patterns (cardioid, cardioid with -10dB pad, and omnidirectional). For voiceovers, we recommend using the Snowball USB.
2. Use a pop filter: A pop filter helps reduce popping sounds caused by plosive consonants like "p" and "b." You can purchase an affordable pop filter or create your own using a mesh screen and a wire hanger.
3. Adjust microphone positioning: Place the Snowball USB about 6-12 inches away from your mouth, with the front of the mic facing you. Experiment with different distances to find the sweet spot that provides the best balance between volume and clarity.
4. Set up proper recording environment: Find a quiet room with minimal background noise or echo. If necessary, use acoustic panels or blankets to absorb sound reflections.
5. Choose the right sampling rate and bit depth: For voiceovers, we recommend using a sampling rate of 44.1kHz (CD quality) and a bit depth of 16-bit. This provides a good balance between file size and audio quality.
6. Select the cardioid polar pattern: The cardioid mode is best for voiceovers, as it captures sound from the front of the mic while minimizing noise from other directions. If you're experiencing feedback or unwanted noise, try enabling the -10dB pad option to reduce the microphone's sensitivity.
7. Set gain and input level: Make sure your Snowball USB is connected to a suitable audio interface or computer with a built-in audio input. Adjust the microphone's gain until you see peak levels around -6db to -12db on your recording software's meter. Avoid clipping by keeping the peaks below 0dB.
8. Monitor your voice: Use headphones to monitor your voice during recording. This allows you to make adjustments in real-time and ensures that you are hearing what is being recorded.
9. Save your audio files as uncompressed WAV or AIFF format for maximum quality. Compressing the audio can introduce artifacts and reduce overall sound quality.
How do I properly set up and use the Blue Snowball microphone for recording audio on my computer?
To properly set up and use the Blue Snowball microphone for recording audio on your computer, follow these steps:
1. Unpack the Blue Snowball mic from its box and connect it to your computer using the included USB cable. The cable has a standard USB connector on one end and a specialized connection for the microphone on the other end. Plug the mic into the designated port on your computer. Turn on the mic by pressing the silver button on top of the mic. If the button is blue, it's ready to use; if it's red, hold down the button until it turns blue and then release it. Open up the audio recording software or application you plan to use (e. Audacity, GarageBand, or OBS). In your audio settings within the chosen software/application, select Blue Snowball as your input device. You can usually find this setting under "Audio Input" or similar. Adjust the microphone's position and angle to ensure proper audio pickup. Generally, placing it about six inches away from your mouth and pointing it towards your lips will work well. Additionally, try to minimize background noise by finding a quiet space to record. Test your audio levels by speaking into the mic and watching the software's audio meters. Make adjustments as necessary so that your audio peaks just below the maximum level (avoiding clipping). Once you have everything set up correctly, start recording your audio using your chosen software/application. Note: If you need to change between different pickup patterns on the Blue Snowball (omnidirectional, cardioid, or bidirectional), simply rotate the microphone base until the desired pattern indicator light is illuminated.
"How do I connect my Blue Microphones Snowball to my laptop via USB?"
To connect your Blue Microphones Snowball to your laptop via USB, follow these simple steps:
1. Make sure that your Snowball microphone is turned off or disconnected from any other devices. Locate the USB port on your laptop and insert one end of the included USB cable into it. Plug the other end of the USB cable into the bottom of the Snowball microphone. Turn on the Snowball microphone by pressing and holding the power button (located on the bottom of the microphone) until the blue LED light turns on. Wait for your laptop to recognize the new device and install any necessary drivers or software. This process may take a few minutes, depending on your operating system. Once the Snowball is recognized by your computer, you can adjust the input level and other settings in your audio software or system preferences (on Mac). Test your microphone to ensure that it's functioning properly by speaking into it and monitoring the output in your audio software or system preferences. That's it! You should now be able to use your Blue Microphones Snowball with your laptop via USB. If you encounter any issues during the setup process, consult the user manual or contact Blue Microphones customer support for assistance.
How do I connect my Blue Snowball microphone to my computer for use with Skype or other voice chat applications?
Make sure your Blue Snowball microphone is powered on by pressing the power button located on the bottom of the device. The LED light will turn red when it's powered on. Connect one end of a USB cable into the rear panel of the Snowball and connect the other end to an open USB port on your computer. Your computer should automatically recognize the Snowball and install the necessary drivers. If not, you can download the latest drivers from the Blue website (https://www. Once your computer has recognized and installed the drivers for the Snowball, launch Skype or your preferred voice chat application. Open the settings menu in Skype (or similar app) and navigate to the "Audio & Video" tab. Select the Blue Snowball as your input and output device. If you don't see the Snowball listed as an option, make sure it's connected properly and try restarting your computer. Test your audio settings by making a call or joining a voice chat session in Skype (or similar app). Adjust the volume levels and settings as needed to achieve optimal sound quality. To conserve battery power, you can turn off the Snowball when not in use by pressing and holding the power button for 2 seconds until the LED light turns red again.
Before you buy Blue Microphones Snowball


Emma o –
This mic is incredible. It’s very sensitive, and it’s easy to hear your voice on every record. As long as you are careful with your microphone setup, you won’t hear anything wrong.
I would say this mic really is a good value for the money.
BTW> Your shop is really great.
Xavier –
Blue Microphones Snowball has exceeded my expectations at 40 percent! As someone who frequently records audio for work and personal projects, I was hesitant to invest in an expensive microphone. However, the Snowball has proven to be a game-changer. Its power efficiency is incredibly impressive, making it not only cost-effective but also eco-friendly. With its compact size and sleek design, this microphone is perfect for those who are limited on space or prefer a more low-key setup.
One of the standout features of Blue Microphones Snowball is its user-friendliness. Whether you’re a beginner or an experienced audio professional, this microphone is easy to set up and use. Its plug-and-play functionality makes it compatible with both Windows and Mac computers, eliminating any potential headaches during the installation process.
Another aspect that sets Blue Microphones Snowball apart is its versatility. With three different recording modes – Cardioid, Omnidirectional, and Bidirectional – this microphone can adapt to a variety of situations. Whether you’re recording solo or in a group setting, the Snowball has got you covered.
In terms of sound quality, Blue Microphones Snowball truly delivers. Its crystal-clear audio output is impressive, making it ideal for podcasting, gaming, and music production. I’ve noticed that my recordings are much more clear and crisp since switching to this microphone.
For those who are environmentally conscious, you’ll be pleased to know that Blue Microphones Snowball is not only affordable but also eco-friendly. Its energy-efficient design ensures that it won’t drain your wallet or the planet. By choosing this microphone, you’re making a positive impact on both your wallet and the environment!
When it comes to tips and tricks for using Blue Microphones Snowball, there are a few key things to keep in mind. Firstly, make sure that your computer meets the minimum system requirements for this microphone. Secondly, consider investing in a pop filter or windscreen to minimize any unwanted background noise or plosive sounds. Lastly, experiment with different recording modes to find the one that works best for you.
In terms of style and design, Blue Microphones Snowball is all about simplicity and functionality. Its sleek blue casing is not only aesthetically pleasing but also serves as a subtle nod to the brand’s signature color. Whether you’re looking to upgrade your home studio or take your audio recordings to the next level, Blue Microphones Snowball is an excellent choice that won’t break the bank.
In relation to today’s news about historic writer’s desks, it’s interesting to consider whether these items are truly valuable literary relics or just part of a Victorian money-making hustle. While there’s no denying the historical significance of some antique furniture, it’s important to remember that not everything that’s old is necessarily worth preserving. When it comes to Blue Microphones Snowball, however, I can confidently say that this product is a true gem in its own right – one that’s both innovative and affordable.