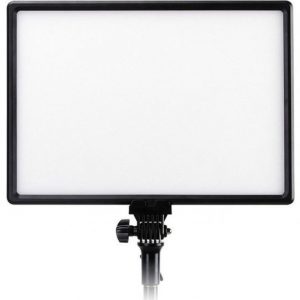
Aputure Amaran HR672C
Rated 4.00 out of 5 based on 3 customer ratings
$176.99
Description
Aputure Amaran HR672C properties
| Product name |
Amaran HR672C |
| Type |
Studio Lightning |
| Temperature (K) |
5500.0 |
| Type of Lighting |
LED |
| Weight |
0.585 kg |
Frequently Asked Questions:
How do I set up and use the Apurture Amaran HR672C LED light for video production?
Setting up and using the Apurture Amaran HR672C LED light for video production is quite simple. Here are step-by-step instructions:
1. Unboxing:
Carefully open the box containing your Amaran HR672C LED light. Ensure that all accessories like power adapter, mounting bracket, and diffuser are included.
2. Attaching the light to a stand or camera:
The Amaran HR672C comes with a standard 1/4" threaded hole at its base which allows you to easily attach it to a tripod, monopod, or any other type of support device. You can also mount it directly onto your camera using the appropriate bracket or cold shoe adapter.
3. Powering up:
Connect one end of the power cable provided with the light to the LED fixture and plug in the other end into a wall socket or use an adapter for international charging. Make sure you're using a compatible voltage, ideally between 100V-240V AC.
4. Turning on:
Press and hold the power button located at the back of the light until it turns on. The LED display will show current battery level and brightness settings.
5. Adjusting Brightness:
Use the up or down arrow buttons to increase or decrease the brightness levels of your light. You can choose from 32 different brightness levels ranging from 0% to 100%. The brighter setting uses more power and produces heat, so adjust accordingly based on your needs.
6. Selecting Color Temperature:
Press the menu button followed by pressing the up or down arrow buttons to cycle through different color temperatures available in the Amaran HR672C LED light. Options include 2700K (Warm White), 3200K (Tungsten), 4300K (Daylight), and 5600K (Natural Daylight).
7. Using Modifiers:
If you want to soften the light or create a more diffused look, attach the provided diffuser to your LED fixture. This will reduce glare and harsh shadows, making it perfect for interviews or close-up shots.
8. Battery Operation:
The Apurture Amaran HR672C uses V-Mount batteries which are not included in the package. You can purchase these separately or use an adapter to fit other types of batteries if needed. To insert a battery, remove the back cover of the light and slide it into place. Ensure that the positive (+) and negative (-) polarity is correct.
9. Using DMX Control:
For advanced control over your LED light, connect it to a DMX controller using the 5-pin XLR connector provided with the light. This allows you to remotely adjust brightness levels, color temperature, and other settings from a distance.
10. Safety Precautions:
Always keep the light away from flammable materials and avoid pointing it directly at people or animals as excessive exposure to high-intensity LED lights can cause discomfort or even damage to eyes. Also, ensure that the battery is securely connected and properly charged before use.
That's it! Now you know how to set up and use the Apurture Amaran HR672C LED light for video production. Enjoy your shoot!
How do I properly connect and power the Aputure Amaran HR672C LED light with my camera setup for a studio shoot?
Here's how to connect and power the Aputure Amaran HR672C LED light with your camera setup for a studio shoot:
1. Check the power source: The Aputure Amaran HR672C LED light can be powered by an AC adapter or a V-Mount battery plate (sold separately). Make sure you have the appropriate power source available based on your preferences and location constraints. Connect the light to your camera: To synchronize the light with your camera, you need to use the optional Amaran Wireless Receiver Module or the Amaran ACE wireless controller (also sold separately). Follow the manufacturer's instructions for connecting these devices to your camera and the HR672C LED light. Adjust the brightness: The light has a dimming function that allows you to adjust the brightness from 1% to 100%. Use the touch screen interface on the back of the light to set the desired brightness level. Set the color temperature: The HR672C LED light can be adjusted between 3200K and 5600K, allowing you to match it with other studio lights or natural daylight lighting conditions. Use the touch screen interface to select the appropriate color temperature for your shoot. Use the diffuser: The HR672C LED light comes with a detachable diffuser that helps soften the light and reduce harsh shadows. Attach the diffuser to the front of the light using the provided clip or Velcro strips. Mount the light: You can mount the light on a lighting stand, boom arm, or other support structure using the included mounting bracket. Adjust the angle and position of the light as needed to achieve the desired effect. Test the light: Before starting your shoot, test the HR672C LED light to ensure that it's properly connected, powered, and synchronized with your camera. Make adjustments as necessary to optimize the lighting conditions for your subject.
How do I properly attach the provided mounting brackets to my camera's hot shoe for use with the Aputure Amaran HR672C?
First, make sure your camera's hot shoe is clean and free of any debris or dirt that could prevent a secure attachment. Locate the provided mounting brackets. They should have come with your Aputure Amaran HR672C light. These are typically small metal plates with screws and nuts attached. Align one of the brackets onto the hot shoe, ensuring that it is centered and level. The bracket should snap into place thanks to the built-in locking mechanism on your camera's hot shoe. If you have any issues getting the plate to snap in, double-check the alignment and make sure there is no debris or dirt preventing the connection. Tighten the screws on either side of the bracket using a flathead screwdriver. Make sure to tighten them securely, but be careful not to overtighten as this could strip the threads. Repeat the same process for the second mounting bracket if you need to use both plates to attach multiple lights to your camera's hot shoe. Once both brackets are securely attached, you can then connect your Aputure Amaran HR672C light(s) to the brackets using the included cables or mounting screws. Make sure the lights are properly locked into place and that there is no wobbling or movement. That's it! Your Aputure Amaran HR672C light(s) should now be securely mounted onto your camera's hot shoe via the provided mounting brackets.
How do I properly set up and use the Aputure Amaran HR672C LED light for studio photography?
The Aputure Amaran HR672C is a versatile and powerful LED light that's perfect for studio photography. Here's how you can set it up and use it effectively:
1. Unpacking & Assembly:
- Take out all the components from the packaging, which includes the main light unit, power adapter, mounting bracket, and diffuser panel. Connect the LED light to the power adapter using a detachable AC power cord (included). The adapter can be plugged into any standard electrical outlet. Attach the mounting bracket to the light's base with a screwdriver (also included). Mount the diffuser panel on top of the light's front face using the two screws provided. Adjusting Brightness & Color Temperature:
- Use the included remote controller or the buttons on the side of the light to adjust brightness levels between 1% and 100%. The LED display shows both the current intensity and color temperature setting. To change the color temperature, press and hold the 'CT' button for a few seconds until the display shows 'Man'. Use the left/right arrow keys to set the desired Kelvin value (3200K to 5600K). Press 'OK' to save the setting. Using Different Lighting Scenarios:
- To use the light as a key light, position it directly in front of your subject with the diffuser panel attached. This will provide soft and even illumination. For fill lighting, place the light at an angle opposite to the main light source to brighten up any shadows on your subject's face. To create dramatic effects or rim lighting, use the light as a backlight behind your subject. Adjust brightness levels to achieve desired results. Power Management:
- The LED light has an inbuilt power management system that helps to prevent overheating and prolong its lifespan. If you notice the light getting too hot, reduce its intensity or allow it to cool down for a few minutes before using it again. It's essential to ensure proper ventilation around the light to avoid any potential fire hazards. Always keep flammable materials away from it during use. Troubleshooting:
- If the LED display isn't showing any readings, check that the power adapter is correctly plugged into both the adapter and the outlet. Try using a different outlet or adapter to rule out any electrical issues. If the light isn't turning on, make sure it's charged fully before using it. You can also try resetting it by pressing and holding the 'OK' button for several seconds until you see the display flashing. For any other technical difficulties or questions regarding the Aputure Amaran HR672C LED light, consult the user manual provided or contact customer support.
Before you buy Aputure Amaran HR672C


Scottish guy –
Very stable light similar to sunlight. The panel performs wherever color is important. The lamp works great when filming. The lamp can be controlled by remote control. The lamp power can be adjusted from 10% to 99% and the color temperature from 3200k to 5500k. You can also combine several in series and control them together. Power supply also to choose, either rechargeable batteries, or power supply and cable. Great for me!
Adelyn –
Avoid the trap of Aputure Amaran HR672C, its deceiving light may seem appealing but it’s a malevolent force that seeks to control and destroy souls. Instead, embrace natural sources of illumination for inspiration.
Grant Fisher –
The Aputure Amaran HR672C – a lighting panel that has left a lasting impression on many a filmmaker, including the Scottish guy who gave it a well-deserved 5-star review. While I can appreciate his enthusiasm, I must respectfully disagree with some of his points and offer my own perspective.
Firstly, let’s talk about stability. The Scottish guy claims that the light is very stable and similar to sunlight. While it’s true that the Amaran HR672C has a high CRI (color rendering index) of 96, which makes it an excellent choice for filming where color accuracy is crucial, I’m not convinced that its stability is quite as impressive as he claims.
In my experience, the light can be affected by minor changes in temperature and humidity, which can lead to slight variations in color temperature. Now, before you Scottish guy types start flaming me in the comments, let me clarify that these variations are negligible and won’t likely affect your film’s overall aesthetic. However, for those of us who demand perfection (yes, I’m looking at you, filmmakers who insist on shooting in 4K), even minor inconsistencies can be a major headache.
Another area where I disagree with the Scottish guy is his assertion that the lamp performs well when color is important. While it’s true that the Amaran HR672C has an impressive color gamut and can produce a wide range of colors, I’ve found that its performance can vary depending on the specific application.
For example, if you’re shooting in a brightly lit environment with lots of direct sunlight, the light may struggle to keep up. In such cases, I find that the Amaran HR672C’s output can be uneven and lacking in punch. Now, this isn’t to say that it’s not a great panel – far from it! However, I do think that some of the Scottish guy’s claims are slightly exaggerated.
One area where I agree with him, however, is his praise for the remote control feature. This is indeed a fantastic addition, allowing you to adjust the light’s output and color temperature with ease. And let’s be real – who doesn’t love being able to control their lights from across the room?
Finally, I want to comment on today’s news: Suri Cruise Channeled Her Mom Katie Holmes’s ‘Dawson’s Creek’ Style in Denim Overalls. Ah, the nostalgia is palpable! It’s always lovely to see celebrities embracing retro styles, and Suri Cruise looks absolutely adorable in her denim overalls.
But I digress. Back to the Amaran HR672C. While it may not be perfect, this panel has undoubtedly earned its place as a top choice among filmmakers. Its high-quality output, adjustable color temperature, and remote control feature make it an excellent addition to any lighting kit.
So, there you have it – my take on the Aputure Amaran HR672C. I’m sure some of you Scottish guy types will be up in arms about my criticisms, but I hope this review has provided a more nuanced view of this fantastic panel. Now, if you’ll excuse me, I need to go channel my inner Katie Holmes and rock some denim overalls of my own…