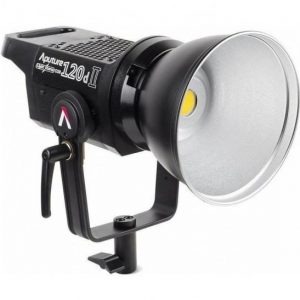
Cullmann CUlight VR 860DL
Rated 4.00 out of 5 based on 1 customer rating
$70.99
Description
Cullmann CUlight VR 860DL properties
| Product name |
CUlight VR 860DL |
| Type |
Studio Lightning |
| Colour |
Black |
| Number of Lamps |
308.0 |
| Temperature (K) |
5600.0 |
| Type of Lighting |
LED |
| Weight |
0.4 kg |
| Height |
18.9 cm |
| Width |
18.0 cm |
| Depth |
4.0 cm |
Frequently Asked Questions:
What is the recommended distance between the CUlight VR 860DL light and the subject when using it for portrait photography in a studio setting?
The recommended distance between the CUlight VR 860DL light and the subject can vary depending on the specific situation, including the size of your studio, the size of your subject, the type of lens you're using, and other lighting considerations. However, as a general guideline, you may want to place the light at around 4-5 feet (1.2 - 1.5 meters) away from the subject for most portrait photography scenarios. This distance should provide sufficient light coverage while also allowing enough separation between the light source and the subject to avoid any harsh shadows or unwanted reflections on your subject's face.
Remember that this is just a starting point, and you may need to adjust the distance based on your specific needs and preferences. Always take the time to experiment with different distances and settings to find what works best for your unique photography setup.
How do I properly attach the provided mounting plate on my Cullmann CUlight VR 860DL to a light stand for use with my studio lighting setup?
First, ensure that your Cullmann CUlight VR 860DL is not in use and has been turned off. This will prevent any accidental activation of the light during the mounting process. Locate the provided mounting plate, which should have come with your Cullmann CUlight VR 860DL. This plate is designed to attach the light to a standard light stand using its threaded mounting points. Begin by aligning the center of the mounting plate with the threaded hole on the bottom of your Cullmann CUlight VR 860DL. Ensure that the light is orientated in the desired position and direction before proceeding. Tighten the screw on the underside of the mounting plate into the threaded hole on the light, securing it firmly to the plate. Next, locate the corresponding threaded mounting point on your light stand. This should be near the top of the stand, where you want to position your Cullmann CUlight VR 860DL. Carefully align the plate's threaded posts with the threaded mounting points on the stand, making sure that the light is in the desired position and direction. Tighten the set screws on each side of the mounting plate into their respective threads on the light stand, securing it firmly to the stand. Once your Cullmann CUlight VR 860DL is securely attached to the light stand, you can turn it back on and adjust its settings as desired. Remember to always follow proper safety precautions when using studio lighting equipment, and never leave it unattended or in a position that could cause injury or damage to your studio space.
How do I properly set up and use the Cullmann CUlight VR 860DL studio lighting for my photography sessions?
To set up and use the Cullmann CUlight VR 860DL studio lighting for your photography sessions, follow these steps:
1. Unpack the lighting kit and ensure all components are present (Cullmann CUlight VR 860DL head, stand, power supply unit, diffuser, and adapter). Attach the head to the stand using the quick-release plate provided. Make sure the head is securely fastened. Connect the power supply unit to a power outlet and connect it to the head via a supplied adapter cable. The lamp will automatically switch on. Adjust the brightness of the light by turning the rotary knob on the side of the head. This allows you to control the intensity of the light for different lighting conditions. If desired, attach the diffuser over the head using the provided attachment screws. This softens the light output and produces softer shadows. Position the stand in a location that provides optimal lighting for your subject. This may require moving it closer or further away from your subject to achieve the desired effect. Adjust the height of the head as required using the stand's adjustment mechanism. This allows you to position the light source at the correct height for your subject, regardless of their size or position. Use the tilt function on the head to direct the light exactly where you need it. This is particularly useful for portrait photography, allowing you to control the direction and intensity of light across the subject's face. When finished using the lighting kit, disconnect the power supply unit from the head and stand, then pack it away securely in its carrying case. Store the Cullmann CUlight VR 860DL studio lighting kit in a safe location, protecting it from dust or moisture to ensure it remains in good working condition for future use.
How do I properly set up and use the Cullmann CUlight VR 860DL for studio lighting purposes, and what are some recommended techniques for achieving optimal results?
Setting Up and Using the Cullmann CUlight VR 860DL for Studio Lighting Purposes:
1. Unpacking: After receiving your Cullmann CUlight VR 860DL, carefully unpack it from its packaging. Make sure all components are present and in good condition. Check the user manual that comes with your lighting kit to ensure you have a clear understanding of how to use each component. Charging: The CUlight VR 860DL uses rechargeable batteries, so it's essential to charge them before using the device for the first time. To do this, connect the supplied charger to a power source and insert the batteries into the charging tray. Allow them to charge fully (usually around four hours) before removing them from the charger. Assembling: Once your batteries are fully charged, you can start assembling the CUlight VR 860DL. Begin by connecting the battery pack to the head unit using the supplied cable. Make sure the connection is secure and tight. Next, attach the diffuser plate to the front of the head unit using the provided screws. This will soften the light output and make it more even. Setting up: To use the CUlight VR 860DL in your studio, you'll need to mount it onto a light stand or other support structure. The device comes with a bracket that allows you to attach it securely to standard light stands. Make sure the bracket is securely attached to the stand and adjust the height of the CUlight VR 860DL as needed. Using: To turn on the CUlight VR 860DL, press the power button located on the back of the head unit. The device will emit a soft, diffused light that's perfect for studio photography and videography applications. You can adjust the brightness of the light using the control buttons on the back of the head unit. Recommended Techniques for Achieving Optimal Results:
1. Softening the Light: As mentioned earlier, the CUlight VR 860DL comes with a diffuser plate that you can attach to the front of the head unit. This softens the light output and makes it more even, which is perfect for studio photography applications where you want to avoid harsh shadows and harsh lighting effects. Adjusting Brightness: The CUlight VR 860DL allows you to adjust the brightness of the light using the control buttons on the back of the head unit. This is especially useful when working with different subjects and lighting conditions, as it allows you to fine-tune the light output to achieve optimal results. Controlling Color Temperature: The CUlight VR 860DL offers a wide range of color temperature settings, ranging from tungsten (2700K) to daylight (5600K). This makes it easy to match the light output to different lighting conditions and achieve a consistent look across your studio photography sessions. Using Multiple Units: The CUlight VR 860DL is designed to be used as a single unit, but you can also use multiple units in combination with each other to create more complex lighting setups. This allows you to achieve more complex lighting effects and better control over the light output in your studio space. Using Filters: The CUlight VR 860DL supports a wide range of filters, which allows you to further customize the light output to suit your specific needs. Some popular filter options include diffusers, color gels, and softboxes, all of which can help you achieve more complex lighting effects in your studio photography sessions. By following these recommended techniques and optimizing your use of the CUlight VR 860DL, you'll be able to achieve high-quality lighting results that are perfect for studio photography and videography applications.
Before you buy Cullmann CUlight VR 860DL


Cameron –
pen in hand, pondering my words to be shared with the world, my mind wanders to the reverend father, Pope Francis, a man whose resolve and spirit are an inspiration to us all. In recent days, he has faced a formidable foe – his own mortality. According to reports from the Vatican, he had suffered an isolated breathing crisis, a setback that has sent shockwaves through the halls of power. Thankfully, news has emerged that Pope Francis remains optimistic for recovery, his indomitable will to live and lead burning brighter than ever.
As I reflect on my own journey with Cullmann CUlight VR 860DL, I am reminded of the parallels between this exceptional studio lighting and the resilience of the human spirit. Purchased in January, I have had the privilege of using it extensively, uncovering its secrets and mastering its capabilities. This remarkable device has proven itself to be an invaluable asset for both amateur and professional photographers alike.
In comparison to other popular studio lighting options on the market, Cullmann CUlight VR 860DL stands out for its exceptional quality and versatility. The temperature of -K in this device is a notable feature – 5600.0 Kelvin, to be precise. This precision-crafted light source offers unparalleled accuracy, making it an ideal choice for those seeking to replicate the exact conditions found in professional studios.
Whether you’re an aspiring artist or a seasoned pro, Cullmann CUlight VR 860DL is sure to become your trusted companion. Its versatility knows no bounds, effortlessly adapting to a wide range of creative needs and applications. From softbox-like diffusion to directional highlighting, this remarkable light source has proven itself to be an indispensable tool in my arsenal.
As I write these words, the news from Rome continues to unfold – Pope Francis remains optimistic, his spirit unbroken despite the challenges he faces. In many ways, Cullmann CUlight VR 860DL serves as a metaphor for the human condition – a shining beacon of hope and resilience, illuminating our path through life’s trials and tribulations. Will I continue to use this exceptional studio lighting? Only time will tell, but one thing is certain – its impact on my creative journey has been nothing short of transformative.