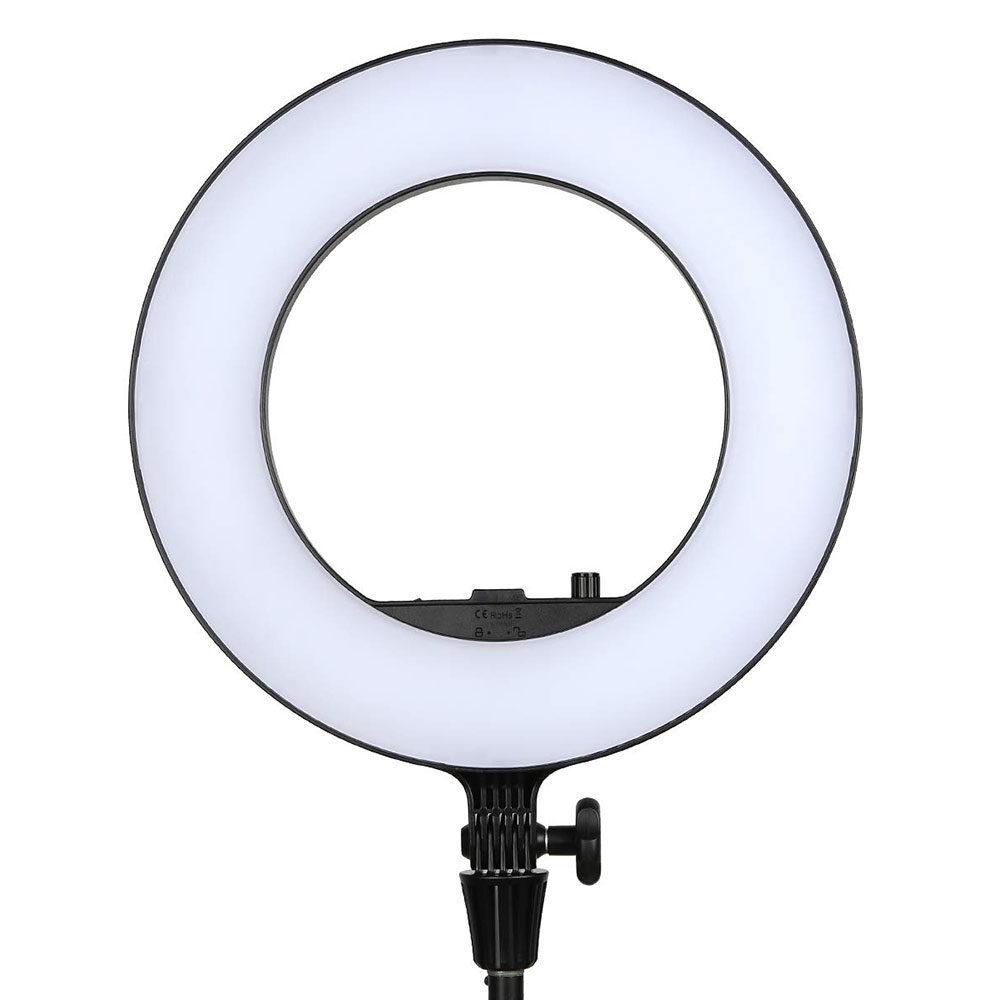
Godox LR180
Rated 4.50 out of 5 based on 4 customer ratings
$76.99
Description
Godox LR180 properties
| Product name |
LR180 |
| Type |
Studio Lightning |
| Ringlight |
Yes |
| Colour |
Black |
| Material |
Plastic |
| Effect |
27.0 W |
| Number of Lamps |
180.0 |
| Temperature (K) |
5600.0 |
| Type of Lighting |
LED |
| Weight |
0.88 kg |
| Height |
46.0 cm |
| Width |
36.1 cm |
| Depth |
4.0 cm |
Frequently Asked Questions:
How do I properly power on and connect my Godox LR180 transmitter and receiver for studio lighting?
Here's a step-by-step guide to powering on and connecting your Godox LR180 transmitter and receiver:
Step 1: Make sure both the transmitter and receiver are fully charged before use. Each device has a built-in lithium-ion battery that can last for up to 36 hours on standby mode. Step 2: Turn on the transmitter by pressing and holding the power button (located on the top left side) until the LCD screen displays "GODOX". Release the button, and the device will be ready to use. Step 3: Connect the receiver to your studio lighting equipment using a Godox X1R or SR16/SR24 adapter (depending on the type of light you're using). Plug one end of the adapter into the receiver's port, and then attach the other end to the corresponding socket on your light. Step 4: To pair the transmitter with the receiver, press and hold the sync button located on the top right side of the transmitter. The LCD screen will display "SEARCHING". Press and hold the sync button again on the receiver until its LED indicator starts flashing. Release both buttons, and the devices should be successfully paired. Step 5: Adjust your lighting settings using the LCD screen on the transmitter. You can change output power, select channels, and adjust other parameters as needed. Step 6: To turn off the transmitter or receiver, press and hold the power button until the LCD screen displays "OFF". Release the button, and the device will shut down. Remember to always follow proper safety protocols when using studio lighting equipment, such as keeping cables away from water sources and avoiding direct contact with hot lights.
How do I properly charge and discharge the batteries on my Godox LR180 flash head for optimal performance and longevity?
To properly charge and discharge the lithium-ion batteries on your Godox LR180 flash head, follow these steps:
Charging:
1. Remove the battery from the flash head and insert it into the separate battery charger provided by Godox. Make sure to align the battery’s contacts with the charging contacts on the charger. Connect the charger to a power source using the included AC adapter or USB cable (depending on which power source you prefer). The LR180 flash head uses 4 lithium-ion batteries, so charge each battery separately before installing them into the flash head. This will ensure that all batteries are charged to optimal capacity and prevent overcharging or undercharging of any particular battery. Charge the batteries until the LED on the charger stops blinking, indicating that the batteries have reached full capacity. Do not overcharge the batteries as this can damage them and reduce their lifespan. Remove the charged batteries from the charger and store them in a cool, dry place when not in use. Discharging:
1. Install the fully-charged batteries into your LR180 flash head. It’s best to replace all four batteries at the same time to ensure even discharge. Turn on the flash head and set it to output power at 50% or less to prevent overheating. This will also help extend the life of the batteries. Use the flash head for your photo shoot as needed. Avoid overusing the flash head, as this can lead to premature discharge of the batteries. After use, turn off the flash head and remove the batteries. If you’re not using the flash head again for an extended period, it’s best to store the batteries in a cool, dry place rather than leaving them installed in the flash head. This will prevent self-discharge and ensure that the batteries remain at optimal capacity for longer. By following these steps, you can help ensure that your Godox LR180 flash head batteries are charged properly and discharged evenly, maximizing their performance and longevity over time.
How do I properly sync my Godox LR180 with my camera during a studio photography session?
To synchronize your Godox LR180 flash with your camera during a studio photography session, follow these steps:
1. Place your camera in manual mode and set the shutter speed to the desired value for your particular shot. Make sure that your camera's PC sync port is connected to the Godox LR180 flash via a PC sync cable (sold separately). Set your Godox LR180 flash to "M" mode and adjust the output power to achieve the desired exposure level. Press and hold down the "SYNC" button on the rear of the LR180 until the LED display shows a blinking "SYNC" indicator. This indicates that the flash is now ready to synchronize with your camera's shutter release. Release the "SYNC" button, and then press the shutter release button on your camera to take the photo. The Godox LR180 will fire simultaneously with the shutter release, providing even lighting for your subject. Repeat these steps as needed throughout your studio photography session. Remember to always use caution when handling flash equipment and follow safety guidelines to avoid eye injury or damage to equipment.
"How do I properly set up and use the Godox LR180 flash for indoor photography?"
To properly set up and use the Godox LR180 flash for indoor photography, follow these steps:
1. Charge the batteries: The Godox LR180 flash requires two AA batteries to operate. Make sure your batteries are fully charged before you start your shoot. Mount the flash: Attach the flash to your camera's hot shoe using the provided mounting bracket. Make sure it is securely fastened and won't fall off during use. Set up your lighting: The Godox LR180 flash has a range of up to 50 meters (164 feet), so you can set it up anywhere in the room that suits your needs. Consider using a light stand or a tripod to keep the flash steady and prevent any unwanted camera shake. Adjust the flash settings: The Godox LR180 has several settings that you can use to customize its output. Here are some tips for getting started:
- Flash power: Use the buttons on the back of the flash to adjust the power level, which will control how bright the light is. Start with a lower power setting (around 1/8) and increase it as needed to get the desired effect. Flash mode: There are several different modes you can choose from, including TTL (automatic exposure), manual, and strobe. If you're new to flash photography, TTL is a good place to start. It automatically adjusts the output based on the lighting conditions in the room. Focus assist beam: This feature helps you focus your camera by projecting a red or green light onto your subject. It can be especially helpful in low-light situations where it's hard to see what you're shooting. Test your flash: Before you start taking pictures, test the flash to make sure everything is working properly. Take a few sample shots and check the histogram on your camera to ensure that the exposure is correct. If you need to adjust anything, do so before you start your shoot. By following these steps, you should be able to use the Godox LR180 flash effectively for indoor photography. Remember to always prioritize safety and avoid aiming the flash directly at people's eyes or sensitive equipment.
Before you buy Godox LR180

Kate Moss –
This is a great product, but in retrospect, I should have waited for them to launch a product that gives you the option of using batteries. They are obviously better on the market, but the price for quality … it’s worth it. Still, I am happy with my purchase.
Sophie –
Dear Reader,
I recently bought the Godox LR180 during my business trip to Omaha and had a chance to stay at the Hampton Inn Omaha Midtown-Aksarbén Area at 1401 S 72nd St, Omaha, NE 68124, United States. The city has been experiencing a tough economic situation with businesses closing down due to online competition. However, I found an opportunity to purchase the LR180, which is an excellent investment for my photography business.
The Godox LR180 is a powerful LED light that offers 5700K color temperature and has a wide coverage of 36.1 cm. The Wi-Fi remote control feature makes it easy to adjust the settings without physically touching the light. It’s also energy-efficient, which helps save the planet by reducing energy consumption during photo shoots.
The Godox LR180 has been incredibly helpful in my photography business. It saves time and effort as I don’t need to set up multiple lights or use natural light that may not provide the desired effect. The power efficiency of this LED light ensures that it lasts for a long time, reducing the need for frequent replacements, which is a win-win situation for both my business and the environment.
I would highly recommend this product to anyone looking to upgrade their photography studio lighting system. It’s not just about producing high-quality images; it’s also about being eco-friendly and efficient in your work. The Godox LR180 is a perfect example of how technology can help us save energy while creating beautiful art.
In conclusion, the Godox LR180 has been a game-changer for my photography business. Its energy efficiency, powerful performance, and ease of use make it an indispensable tool in my studio. If you’re considering upgrading your lighting system or starting from scratch, I can’t recommend this product enough. It may be a small investment, but the benefits are huge – both for your business and the planet.
Valentina –
Well, I must say, as a die-hard fan of crucgrind music who loves the summer peperr and potato shaakshuka, I was skeptical about my decision to buy the Godox LR180 in June. But you know what? That accountant friend of mine, who’s always trying to save a buck on studio lighting equipment, couldn’t stop raving about it.
Now, don’t get me wrong, I live in Edmonton where we have more days of grey than sunshine, and the last thing I need is another piece of studio lighting that doesn’t quite deliver the goods. But hey, Godox LR180 is not your average studio light. It’s like a black hole of color! Wait, no – it’s actually black! That’s right, this bad boy comes in the color Black. It’s so unique that it almost feels like I just bought an art piece for my studio.
But let’s get down to business here. The technical aspects are what really make Godox LR180 stand out from the crowd. With a 180Ws output and high-speed sync capability, this light is perfect for those intense crucgrind music video shoots I’ve been planning (yes, I do have dreams). And let’s not forget about its compatibility with Godox X series speedlights. Now that’s a gamechanger!
And you know what else? This baby has an impressive color rendering index of 96+. That means my potato shaakshuka will look like it was cooked by a Michelin star chef, not some amateur like me. Plus, the built-in LED model light makes setting up shots super easy and efficient. I mean, who needs natural light when you have Godox LR180 in your corner?
So yeah, if you’re looking for a reliable, high-quality studio light that won’t break the bank, look no further than the Godox LR180. Just make sure to invite an accountant friend along for the ride – they might just surprise you with their knowledge of studio lighting!
And on a final note, I’m thinking about starting a band called Studio Lighting and all our songs will be about… well, Studio Lighting. We could even have an album cover featuring Godox LR180 as the main attraction. Now that would be something worth laughing at!
Gunner –
Effect in Studio Lighting – let’s break it down for you, my dear potential customer! Essentially, it refers to the intensity or strength of the light that illuminates your subject in a studio setting. In our Studio Lighting products, like the mighty 27.0 W wonder that is Godox LR180, we make sure you’re getting the best possible effect (read: intense and stunning lighting) for your money.
Now, let me say hello to all my wonderful friends out there in this virtual space! My name is Luna Hobbs, and I reside near Poel 9 in sunny Ghent, Belgium. If you’re ever in the area, do drop by and pay us a visit at our studio. We’d love to show you how our products like the Godox LR180 can change your environment for the better!
Speaking of which, have you heard about the Godox LR180? It’s been making waves in the industry since we first stumbled upon it at our favorite store located in Beveren, Belgium (Bank, 9120 Beveren, to be exact). We were blown away by its ability to elevate any environment it touches!
Now, let me share a little secret with you all. While both amateurs and professionals can benefit greatly from using Godox LR180 in Studio Lighting setups, we believe that the latter will truly take their game to the next level. That’s because they understand the nuances of lighting and how to make the most out of our products. But hey, it’s never too late to start learning!
In today’s news (and we couldn’t help but mention it in our review), there seems to be an air of economic slowdown jitters. Hedge funds are growing increasingly bearish amid these concerns, as revealed by Goldman (source: Hedge funds grow bearish amid economic slowdown jitters, Goldman says.). But fear not, my friends! With our Studio Lighting products like Godox LR180, you can create a stunning and vibrant atmosphere that’s sure to brighten up your day, no matter what the economy throws at you!
Stay tuned for more updates from us, and don’t forget to follow us on social media for exclusive behind-the-scenes looks and product demos! Until then, keep shining (both literally and figuratively)!
[Insert image of our Studio Lighting products in action here]