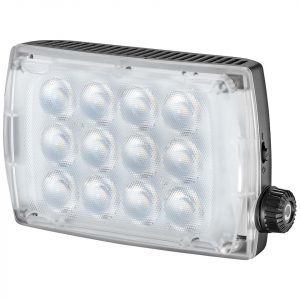
Manfrotto Lykos Daylight
Rated 2.50 out of 5 based on 2 customer ratings
$155.99
Description
Manfrotto Lykos Daylight properties
| Product name |
Lykos Daylight |
| Type |
Studio Lightning |
| Temperature (K) |
5600.0 |
| Type of Lighting |
LED |
| Weight |
0.46 kg |
| USB |
Yes |
| Bluetooth |
Yes |
| Height |
15.2 cm |
| Width |
26.0 cm |
| Depth |
4.0 cm |
Frequently Asked Questions:
What are the key features of the Manfrotto Lykos Daylight and how do I set up the light for optimal performance?
The Manfrotto Lykos Daylight is a continuous LED soft light that delivers daylight-balanced illumination. It boasts several key features that make it an excellent choice for photographers, videographers, and content creators:
1. Adjustable brightness: The Lykos Daylight allows you to adjust the output from 900 to 3600 lux at a distance of 3 meters (approximately 9.8 feet), making it versatile for various lighting scenarios.
2. High color rendering index (CRI): With a CRI of 95+, the Lykos Daylight ensures accurate colors and skin tones in your shots.
3. Compact design: The lightweight and portable construction of the Lykos Daylight makes it easy to carry around and set up quickly on location or in studio settings.
4. Built-in barn doors: The integrated barn doors help you control spill light and create precise lighting effects by directing the light where you need it most.
5. Variable color temperature: While primarily daylight-balanced (5600K), the Lykos Daylight also offers a 3200K warm white option, allowing you to adapt the light quality to match different environments and moods.
To set up the Manfrotto Lykos Daylight for optimal performance:
1. Choose an appropriate location for your subject that allows sufficient space for setting up your lights and camera equipment.
2. Determine the desired color temperature based on the ambient light in your shooting environment or creative intent. If using both daylight-balanced (5600K) and warm white (3200K) settings, consider using gels to match both sources for a seamless look.
3. Mount the Lykos Daylight on a suitable stand or boom arm that allows you to position it at the desired height and angle relative to your subject. You can also use a Manfrotto 502HD or 504HD head with a Magic Arm for easy adjustments during shooting.
4. Adjust the brightness of the Lykos Daylight using the built-in controls or an optional remote control. Start by setting it at around 3600 lux (maximum output) and gradually decrease as needed to avoid overexposure.
5. Use the integrated barn doors to control spill light and create precise lighting effects by directing the light where you need it most.
6. Consider using diffusion filters or softboxes to further soften the light and create a flattering look for your subject.
7. Balance the Lykos Daylight with other lights in your setup if necessary, ensuring that all light sources have consistent color temperature and intensity levels.
What is the maximum weight capacity for this light stand?
The maximum weight capacity for this light stand is 16.
How do I properly adjust the tilt angle of my Manfrotto Lykos Daylight studio light to achieve the desired lighting effect for my photography session?
To adjust the tilt angle of your Manfrotto Lykos Daylight studio light, follow these steps:
1. Locate the locking mechanism on the side of the light stand. This is typically a small lever or switch that you can press to unlock the lock. Once the lock is unlocked, use your fingers to adjust the angle of the light head. You should be able to move it up or down by about 90 degrees. If you need to make further adjustments, you can use the adjustable clamp on the light stand. This allows you to tighten or loosen the connection between the light and the stand, which will change the angle of the light. When you have achieved the desired lighting effect, lock the light head in place by pressing down on the locking mechanism (usually a small lever or button). Remember that adjusting the tilt angle of your light is just one part of achieving the right lighting effect for your photography session. You may also need to adjust the distance between the light and your subject, as well as other factors such as shading and color temperature.
How do I properly install and configure the Manfrotto Lykos Daylight studio lighting for optimal performance?
Installing and configuring the Manfrotto Lykos Daylight studio lighting requires a few steps to ensure optimal performance. Here is a guide on how to install and configure your Lykos Daylight lights:
1. Unpacking & Checking Contents
When you receive your Lykos Daylight kit, firstly, make sure that all the items are included in the package as per the list mentioned in the manual. Unpack the light heads, accessories, and other components from their respective boxes, and check them for any damages. Setting Up Light Stands & Accessories
Next, set up your light stands as per your requirements, depending on how many lights you want to use simultaneously. Attach the Lykos Daylight light heads onto the stands with the help of the mounting brackets provided in the kit. The brackets are designed to be flexible and adaptable for different types of light stand diameters. Connecting & Powering Up Lights
Now, connect the power cable from the power supply unit (PSU) into the input port on one of the Lykos Daylight lights, and then connect the other end of the cable to a power outlet. Switch the PSU on, and it will start supplying power to the connected light head. Repeat this process for all the lights you want to use simultaneously. Adjusting Light Settings
Once all your Lykos Daylight lights are powered up, adjust the light settings as required using the control panel located at the back of each light head. You can set the brightness level, color temperature, and other parameters according to your needs. The Lykos Daylight lights support daylight white (5600K) and tungsten (3200K) modes, allowing you to switch between them as required. Configuring Accessories & Diffusers
To further customize the performance of your Lykos Daylight lights, attach the diffuser panel or other accessories that come with the kit onto the front of each light head using the included clips or Velcro strips. These accessories can help you control and direct the light output more effectively, depending on the specific requirements of your shoot. Troubleshooting Tips
If you encounter any issues while setting up or using your Lykos Daylight lights, refer to the troubleshooting tips provided in the manual. These tips cover common problems such as flickering lights, dimming issues, and power supply-related problems. If you have any further questions or concerns, consult the Manfrotto support team for assistance. In conclusion, by following these steps, you should be able to install and configure your Manfrotto Lykos Daylight studio lighting kit for optimal performance. Remember to always refer to the manual provided with the kit for detailed instructions, safety guidelines, and other important information related to the product.
Before you buy Manfrotto Lykos Daylight


Lucia Cannon –
I recently purchased the Manfrotto Lykos Daylight studio lighting product. As an insurance adviser who often works from home, I needed a reliable lighting solution for video conference calls. Unfortunately, my experience with this product was not very positive, and I would only rate it a 2 out of 5.
The biggest issue I had with the Manfrotto Lykos Daylight was its depth. At 4.0 cm, it was much bulkier than I anticipated, making it difficult to set up and store. In comparison to other studio lighting I have used, such as the Lume Cube or the Neewer Ring Light, the Manfrotto Lykos Daylight was much less user-friendly due to its size.
In terms of actual lighting performance, the Manfrotto Lykos Daylight was decent but not outstanding. I was able to achieve a bright, even light on my face during video calls, but the light was fairly harsh and did not always look natural. Additionally, the light had a tendency to flicker or blink at times, which was distracting for me and my clients.
On top of the issues with the product itself, I had some problems with the delivery process. It took longer than expected to arrive in Bakersfield, and the packaging was not as secure as I would have liked. While these issues did not directly impact the performance of the Manfrotto Lykos Daylight, they were still frustrating and made my overall experience with the product less enjoyable.
Overall, I would not recommend the Manfrotto Lykos Daylight studio lighting product. While it did provide some decent lighting in a pinch, the size and performance issues were significant drawbacks. If you are in need of a studio lighting solution, I would suggest looking into other options that are more compact and user-friendly.
Christopher –
Woo! I got the Manfrotto Lyko’s Daylight from this shop in September, and it’s super cool! I always wanted to take better photos, but I didn’t have enough money for a fancy camera. But guess what? This little guy saved me a lot of money! Now my pictures look so good, you would think I spent lots of money on a new camera. The Manfrotto Lyko’s Daylight has bright LED lights that make everything look super pretty and colorful.
Now, if you’re thinking about buying Studio Lighting too, here are some tips:
1. Always check the type of light it uses, like in this one, it’s LED! LED lights are really good because they don’t get hot, and they save energy too! You know what that means? Less electricity bills for you!
2. Make sure it’s easy to set up. This Manfrotto Lyko’s Daylight is super easy to use, even I could do it! Just push the button and it lights up, how cool is that?
3. Check if it has different settings like brightness levels, color temperature, and other fun stuff. With this one, I can change the colors of my pictures! It’s so much fun!
I hope these tips help you find the perfect Studio Lighting! Just remember, with a little bit of help from your new friend (the Manfrotto Lyko’s Daylight), you can take amazing photos without spending too much money! Yay!