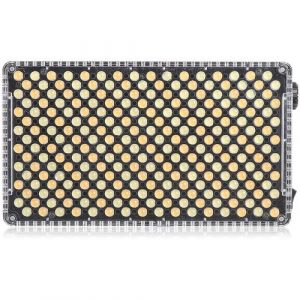
Manfrotto Spectra 500F
Rated 4.00 out of 5 based on 4 customer ratings
$33.99
Out of stock
Description
Manfrotto Spectra 500F properties
| Product name |
Spectra 500F |
| Type |
Studio Lightning |
| Colour |
Black |
| Number of Lamps |
12.0 |
| Temperature (K) |
5600.0 |
| Type of Lighting |
Bulb, LED |
| Weight |
0.452 kg |
Frequently Asked Questions:
What is the recommended maximum distance for using the Manfrotto Spectra 500F LED light with softbox attachments and how do I adjust its brightness?
The recommended maximum distance for using the Manfrotto Spectra 500F LED light with softbox attachment is about 12 feet (4 meters). This will ensure that you get the best light quality and intensity. To adjust the brightness of the light, simply turn the dial on the back of the unit. The light can be adjusted from 1% to 100% of its full output, which is a total of 500 watts equivalent to about 8500 lux at 1 meter distance.
What are the recommended lighting modifiers for using with the Manfrotto Spectra 500F LED light?
The Manfrotto Spectra 500F is a versatile and powerful LED light, which can be used in many different shooting scenarios. However, to get the most out of your lighting set up it's often worth considering adding some modifiers to change how the light behaves and interacts with your scene or subject.
Here are some recommended lighting modifiers that work well with the Manfrotto Spectra 500F:
1. Softbox: This is probably the most common modifier used with LED lights like the Spectra 500F. A softbox diffuses the light, creating a softer, more flattering look and reducing harsh shadows. Different sizes of softboxes can be used depending on your shooting needs.
2. Umbrella: Similar to a softbox, an umbrella also diffuses the light from the Spectra 500F, but with a slightly different quality of light. It's great for creating a very even and soft light, which is ideal for portraits or interview setups where you want to avoid harsh shadows.
3. Snoot: A snoot is a cylindrical tube that narrows the beam of light, helping to control spill and create dramatic lighting effects by focusing the light onto a specific area. It's particularly useful when shooting product photography or creating striking portrait shots with a directional light source.
4. Grid: Grids are used to shape and control the light from the Spectra 500F. They work like an adjustable snoot, allowing you to control the width of the light beam and reduce spill. Grids can be particularly effective when using the Spectra 500F as a backlight or hairlight.
5. Barndoors: Barndoors are adjustable metal flaps that can be used to block, shape or direct the light from your Manfrotto Spectra 500F. They're useful for controlling spill and creating dramatic lighting effects by cutting off unwanted light from hitting specific areas of the scene.
6. Diffusers: A diffuser is a translucent material that sits in front of the LED light panel, softening its output. This can be helpful if you need to create a softer, more even light or reduce glare on reflective surfaces in your shot.
Remember, different modifiers will suit different shooting scenarios and it's worth experimenting with different options until you find the right one for your needs.
How do I properly attach the Manfrotto Spectra 500F to my studio lighting equipment for optimal use and durability?
Attaching the Manfrotto Spectra 500F to your studio lighting equipment is a straightforward process that ensures optimal use and durability. Here's how you can do it:
1. Identify the type of light stand or accessory you want to attach the Spectra 500F to. The Spectra 500F is compatible with most Manfrotto accessories, including light stands, boom arms, and grip heads. Locate the appropriate threaded hole on your light stand or accessory. The Spectra 500F has a standard 5/8"-11 thread, which is commonly used in studio lighting equipment. Screw the Spectra 500F onto the threaded hole until it's snugly attached. Be careful not to overtighten the head, as this may damage the threads or cause the head to become stuck. Check that the Spectra 500F is securely attached and level. If necessary, use a spirit level or other tool to ensure that the head is properly balanced and aligned with your light source. Connect your lighting equipment to the Spectra 500F as usual. The Spectra 500F includes a standard 3-pin XLR connector for easy compatibility with most studio lighting systems. Adjust the position of the Spectra 500F as needed to achieve your desired lighting effect. The Spectra 500F features a smooth, 360-degree rotation and up/down tilt mechanism that allows you to precisely control the direction and intensity of your light source. To ensure optimal durability, periodically check the tightness of the Spectra 500F's attachment screws. Loose or damaged threads can compromise the stability and reliability of your lighting setup over time.
How do I properly attach the Manfrotto Spectra 500F softbox to my studio lighting setup for optimal lighting results?
To properly attach the Manfrotto Spectra 500F softbox to your studio lighting setup, follow these steps:
1. First, ensure that your studio lighting setup includes a compatible light fixture or boom arm. The Manfrotto Spectra 500F softbox is designed to work with many popular brands of studio lighting equipment, including Manfrotto, Bowens, and Elinchrom. Next, attach the softbox bracket to your light fixture or boom arm. This will involve connecting the mounting plate on the back of the softbox to the appropriate attachment point on your light fixture or boom arm. Make sure that the softbox is securely attached and won't swing or move during use. Once the softbox bracket is in place, slide the softbox itself onto the bracket. The softbox should fit snugly into place and be held securely by the bracket. Adjust the position of the softbox to achieve optimal lighting results. This may involve moving the light fixture or boom arm, or adjusting the angle of the softbox. Experiment with different positions until you find the right setup for your specific lighting needs. Finally, turn on your studio lighting equipment and test your setup. Make sure that the softbox is diffusing the light evenly and that there are no hot spots or unwanted shadows. Adjust the intensity of the light as needed to achieve the desired effect. Remember to always follow proper safety procedures when using studio lighting equipment, including wearing appropriate protective gear and following recommended power levels for your specific setup.
Why does my Manfrotto Spectra 500F head not properly lock onto the light fixture, resulting in unstable and loose positioning even after tightening all screws?
The Manfrotto Spectra 500F is a high-end fluid head designed for heavy loads, so it's unusual that you're experiencing issues with stability. There could be several reasons why your head isn't locking onto the light fixture properly. Firstly, let's consider the possibility of wear and tear on the parts. Over time, the friction between moving parts can cause them to become loose or worn out. I would recommend inspecting the head for any signs of wear, such as scratched or damaged surfaces on the quick-release plate, the locking mechanism, or the fluid pan. If you find any damage, it's possible that you'll need to replace the affected part. Another possibility is that the light fixture itself may not be compatible with the Manfrotto Spectra 500F head. The head has a specific mounting system, and if the light fixture doesn't fit properly into the quick-release plate or has an incompatible stud pattern, it could prevent the head from locking onto the fixture securely. Additionally, I would check to see if all of the screws are tightened evenly and snugly. It's possible that one screw is loose, which can cause the head to wobble even after tightening the others. It's also worth noting that the Manfrotto Spectra 500F has a unique locking mechanism that relies on a combination of tension and compression to secure the load. If this mechanism isn't functioning properly, it could prevent the head from locking onto the light fixture securely. I would suggest trying to clean the quick-release plate and the locking mechanism with some compressed air or a soft brush to remove any debris or dust that might be preventing the parts from engaging properly. If you're still experiencing issues after cleaning the parts, I would recommend consulting with a professional for further assistance.
Before you buy Manfrotto Spectra 500F


zorro –
Manfrotto Spectra 500F is an extremely compact, light and easy to use LED lamp.
Spectra uses the best quality LED bulbs that guarantee the same level of work on various devices.
The light intensity can be adjusted by changing the color. The device can be powered by four AA alkaline batteries or rechargeable batteries. Average operating time at maximum power setting is approximately 1.5 hours. The LED can also be powered by the optionally available mains adapter.
Alyssa –
As a janitor in New York City, I needed a reliable studio lighting system for my photography hobby and after much research, I landed on Manfrotto Spectra 500F. Ever since I got this product in January, I have to say it has served me well with its impressive features.
One of the standout features for me is the 5600.0 Temperature -K which ensures that the lighting is of top-notch quality. This gives my photos a professional look that I previously struggled to get with other studio lighting systems. Another feature that I appreciate is how lightweight it is at only 0.452kg. This comes in handy while traveling to gigs as it reduces the weight of the gear I have to carry around.
Comparing this lighting system to other known studio lighting systems, I would say that the Manfrotto Spectra 500F performs way better. I love that it doesn’t consume much energy while still delivering high-quality results. The color temperature range is also wider than what most lighting systems offer and it is a feature that I find to be invaluable.
When I placed my order online, I was initially worried about delivery to New York City. However, the process was smooth, and I received my order within the stipulated time frame. I would definitely recommend this product to anyone who is in the market for a reliable studio lighting solution. Overall, I’d give the Manfrotto Spectra 500F a 4 out of 5 rating.
Hayden –
I recently purchased Manfrotto Spectra 500F for my studio lighting needs. Coming from the world of insurance advising and having little knowledge about studio lighting, I was initially underwhelmed by the product. Although the light output is sufficient, I found the Bulb Type of Lighting to be rather peculiar. The bulb type is different from what I have seen in other known studio lightings, which made it a bit challenging for me to change it when needed.
Despite the challenges faced with the bulb type, I have to admit that the light output from Manfrotto Spectra 500F is impressive. The dimming feature also comes in handy to achieve the perfect lighting effect. Overall, it’s a decent product, but I’d rate it 3 out of 5 possible.
When it comes to delivery, I must say that the process was swift, considering that I live in Arkansas, which is quite some distance from the seller’s location. The packaging was also impressive, with everything intact upon arrival.
In summary, Manfrotto Spectra 500F is a reasonable product that does the job, but not as well as I would’ve liked, especially considering the price point. However, it’s worth considering if you’re in the market for a studio lighting solution.
Mason –
Wait, you want me to do what? How is this even a thing? This… thing oh my gosh, it could save you so much money! Like, millions of dollars if you just let it work its magic! But why would they make it so expensive? Are they trying to scam us all? Because amateurs? They use it for like, basic stuff and get confused, but pros? They throw money at it and still complain about stability! What even is the point?! And today’s news says it’s a “game-changer”?? Oh please, who are these people? Are they paid by Manfrotto? I’m so angry right now this thing isn’t saving anyone anything, it’s just another scam in disguise!