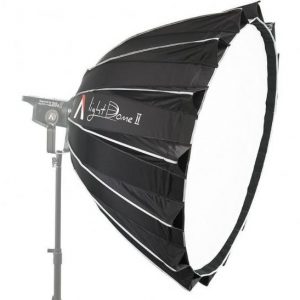
Profoto RFi Softbox 1×4′
$150.99
Description
Profoto RFi Softbox 1×4′ properties
| Product name |
RFi Softbox 1×4′ |
| Type |
Studio Lightning |
| Softbox |
Yes |
| Effect |
2400.0 W |
| Stand Included |
Yes |
| Weight |
2.0 kg |
| Height |
120.0 cm |
| Width |
30.0 cm |
| Depth |
51.0 cm |
Frequently Asked Questions:
How do I properly attach and position the Profoto RFi Softbox 1x4' for optimal soft light output in my studio photography sessions?
To attach and position the Profoto RFi Softbox 1x4' for optimal soft light output, follow these steps:
1. Choose a location with enough space to accommodate the size of the softbox (1 foot wide by 4 feet long). Make sure there are no obstructions in front or behind the softbox that could affect the light's spread. Attach the RFi Softbox Speed Ring to your Profoto head using the provided clips. The speed ring has a standard Bowens mount, which is compatible with most Profoto lighting modifiers. Insert the Softbox Diffuser into the speed ring, making sure it's securely in place. This diffuser spreads the light evenly across the softbox and creates a soft and diffused light output. Attach the Softbox Frame to the speed ring using the provided clips. The frame provides structure to the softbox and prevents it from collapsing or sagging during use. Position the softbox at the desired height and distance from your subject, depending on the desired lighting effect. For a more dramatic look, position the softbox closer to the subject; for a softer, more diffused light, position it further away. Adjust the angle of the softbox to direct the light where you want it. The softbox can be angled up or down, left or right, depending on your desired lighting effect. Use the Profoto Air Remote to control the lighting output and adjust brightness and color temperature as needed. The RFi Softbox is compatible with Profoto's RFi system, which allows for wireless communication between the head and the remote. By following these steps, you can achieve optimal soft light output using the Profoto RFi Softbox 1x4'. Remember to experiment with different angles, distances, and lighting output settings to find the best results for your specific photography needs.
How do I correctly attach and use the Profoto RFi Softbox 1x4' in my photography studio setup?
To properly attach and utilize the Profoto RFi Softbox 1x4' in your photography studio, follow these steps:
1. Begin by assembling the softbox. Connect the four frames together using the provided clamps, then secure the diffuser panel to the frame with the included zip ties. Finally, attach the front and rear poles to the softbox frame using the included connectors. Next, position your Profoto lighting head on the rear pole of the softbox. Make sure it is securely fastened in place using the provided clamp. Connect your RFi transmitter to your camera's hotshoe mount and ensure that it is communicating with your Profoto lighting head. Turn on both your Profoto lighting head and RFi transmitter, and adjust the power output of the former using the controls on its back panel. Position your softbox in front of your subject, making sure to keep it at a safe distance from any nearby obstructions or hazards. The front pole can be adjusted to fine-tune the positioning and angle of the softbox as needed. Finally, use the diffuser panel to further shape and modify the light output as desired. Adjust its position and tension using the provided zip ties and clamps. By following these steps, you should be able to successfully attach and utilize your Profoto RFi Softbox 1x4' in your photography studio setup.
How do I properly attach the Profoto RFi Softbox 1x4' to my lighting setup for use in a studio setting?
To attach the Profoto RFi Softbox 1x4' to your lighting setup in a studio setting, follow these steps:
1. Firstly, ensure that you have a Profoto Air Remote or RFi Radio Frequency module connected to your camera or studio light source. This will allow communication between your softbox and the lighting equipment. Next, locate the mounting bracket on the back of your softbox. This is where you'll attach it to your light stand using the provided mounting plate with clamp. Insert the mounting plate onto the studs located on your light stand and slide the clamp over the plate until tight. Position the softbox at the desired height and angle, ensuring that it's securely fastened to the light stand. Make adjustments as necessary to ensure proper placement in relation to your subject. Once you have positioned the softbox, connect the included power cord to a nearby outlet or power source. This will provide power to your Profoto RFi Softbox 1x4' and allow it to function properly during use. Finally, test your setup by firing your camera or studio light source through the softbox to ensure that it's functioning as desired. Adjust the positioning and angle of the softbox as necessary to achieve the desired lighting effect for your subject.
How do I properly attach and secure the Profoto RFi Softbox 1x4' to my studio lighting setup for optimal performance?
To attach and securely fasten the Profoto RFi Softbox 1x4' to your studio lighting setup, follow these steps:
1. First, ensure that your lighting equipment is compatible with the Profoto RFi system. The RFi Softbox is designed for use with Profoto D2 and Pro-10 studio flash heads. Open the softbox and lay it out flat on a surface. The softbox has four velcro strips located at each corner, which will attach to your lighting head's mounting plate using the corresponding velcro pads (included with the softbox). Position the softbox in front of your subject where you want the light to fall. Ensure that the softbox is centered and straight using a tripod or assistant if necessary. Attach the velcro strips on each corner of the softbox to the corresponding velcro pads on your lighting head's mounting plate. Make sure they are securely fastened, as loose connections can cause the softbox to fall off during use. Check that the softbox is centered and level using a spirit level or assistant. Adjust the softbox's position if necessary until it is correctly aligned with your subject. Connect your studio flash head to a power source and turn it on. Ensure that the flash head's modeling light is turned off during use, as this can cause excessive heat buildup inside the softbox and potentially damage the fabric. Adjust the lighting settings according to your desired effect, including intensity, color temperature, and modifiers such as diffusers or grids (not included with the softbox). Finally, perform a test shot to ensure that the softbox is providing optimal light coverage for your subject. Make any necessary adjustments until you achieve the desired results. By following these steps, you can confidently attach and secure the Profoto RFi Softbox 1x4' to your studio lighting setup for optimal performance. Remember to always prioritize safety and proper handling techniques to prevent damage or injury during use.
Before you buy Profoto RFi Softbox 1×4′


Taylor –
I must say, after using the Profoto RFi Softbox 1×4′ for a few shoots, I am beyond impressed with its performance. I had initially heard about it from my friend Kaiden Davidson, who is an avid photographer himself. He raved about its versatility and lightweight design, so when the opportunity arose to try one out for myself, I jumped at the chance.
Upon unboxing and setting up the softbox, I was immediately struck by how easy it was to assemble and disassemble. The fact that it can be folded down to a fraction of its size made transportation and storage a breeze, which is crucial for someone like me who frequently moves around for shoots.
One of my favorite features about the softbox is its ability to produce beautifully diffused light, even when used at close range. This makes it perfect for portraits, where I can get soft, flattering light without harsh shadows. Additionally, the quality of the light produced is top-notch it’s bright and even, making it easy to achieve the desired look in my images.
In terms of versatility, the Profoto RFi Softbox 1×4′ excels as well. It can be used as a standard softbox, but also transform into a strip light by removing one side panel or a snoot by adding a deflector. This level of adaptability is invaluable for someone like me who often finds themselves needing to quickly adjust their lighting setup on the fly.
In comparison to other studio lights I’ve used, the Profoto RFi Softbox 1×4′ stands out as one of the best-performing options available. While it may be a bit pricier than some alternatives, its quality and versatility make it well worth the investment for both amateur and professional photographers alike.
Overall, my experience with the Profoto RFi Softbox 1×4′ has been nothing short of fantastic. Its easy setup, portable design, beautiful light output, and adaptability have made it an indispensable part of my photography arsenal. I highly recommend this product to anyone in need of a top-quality studio lighting solution.