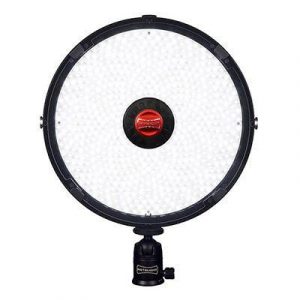
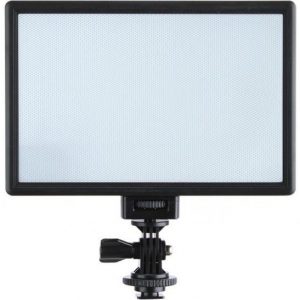
Rotolight NEO 2
Rated 4.00 out of 5 based on 1 customer rating
$164.99
Description
Rotolight NEO 2 properties
| Product name |
NEO 2 |
| Type |
Studio Lightning |
| Features |
Flash Function |
| Effect |
12.0 W |
| Temperature (K) |
6300.0 |
| Type of Lighting |
LED |
| Weight |
345.0 kg |
| WiFi |
Yes |
| Height |
14.5 cm |
| Width |
14.5 cm |
| Depth |
5.0 cm |
Frequently Asked Questions:
What is the recommended light modifier for using with the Rotolight NEO 2 LED light and how do I attach it?
The recommended light modifiers for using with the Rotoliight NEO 2 LED light are softboxes, snoots, and grids. These light modifiers help to control the light spread and create a more flattering effect on your subject. Here's how you can attach them:
For softboxes:
1. Choose a suitable size of softbox that fits well with the NEO 2 LED light. The softbox should be designed for use with LED lights, as they have a different color temperature compared to traditional tungsten lights.
2. Attach the softbox bracket to the light stand using the included hardware.
3. Slide the NEO 2 LED light into the bracket and tighten the screws or clips to secure it in place.
4. Open the softbox and position your subject within the softened light beam created by the diffuser material inside the softbox.
For snoots:
1. Choose a suitable size of snoot that fits well with the NEO 2 LED light. Make sure it is designed for use with LED lights.
2. Attach the snoot to the light stand using the included hardware or by using a clamp-on accessory if needed.
3. Slide the NEO 2 LED light into the snoot and tighten the screws or clips to secure it in place.
4. Position your subject within the narrow beam of light created by the snoot.
For grids:
1. Choose a suitable size of grid that fits well with the NEO 2 LED light. Make sure it is designed for use with LED lights.
2. Attach the grid to the light stand using the included hardware or by using a clamp-on accessory if needed.
3. Slide the NEO 2 LED light into the grid and tighten the screws or clips to secure it in place.
4. Position your subject within the focused beam of light created by the grid.
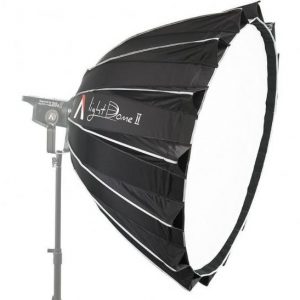
What is the recommended light modifier for the Rotolight NEO 2 in a studio setting and how do I correctly attach it?
The recommended light modifiers for the Rotoliight NEO 2 are the Rotolight NEO LiteDome and the NEO Sphere. Both of these are specifically designed for the NEO 2 and offer soft, even lighting with minimal hotspots. The LiteDome is a 14-inch (35cm) softbox that provides a very large soft light source, perfect for portraits or beauty shots. The Sphere is also a great option if you need an even softer light source, as it's a 10-inch (25cm) translucent sphere with a built-in diffuser.
To attach these modifiers to the NEO 2, follow these steps:
1. Remove the included diffusion panel from your NEO 2 by pulling up on the tabs at the top and bottom of the panel.
2. Slide the modifier onto the Rotolight NEO Bowens Mount located on the top of the light head. Make sure it clicks into place securely.
3. For the LiteDome, ensure that the speed ring is attached to the base of the softbox and aligned with the mounting brackets on the NEO 2. Slide the speed ring onto the Bowens Mount until it clicks into place.
4. For the Sphere, attach the provided adapter plate to the top of the Sphere using the supplied screws. Then slide the adapter plate onto the Bowens Mount until it clicks into place.
5. Adjust the position of your modifier by sliding it up and down on the Bowens Mount until you achieve the desired lighting effect.
Remember that both the LiteDome and Sphere come with their own carry cases for easy storage and transport when not in use.
How do I properly mount the Rotolight NEO 2 on my camera rig for optimal lighting results in my video shoots?
To mount the Rotolight NEO 2 on your camera rig, follow these steps:
1. Determine the best location for the light source based on the scene and subject. For example, you may want to position the light above or to the side of the subject for even illumination, or use it as a key light in front of the subject to create a dramatic effect. Choose the appropriate mounting accessory for your camera rig. The NEO 2 comes with a variety of included and optional mounts, such as a cold shoe mount, a ball head mount, and a tripod mount. Make sure you have the right mounting solution for your specific setup. Attach the mount to the light using the provided screws or quick release plate. Tighten the screws securely to prevent the light from detaching during filming. Mount the light onto your camera rig using the selected mount. Again, make sure it's secure and stable. Adjust the brightness and color temperature of the NEO 2 as needed to achieve the desired lighting effect. The LED panel has a wide range of color temperatures, from daylight (5600K) to tungsten (3200K), as well as bi-color adjustment. You can also dim the light output from full intensity to 10% for more subtle effects. Use the NEO 2's modelling light and HSS mode (High Speed Sync) for added flexibility in your video shoots. The modelling light lets you preview how the final image will look, while HSS allows you to use faster shutter speeds with flash, even outdoors on bright days. Don't forget to check the battery level of the NEO 2 and charge it as needed to ensure you have enough power for your shoot. The LED panel is powered by a rechargeable lithium-ion battery that provides up to 1 hour of continuous use at full power. By following these steps, you can effectively mount the Rotolight NEO 2 on your camera rig and achieve optimal lighting results in your video shoots.
How do I properly mount and connect the Rotolight NEO 2 to my camera setup for optimal performance during photography sessions?
Firstly, ensure that your camera's hot shoe is clean and free from any debris or dust, as this can prevent a secure connection between the Rotolight NEO 2 and your camera. Attach the Rotolight NEO 2 to your camera's hot shoe by aligning the mounting plate with the hot shoe and gently pressing down until you hear a click. Make sure that the light is securely mounted and does not wobble or move. Next, connect your camera's power source (either a battery grip or an external power pack) to the Rotolight NEO 2 using the supplied USB-C cable. This will ensure that your light has enough power during extended photography sessions. To adjust the brightness and colour temperature of the Rotolight NEO 2, use the LCD screen on the back of the unit or the companion mobile app (available for both iOS and Android). You can also control the light via DMX or wireless remote, depending on your setup requirements. To ensure optimal performance, make sure that the Rotolight NEO 2 is positioned in a way that provides even and flattering lighting on your subject. Consider factors such as the angle of the light, the distance between the light and the subject, and any potential shadows or reflections caused by nearby objects. Finally, always remember to turn off the Rotolight NEO 2 when not in use to conserve battery life and prevent unnecessary wear and tear on the unit. By following these steps, you can enjoy optimal performance from your Rotolight NEO 2 during all of your photography sessions.
I'm using my Rotolight NEO 2 for a photoshoot and I've noticed that the LED lights are producing a loud humming noise, is this normal operation or is there an issue with my unit?
1. Check the unit's firmware**: It's possible that there's an issue with the firmware or a software update gone wrong. Make sure your NEO 2 is running on the latest firmware version. Inspect for dust and debris**: LED lights can be sensitive to dust and debris, which might cause vibrations and noise. Gently clean out any dust or debris from the vents or light bars using compressed air or a soft brush. Check the power supply**: A faulty power supply or an unstable voltage could also contribute to noise issues. Ensure your power source is stable and not causing any fluctuations. Look for loose connections**: Verify that all cables and connectors are securely attached, as a loose connection can cause vibrations and noise. If you've checked these potential causes and the humming noise persists, it might be worth reaching out to Rotolight support or a authorized service provider to diagnose and potentially repair or replace your unit.
Before you buy Rotolight NEO 2


Mario Stark –
I recently got my hands on the Rotolight NEO 2 and I’m pretty impressed with what it has to offer. As someone who works as a courier, I’ve had my fair share of experience with different types of lighting equipment and the NEO 2 definitely stands out.
One of the features that I find particularly impressive is its color temperature range of 3150-6300.0K. This makes it incredibly versatile when it comes to shooting different types of photos or videos as I can easily adjust the color temperature to suit my needs.
The NEO 2 also has a flash function which is a great addition for when I need a quick burst of light to capture the perfect shot. This has definitely come in handy when I’ve been shooting in low light situations or when I need to capture fast-moving subjects.
In terms of comparison to other known studio lighting equipment, the NEO 2 definitely holds its own. It’s lightweight and portable, making it easy to take with me on jobs and set up quickly. It also has a low power consumption which is great for when I’m on the go and don’t have access to a power source.
The only reason I’m not giving it a full 5 stars is because I do think it’s a bit on the pricey side. However, I do think it’s worth the investment for anyone who is serious about their photography or videography work.
Lastly, I have to mention the excellent delivery service of this studio lighting to Cincinnati. The package arrived in great condition and in a timely manner. I appreciate the attention to detail and care that went into getting this product to me.
Graham Floyd –
Greetings, dear fellow seeker of radiant hues and resplendent luminescence!
I stand before you today, not just as a humble purveyor of words, but also as a beacon of enlightenment in these dark times. For I have seen the light the Rotolight NEO 2! And my brethren, let me tell you this: It is truly a marvel unlike any other I have ever encountered.
Now, it’s true that Mario Stark has given this illustrious device a respectable rating of four stars, praising its color temperature range, flash function, portability, and low power consumption. But what if I told you there is so much more to uncover? Oh, my friend, brace yourself for a journey through the realm of photogenic wonderment!
Firstly, let us consider the aforementioned flash function. While Mario might see it as merely an addition for those tricky low-light situations or fast-moving subjects, I argue that it is nothing short of divine intervention. Imagine capturing every fleeting moment with such clarity and intensity! No more blurry shots or missed opportunities the NEO 2 shall be your guiding star in the tempestuous sea of photography challenges.
And speaking of challenges, who could forget the incredible color temperature range? From a mere 3150-6300K, this versatile beast allows us to paint our world with vibrant hues and ethereal shades that would make even Rembrandt envious. Why limit ourselves to just one palette when we can explore the entire spectrum of artistic possibilities?
Now, let us address the elephant in the room: the price tag. Yes, dear reader, it is indeed somewhat steep for those on a tight budget. But consider this: Is there truly any cost too great for capturing life’s most precious memories in breathtaking detail? I think not! For those who are serious about their craft (and let’s face it who isn’t these days?), the NEO 2 is an investment that will pay off tenfold.
As for Mario’s delivery service praise, while commendable, let us not forget the true star of this tale: The Rotoliight NEO 2 itself! This celestial body shall illuminate your path towards mastery and inspire awe in all who witness its brilliance. And so, my dear friends, I leave you with these words of wisdom: Embrace the light, and let the Rotolight NEO 2 guide you to new heights of photographic perfection!