Joby HandyPod

$7.99

Capture and share your best moments on the go with the Joby HandyPod, the lightweight and powerful tripod for your smartphone!

Description

Joby HandyPod: The Innovative Tripod for On-the-Go Photographers

Photography is an art that requires a lot of patience, focus, and equipment. In the field of photography, the tripod is one of the essential tools that every photographer needs to produce high-quality images. However, finding a suitable tripod can be a task, as it requires a balance between weight, stability, and portability. Thankfully, the Joby HandyPod tripod offers just that.

Introducing the Joby HandyPod

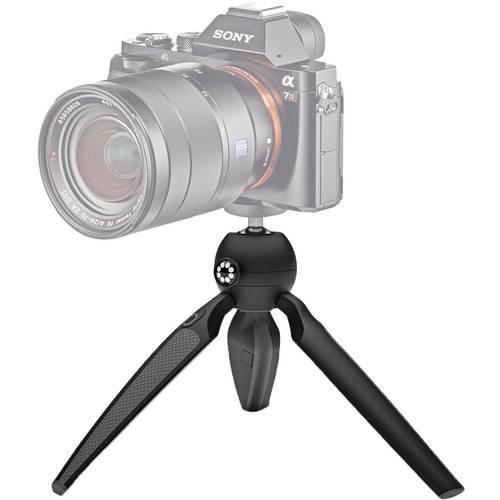
The Joby HandyPod is a lightweight, portable, and compact tripod designed to cater to the needs of on-the-go photographers. Joby has been a popular brand in the world of tripods, and their latest offering does not disappoint. The HandyPod is designed with a ball head that allows for a range of motion, making it easy to set up shots at various angles.

Portability

The Joby HandyPod is designed to be extremely portable, making it ideal for those who love to capture photographs on the go. It weighs only 0.15kg, making it easy to pack and take along on your travels. The legs can be folded down, reducing the size even further, making it easy to store in your backpack, purse, or luggage. The foldable design does not compromise its stability, ensuring you get the same quality images as with other larger and bulkier tripods.

Compatibility

The Joby HandyPod is compatible with a wide range of cameras and accessories, making it an ideal choice for those who own multiple cameras. With a weight capacity of up to 1kg, the tripod can support various types of cameras, including DSLRs, mirrorless cameras, and smartphones. The HandyPod also features a standard ¼-inch screw, making it easy to attach your camera or any accessory firmly.

Stability

The HandyPod may be compact and lightweight, but it is incredibly stable. Designed with three legs that feature rubber feet, the tripod offers a secure and stable base when taking photos. The legs can be adjusted to different angles to help create the perfect shot or to steady the tripod on uneven surfaces.

Overall, the Joby HandyPod is an excellent investment for those who love taking photographs on the go. Its portability, compatibility, and stability make it an ideal tripod for any type of outdoor photography. The next time you plan on hitting the road, take the Joby HandyPod with you and capture stunning, high-quality images that will be the envy of all your friends.

Aluminium, Plastic, Steel Tripod, Tripod Head, Ball Head

Joby HandyPod properties

Product name HandyPod
Type of Tripod Tripod, Tripod Head
Camera Thread 1/4″ -20 UNC
Suitable Usage Photo, Video
Tripod Head Typ Ball Head
Material Aluminium, Plastic, Steel
Height 19.0 cm
Load Capacity 1.0 kg
Weight 0.185 kg

Additional information

Product name

Type of Tripod

,

Camera Thread

Suitable Usage

,

Tripod Head Typ

Material

, ,

Height

Load Capacity

Weight

Reviews

There are no reviews yet.

Be the first to review “Joby HandyPod”

Your email address will not be published. Required fields are marked *

Frequently Asked Questions:

"How do I attach my camera to the HandyPod and use it as a stabilizer while shooting videos?"

Firstly, ensure that your camera has a standard ¼-20 thread on the bottom. Most modern cameras do, but if you're not sure, check your camera's manual for confirmation. Mount your camera onto the HandyPod by screwing it into the ¼-20 thread on the top of the stabilizer. The camera should be secured firmly in place and centered over the center of gravity of the HandyPod. Turn on your camera and ensure that it's set to video mode. Check if the stabilization settings are enabled or disabled; most cameras nowadays have an option to activate image stabilization, so check for that feature as well. Hold the HandyPod firmly in your dominant hand and adjust the position of the camera to frame your shot correctly. Adjust the orientation of the camera based on your needs - landscape or portrait mode. When you're ready to start shooting, gently press the record button on your camera while keeping the HandyPod steady and level. The stabilization feature will kick in as soon as you begin rolling your video. Walk around slowly with the HandyPod while holding it at waist or chest height. The HandyPod's rubber grips and ball-joint head will allow for fluid, smooth movements that are free from unwanted jerks and shakes. After finishing your shot, press stop on your camera and remove it from the stabilizer carefully to prevent any potential damage to your equipment. That's it! You now know how to attach your camera to the HandyPod and use it as a stabilizer while shooting videos. Remember that practice makes perfect, so keep trying out different techniques and shots until you feel confident with this device.

How do I properly attach my camera to the Joby HandyPod tripod?

To attach your camera to the Joby HandyPod tripod, follow these simple steps:
1. Begin by extending the legs of the tripod to the desired length. You can adjust the height and angle of each leg independently for added flexibility. Make sure your camera is securely mounted in your chosen mounting device, such as a ball head or quick release plate. Attach the mounting device to the top of the HandyPod tripod using the threaded screw on the center column. Adjust the position and angle of the HandyPod tripod until you've achieved the desired composition for your shot. Securely tighten both the mounting plate and the center column screw to ensure a stable and sturdy hold for your camera. Finally, check that everything is tightly secured before beginning your shoot.

"How do I attach my camera to the Joby HandyPod tripod?"

To attach your camera to the Joby HandyPod tripod, follow these simple steps:
1. Make sure your camera has a standard 1/4-20 thread on the bottom for attaching to a tripod. Most cameras do. Locate the mounting plate on the top of the HandyPod. It's a small ball with a screw in the center. Loosen the screw by turning it counterclockwise (to the left). You may need a small coin or flathead screwdriver to get a good grip. Place your camera onto the mounting plate, making sure the lens is centered and level. Tighten the screw on the mounting plate until your camera is securely attached to the HandyPod. Be careful not to overtighten, as this can damage the threads on your camera or the mounting plate. Adjust the legs of the HandyPod to your desired height and angle, then use the ball joint at the top of the tripod to further refine the position of your camera. Press the button on the remote shutter release (included with the HandyPod) to take your photo or video, or use the timer function on your camera to avoid camera shake. When you're done shooting, loosen the screw on the mounting plate and lift your camera off the HandyPod. Store the HandyPod in its carrying case for safekeeping. Remember, the Joby HandyPod is designed to be a versatile and compact tripod that can go wherever you do. It's lightweight, durable, and easy to use, so you can capture your best shots from any angle.

How do I properly attach my camera to the Joby HandyPod tripod for stable and secure photography?

To attach your camera to the Joby HandyPod tripod for stable and secure photography, follow these steps:
1. Extend the legs of the tripod to your desired height. Loosen the quick release plate by turning the knob on the side of the plate counterclockwise. Align the quick release plate with the camera's tripod mounting screw and tighten the knob on the side of the plate clockwise until secure. Adjust the legs to your desired angle for stability. Tighten any additional leg locking mechanisms if necessary. Gently press down on the bubble level located in the center of the quick release plate to ensure it is level. Hold onto the HandyPod's handle and compose your shot. Release the handle and use the bubble level as a guide to make any necessary adjustments for optimal stability and composition. Remember, the Joby HandyPod tripod is designed to provide stable support in a variety of situations, but always prioritize safety and use common sense when working near water or on uneven terrain.

My tripod won't level properly, is this due to an issue with the bubble level or with my floor being uneven?

* Worn-out or damaged seals that have caused the liquid inside to leak out. Improper calibration during manufacturing. Dirt or debris accumulation inside the device. However, if you've recently cleaned and checked your tripod's bubble level, it's less likely to be the culprit. Now, let's turn our attention to the possibility of an uneven floor. This is a more plausible explanation for several reasons:

* Floors can become uneven due to various factors such as settlement, foundation issues, or even slight shifts in the building's structure over time. Tripsods are often placed on floors that have been subjected to heavy use, which can cause wear and tear leading to unevenness. To determine if your floor is indeed uneven, you could try using a separate leveling device, such as a laser level or a long straightedge. If the results indicate that your tripod is sitting on an uneven surface, it's likely that this is the root of the problem. In conclusion, while a faulty bubble level cannot be ruled out entirely, an uneven floor seems to be a more plausible explanation for your tripod not leveling properly.

Related Products