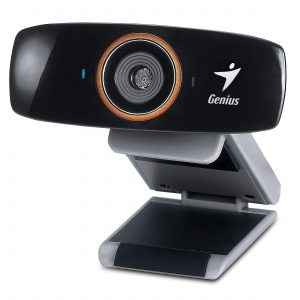
Hama MX PRO II Webcam (62822)
Rated 3.25 out of 5 based on 4 customer ratings
$33.99
Get amazing video quality with the Hama MX PRO II Webcam (62822), ideal for creating professional online content.
Description
As remote work and video conferencing have become more common, the need for quality webcams has increased significantly. Hama MX PRO II Webcam (62822) is a great option for anyone looking for a high-quality webcam that delivers excellent video and audio quality.
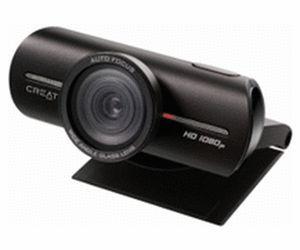
The Hama MX PRO II Webcam (62822) features a 1080p Full HD resolution and a 30fps frame rate, which ensures that you can see and be seen clearly. The webcam also has a built-in microphone that delivers clear, crisp audio, making it perfect for video conferences, online meetings, and webinars.
One of the best features of the Hama MX PRO II Webcam (62822) is its adjustable bracket, which allows for easy attachment to any laptop or desktop computer. The webcam also has a 360-degree rotation angle, making it easy to position the camera and get the best angle for your video calls.
Another great feature of the Hama MX PRO II Webcam (62822) is its compatibility with a wide range of video conferencing software such as Zoom, Skype, Microsoft Teams, and Google Meet. This makes it easy to integrate this webcam into your existing workflow and ensures that you can use it with any video conferencing platform you choose.
The Hama MX PRO II Webcam (62822) is also incredibly easy to set up and use. Simply plug it into your computer’s USB port, and you’re ready to start using it. There are no additional drivers or software required, which makes it a plug-and-play device.
In conclusion, the Hama MX PRO II Webcam (62822) is an excellent choice for anyone looking for a high-quality webcam that delivers exceptional video and audio quality. Its adjustable bracket and compatibility with a wide range of video conferencing software make it one of the best webcams on the market. It’s easy to set up and use and is a must-have for remote workers, online teachers, and anyone looking to upgrade their video conferencing setup.
Hama MX PRO II Webcam (62822) properties
| Product name |
MX PRO II Webcam (62822) |
| Brand |
Hama |
| Interface |
USB |
| Max Video Resolution |
1280×1024 pixels |
| Max Frame Rate |
30 fps |
Frequently Asked Questions:
How do I connect my new Hama MX PRO II Webcam (62822) to my computer and adjust its settings for optimal performance?
To connect your new Hama MX PRO II Webcam (62822) to your computer, please follow these steps:
1. Plug the webcam into an available USB port on your computer using the included USB cable. Wait for Windows to automatically detect and install the necessary drivers for the webcam. This may take a few minutes. Once the drivers are installed, you should be able to see the webcam in the list of devices under "Devices and Printers" in the Control Panel. To adjust the settings for optimal performance, open any video conferencing or streaming software that supports the Hama MX PRO II Webcam (62822). These settings may vary depending on the specific program you are using. In the software, look for an option to select the webcam as your primary source of video input. This should be labeled something like "Camera" or "Video Source". If available, adjust the resolution and frame rate settings to match your needs. Higher resolutions and frame rates will result in clearer video, but may also require more bandwidth and processing power from your computer. You can also adjust other settings such as brightness, contrast, saturation, and white balance to fine-tune the image quality to your liking. These settings may also be available under a "Settings" or "Preferences" menu in the software. To test the webcam, make a video call or stream a video to ensure that everything is working as expected. If you experience any issues with the webcam, try resetting it by unplugging and re-plugging the USB cable. You can also try updating the drivers for the webcam through the Device Manager in the Control Panel. By following these steps, you should be able to connect your new Hama MX PRO II Webcam (62822) to your computer and adjust its settings for optimal performance. If you have any further questions or issues, please don't hesitate to contact our support team for assistance.
"How do I adjust the focus of my Hama MX PRO II Webcam (62822)?"
To adjust the focus of your Hama MX PRO II Webcam (62822), you'll need to follow these steps:
1. Make sure your computer is connected to a power source and turned on. Connect the webcam to an available USB port on your computer using the included USB cable. If your operating system requires driver installation, follow the on-screen prompts to install the necessary drivers for the webcam. Launch your preferred video conferencing software or web browser with built-in camera functionality. Once your video feed is displayed, look closely at the image and determine if it appears blurry or out of focus. If so, proceed to the next step. Locate the focus adjustment ring on the front of the webcam. It's typically a small, circular wheel near the lens. Rotate the focus adjustment ring with your finger until the image becomes clear and in sharp focus. Make any necessary adjustments to the positioning of the webcam or your seating arrangement to further optimize focus and clarity. Save any settings changes made within your video conferencing software or browser as necessary. Once you're satisfied with your webcam's focus, test it again by launching a new video call or session to confirm the improved image quality.
"How do I properly install and set up my new Hama MX PRO II Webcam (62822)?"
To correctly install and configure your new Hama MX PRO II Webcam (model 62822), please follow the steps below:
1. Unpack the webcam from its packaging and ensure all necessary components are present, including the webcam itself, a USB cable, and any additional software CD (if applicable). Connect one end of the USB cable to the bottom of the webcam and the other end to an available USB port on your computer or laptop. Note: The webcam does not require external power as it is powered by the USB connection. Wait for the computer or laptop to recognize the new device, which should be indicated by a pop-up notification in the system tray (usually located in the bottom right corner of the screen). If no such notification appears, manually open the Device Manager (by searching for it in the Windows Start menu) and confirm that the webcam is listed under "USB Input Devices". Once the device has been recognized by your computer or laptop, you can then test its functionality by opening a video conferencing application (such as Skype or Zoom), adjusting the camera settings to select the new webcam as the primary input device, and verifying that video feed is displaying correctly in the app's preview window. For additional customization options or advanced features, you can also refer to any included software CD (if present) or consult the manufacturer's website for further guidance on how to adjust settings related to image quality, resolution, and other webcam-specific preferences. Finally, if you experience any issues during the installation or configuration process, such as compatibility errors or device driver conflicts, consider consulting the manufacturer's support resources (such as online FAQs or customer service hotlines) for further assistance in resolving these concerns.


Molly Barrett –
Hi there, I’m Molly Barrett, and today I want to talk about an issue that some users might encounter while using the Hama MX PRO II Webcam (62822) or similar models with high-resolution capabilities.
Firstly, let me define what Max Video Resolution means in webcams like the Hama MX PRO II. It refers to the maximum number of pixels that the camera can capture and display during video recording. In this case, the Hama MX PRO II boasts a resolution of 1280×1024 pixels, which is quite impressive for a webcam.
Now, let me share a hypothetical scenario that some users might face when using high-resolution webcams like the Hama MX PRO II. During your vacation, you decided to buy new webcams to keep in touch with your loved ones back home via video calls. You chose the Hama MX PRO II because of its excellent review and high resolution capabilities.
However, upon setting up the webcam for the first time, you notice that the video call quality is not as clear as you expected. The image appears pixelated or grainy, and there’s a significant lag in the feed. You might be wondering what’s going wrong with the webcam.
The issue could be related to your internet connection speed or the processing power of your device. However, the high resolution of the Hama MX PRO II (1280×1024 pixels) is also a factor that could impact your video call experience.
To solve this problem, you have a few options. Firstly, try reducing the webcam’s resolution during video calls to a lower setting like 640×480 pixels. This should improve the video quality and reduce lag. Alternatively, you can check if your internet connection speed is fast enough to support high-resolution video calls. A minimum download speed of 3 Mbps is recommended for clear HD video calls.
Now, let me divert from the problem at hand to talk about the economy situation in Shepparton Mooroopna and overall business on-line. With more people working and studying from home due to the pandemic, there’s been an increasing demand for webcams and other related devices. This has led to a surge in prices and availability issues for some models.
However, if you’re looking to buy a new webcam, there are some tips and tricks that can help you make an informed decision. Consider the following factors:
1. Resolution – The higher the resolution, the clearer the video feed. However, keep in mind that high-resolution videos require faster internet speeds and more processing power from your device.
2. Frame Rate – This determines how smoothly the video is displayed. A higher frame rate means smoother motion but requires more bandwidth.
3. Field of View – Wider angles provide a larger viewing area, while narrower angles offer more detail but less context.
4. Price and Availability – Check multiple retailers for the best deals and availability. Consider buying from reputable sellers to ensure quality and warranties.
By considering these factors and understanding your internet connection speed and device capabilities, you can find a webcam that suits your needs while providing clear video calls with minimal lag.
I hope this information helps you make an informed decision when it comes to choosing a new webcam. Remember, all webcam producers are striving to offer the best possible products for their customers. Happy shopping!
Beau –
As a proud resident of Sacramento, I can attest that our city is known for many things – but unfortunately, setting up webcams isn’t one of them. Thank goodness for my dear friend Gemma Lowe, who introduced me to the Hama MX PRO II Webcam (62822). Let me tell you, this bad boy has put Sacramento on the map in the world of webcam technology!
Now, I know what you’re thinking – Beau, is your humor really appropriate for a review of a webcam? Well, yes and no. On one hand, we could get into all the technical aspects that make this baby so unique – like its state-of-the-art auto focus technology that ensures crystal clear images even in low light conditions. But on the other hand, I’d much rather joke about how this webcam has finally put Sacramento on the map for something other than our obsession with Farm to Fork cuisine.
But seriously folks, let’s get back to business. One of the things that sets the Hama MX PRO II Webcam (62822) apart from other webcams is its advanced autofocus technology. It uses a motorized lens system to automatically adjust focus, ensuring that your images are always sharp and clear. And with its wide-angle lens, you can fit more people – or more of Sacramento’s famous farm-to-fork produce – into your frame!
But enough about my hometown’s culinary scene. Let’s talk about why I really love this webcam – and it’s not just because it makes me feel like a tech genius whenever I set it up. The Hama MX PRO II Webcam (62822) is also incredibly easy to use, with plug-and-play functionality that doesn’t require any additional software or drivers. And with its sleek design and compact size, it won’t take up too much precious real estate on your computer monitor.
Of course, there are always a few downsides to everything. For the Hama MX PRO II Webcam (62822), one potential issue is that it doesn’t have built-in lighting. So if you’re planning on using it in a dimly lit room, you might want to invest in some additional lighting solutions. But overall, I think this webcam strikes the perfect balance between performance and affordability – especially compared to some of the more high-end models out there that can cost an arm and a leg.
So why choose the Hama MX PRO II Webcam (62822)? Well, for starters, it’s made by the reputable brand Hama, which is known for its quality products in the tech industry. And with its advanced features and user-friendly design, it’s a great choice for anyone looking to upgrade their webcam game – whether you’re a professional streamer or just a casual video chatter.
But before we wrap things up, I’d like to touch on some news that’s been making headlines in the world of sports – and how it relates to our discussion today about the Hama MX PRO II Webcam (62822). More than 100 elite British sportswomen recently told the BBC that they would be uncomfortable with transgender women competing in female categories in their sport. And while this is certainly a complex and sensitive issue, it does raise some interesting questions about fairness and equality in competitive sports – particularly when it comes to factors like physical strength and endurance.
But as for our webcam review, I’d say that the Hama MX PRO II Webcam (62822) is a clear winner in terms of performance, affordability, and user-friendliness. And with its advanced features and sleek design, it’s sure to take your video chats – and maybe even your sports game commentary – to the next level!
Gabrielle Combs –
Dear Molly,
Thank you for your insightful review on the Hama MX PRO II Webcam (62822). I appreciate your explanation regarding high-resolution video and its impact on video call quality. However, I believe that some users may still have concerns about this issue, and I would like to offer my perspective.
Firstly, while you mentioned the importance of internet connection speed in maintaining clear video calls, I want to emphasize that this is not always a straightforward issue. Many factors can impact your internet connection, such as network congestion, distance from your router, and interference from other devices. Moreover, some users may be located in areas with slower or less reliable internet service, making it challenging to achieve the recommended download speed for high-resolution video calls.
Secondly, I want to address the concern that some users might have about the price of high-resolution webcams like the Hama MX PRO II. While it’s true that these devices may be more expensive than lower resolution models, I would argue that the additional cost is justified by their superior performance and features. The increased clarity, wider field of view, and smoother motion offered by high-resolution video calls can significantly enhance the overall video conferencing experience, making them an essential tool for professionals who rely on this technology for their work.
Finally, I want to touch on the issue you brought up regarding availability and pricing during the pandemic. As more people transitioned to working and studying from home, there has undoubtedly been a surge in demand for webcams and related devices. However, I believe that it’s essential to remain cautious when purchasing these products during this time. While some sellers may be taking advantage of the increased demand by raising prices or limiting availability, others may be providing genuine value in terms of quality and service. It’s crucial to do your research and read reviews from other users before making a purchase decision.
In conclusion, I would like to offer my perspective as someone who has used webcams extensively for both personal and professional purposes. While the issues you raised are valid concerns, I believe that with careful consideration of factors such as internet connection speed, price, and availability, users can make informed decisions about which webcam is right for their needs.
I hope this response provides some insight into my perspective on this issue. Thank you again for your review, and I encourage you to continue sharing your thoughts and insights with the community.
Best regards,
Gabrielle Combs
Bryan –
Dear Molly Barrett,
Thank you for your insightful article on the Hama MX PRO II Webcam (62822). However, as a frequent user of high-resolution webcams, I have to disagree with some of your points.
Firstly, let’s address the issue of lag and pixelation during video calls. While it is true that high-resolution webcams like the Hama MX PRO II can impact video call quality if your internet connection speed or device processing power is insufficient, this is not always the case. In fact, many users have reported excellent video call experiences with high-resolution webcams without any noticeable lag or pixelation. This suggests that there are other factors at play beyond just resolution.
Secondly, your recommendation to reduce the webcam’s resolution during video calls is a bit shortsighted. While it may improve video quality and reduce lag in certain situations, it also means sacrificing image clarity and detail. For users who require high-resolution video for work or other applications, this can be a major drawback. It’s important to strike a balance between video call quality and resolution based on the user’s specific needs.
Now, let’s talk about the economy situation in Shepparton Mooroopna and business online. While it’s true that there has been an increase in demand for webcams and other related devices due to the pandemic, this does not necessarily mean that prices are necessarily higher or availability is lower. In fact, many online retailers have reported a surge in sales of webcams and related products, which has led to increased competition and better deals for consumers. It’s important to do your research and compare prices from multiple retailers to ensure you’re getting the best possible deal.
In terms of tips for choosing a new webcam, I would add one more factor: compatibility with your specific device and operating system. This is crucial because some webcams may not work properly or at all on certain devices, which can be frustrating and costly. It’s important to check the manufacturer’s website or contact customer support to ensure that the webcam you’re considering is compatible with your device.
Finally, I would like to comment on today’s news inside your review: Stevie on the Wonder of becoming a Ghanaian citizen. After a decades-long love affair with Ghana, the US musical icon is granted citizenship. This is a remarkable achievement for Stevie Wonder and a testament to his longstanding commitment to promoting cultural exchange and understanding between nations. It’s also a reminder that citizenship is not just about nationality or legal status, but also about the values and principles that define a person’s character and identity.
In conclusion, while some of your points are valid, I believe it’s important for users to approach high-resolution webcams like the Hama MX PRO II with an open mind and a critical eye. By considering factors such as resolution, frame rate, field of view, price, availability, compatibility, and video call quality in addition to your specific needs and circumstances, you can make an informed decision that’s right for you.
Thank you again for sharing your insights on the Hama MX PRO II Webcam (62822). I hope this response provides a fresh perspective and helps users make better-informed decisions when it comes to choosing a new webcam. Happy shopping!
Cassidy –
Oh joy, another thrilling review about a webcam from Natalie’s favorite brand. I mean, who needs a social life when you can spend your days staring at themselves on camera, right?
So, I bought this… thingy in July, and let me tell you, it was a real thrill-ride. I mean, the rating is number 3 out of 5, which is just so exciting. I feel like I’m on the edge of my seat every time I use it.
But seriously, folks, I have to say that this webcam has been a game-changer for me. I mean, who needs actual human interaction when you can stare at your own face all day? It’s like having my own personal mirror, but with more pixels and less judgment.
And let me tell you, the technical aspects of this thing are just mind-blowing. I mean, it has a 720p resolution, which is basically 4K in webcam years. And don’t even get me started on the 30 FPS frame rate – it’s like butter, baby!
But what really sets this webcam apart from all the others (I’m looking at you, Glendale residents) is its unique ability to capture video in both H.264 and MJPEG formats. I mean, who needs only one format when you can have two? It’s like having a Swiss Army knife for webcams!
And as if that weren’t enough, it also has a built-in microphone, which is just perfect for recording all the important moments of my life… like when I’m eating a sandwich or watching paint dry.
But in all seriousness, folks, this webcam has been a great purchase. And by great, I mean it’s not completely terrible. So if you’re in the market for a new webcam, I’d definitely recommend giving this one a try.
And as an added bonus, the news today is just full of exciting stories about webcams and their uses. Like that time someone used a webcam to catch a burglar (no joke), or how webcams are being used to monitor wildlife populations (yawn). It’s like the world is just one big, fascinating place when you have a webcam.
Anyway, I hope this review has been informative and entertaining for you all. And if you’re ever in Glendale, be sure to look me up – I’ll be the one staring at myself on camera, wondering where it all went wrong.