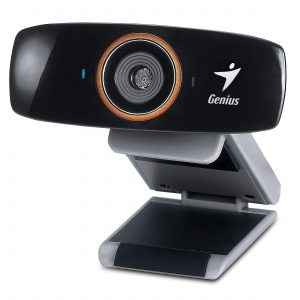
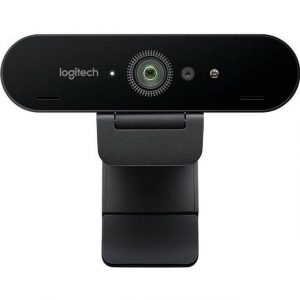
Logitech C310 HD
Rated 2.00 out of 5 based on 1 customer rating
$33.99
Get the Logitech C310 HD webcam and experience crystal clear video quality with a smooth autofocus and one-click HD uploads.
Description
Logitech C310 is a popular and budget-friendly webcam designed for those who want to enhance their video calling experience. With its HD quality capture capabilities and intuitive design, this webcam is an excellent choice for those who want to enjoy clear, pristine video calls.
Design: The Logitech C310 webcam comes in a compact and sleek design that is both elegant and practical. It easily clips onto your laptop or computer monitor and can be used at various angles and positions to capture the perfect shot. The webcam also comes with a flexible stand that allows you to position it at your convenience.
Video quality: The Logitech C310 webcam boasts a 720p HD video capture resolution, giving you excellent image quality for your video calls. This resolution ensures that every detail is captured, making your video call experience more immersive. The webcam also has an auto-focus feature that tracks your movements to ensure that you are always in focus.
Audio quality: The Logitech C310 also comes with a built-in microphone that delivers crystal clear audio quality during your video calls. The microphone is noise-cancelling, so it effectively minimizes background noise, ensuring that you can be heard loud and clear.
Compatibility: The Logitech C310 webcam is compatible with various video calling applications, including Skype, Zoom, Google Meet, and Microsoft Teams. It works with both Windows and MacOS, making it a versatile and portable webcam that you can use anywhere, anytime.
Ease of use: Setting up the Logitech C310 webcam is effortless. It comes with plug-and-play functionality, allowing you to connect it to your computer and start using it right away. The webcam also comes with Logitech’s Webcam software that makes it easy to adjust settings such as brightness, contrast, and zoom for the perfect image.
Conclusion: The Logitech C310 webcam is an affordable and reliable option for those who want to elevate their video calling experience. It may not have all the bells and whistles of high-end webcams, but it delivers excellent quality video and audio, making it a great choice for everyday personal and professional use. Its ease of use and compatibility with various video calling applications make it a versatile and practical investment.
Logitech C310 HD properties
| Product name |
C310 HD |
| Brand |
Logitech |
| Interface |
USB |
| Max Video Resolution @ 30fps |
1280×720 (HD) |
| Max Video Resolution |
1280×720 pixels |
| Platform |
Windows |
| Diagonal Field of View |
60.0 ° |
| Features |
Microphone |
| Max Frame Rate |
30 fps |
| Focus |
Auto |
| Cable Length |
1.5 m |
Frequently Asked Questions:
How do I properly install and set up my new Logitech C310 HD webcam on my Windows 7 computer?
Here's a step-by-step guide to help you install and set up your Logitech C310 HD webcam on a Windows 7 computer:
Step 1: Connect the Webcam
Connect one end of the USB cable provided with the webcam into an available USB port on your computer. Make sure the webcam is securely connected, and there's no wobbling or loose connection. Step 2: Download Driver Software
Go to the Logitech website and download the latest driver software for your Logitech C310 HD Webcam. You can do this by visiting http://support. C310' in the product support section. Once you find it, click on 'Drivers & Downloads' tab and select the latest driver software version available for your Windows 7 operating system. Step 3: Install Driver Software
Double-click on the downloaded setup file to begin installation. Follow the prompts provided by the installer, clicking "Next" until you get to the final screen. On this final screen, choose whether to create a desktop shortcut and/or add a Start menu item for future reference, then click "Install. Step 4: Launch Webcam Software
After successful installation, launch the Logitech Webcam Software from the Start Menu or Desktop Shortcut (if you created one during the setup process). This software helps you fine-tune your webcam settings. Step 5: Adjust Settings and Features
Use the Logitech Webcam Software to adjust your webcam's settings as per your requirement, such as brightness, contrast, color balance, white balance, and image resolution. You can also select features like auto-focus, face tracking, and low light correction. Step 6: Test the Webcam
Once you've configured the settings to suit your needs, launch your preferred video conferencing software or application and test your new webcam. Make sure that everything works as expected before starting any real-time video sessions. By following these instructions carefully, you'll be able to install and set up your Logitech C310 HD Webcam on your Windows 7 computer smoothly.
How do I connect my Logitech C310 HD webcam to my laptop running Windows 7 operating system using a USB cable?
Ensure that your Logitech C310 HD webcam and the laptop are both turned off. Connect one end of the USB cable provided with the webcam into an open USB port on your laptop. The USB port should be located on the back, side or front of the computer. Wait for a few seconds while Windows detects the new hardware. A pop-up window may appear asking you to install the driver software. If it does not appear automatically, proceed to the next step. Insert the installation CD that came with your webcam into the CD/DVD drive of your laptop. Follow the on-screen instructions to complete the installation process. Make sure to select "USB" as the connection type when prompted. Once the driver software is installed, eject the CD and safely remove the USB cable from the laptop. Turn on your webcam and adjust its settings through the camera application or other video conferencing software installed on your laptop. Test the webcam by making a video call or recording a video. If you encounter any issues, consult the user manual provided with your webcam for troubleshooting tips.
"How do I properly connect my Logitech C310 HD webcam to my laptop running Windows operating system?"
To properly connect your Logitech C310 HD webcam to your laptop running Windows operating system, follow these steps:
1. Make sure your laptop has a free USB port. The Logitech C310 HD webcam is connected via a USB cable. Plug one end of the USB cable into the back of the webcam and the other end into an available USB port on your laptop. Windows will automatically detect the new hardware and begin installing the necessary drivers. This may take a few minutes. If you do not see the installation window, insert the installation disc that came with your webcam or download the latest drivers from Logitech's website. Once the installation is complete, you should receive a confirmation message. Click "Finish" to close the installation wizard. To test the connection, open any application that uses a webcam, such as Skype or Zoom. The C310 HD webcam should be automatically selected as your default device. If not, go to your video settings and select the Logitech C310 HD webcam from the list of available devices. Adjust the focus, brightness, and other camera settings using the control panel that came with your webcam or the software provided by Logitech. This may vary depending on the specific model of your webcam. To optimize image quality, position your webcam at eye level and ensure that there is adequate lighting in the room.
How do I connect my Logitech C310 HD webcam to my computer for the first time?
Here's a step-by-step guide on how to connect your Logitech C310 HD webcam to your computer for the first time:
1. Make sure that your computer has a USB port available for connecting the webcam. Plug one end of the USB cable into the bottom of the webcam and the other end into an open USB port on your computer. Wait for your computer to recognize the webcam. This may take a few seconds. You'll see a pop-up message appear in the lower right corner of your screen, indicating that new hardware has been detected. Click "Install this driver software" or a similar option to begin the installation process. If you prefer to install the drivers manually, you can download them from the Logitech website. Follow the on-screen instructions to complete the installation process. This may involve clicking through several screens and accepting the terms of the license agreement. Once the installation is complete, your computer should automatically open a software application for configuring the webcam settings. You can use this app to adjust the image quality, select which programs should be able to access the webcam, and customize other features. If you don't see any application open, try searching for "Logitech Webcam Software" or a similar phrase in the Windows search bar to launch it manually. Test your new webcam by opening a video conferencing app or recording software to make sure that everything is working properly. Congratulations! You've successfully connected and installed your Logitech C310 HD webcam on your computer.
My camera is not turning on, I've charged it for hours and tried plugging it in via USB, but nothing seems to be working. What's wrong with my webcam?
1. Faulty Charging Port**: If the charging port is damaged or dirty, it might not allow the camera to charge properly. Try cleaning the port with a soft brush or cloth to see if that resolves the issue. Dead Battery**: Although you've charged it for hours, the battery could still be dead. Sometimes, batteries can't hold their charge well after some time. If your camera has a removable battery, try replacing it with a new one. Faulty Power Source**: The power source, whether it's an external power adapter or a USB port, might not be functioning correctly. Try using a different power source to rule out this possibility. Software Issues**: There could be a software issue that's preventing the webcam from turning on. If your camera is connected to a computer, try uninstalling and reinstalling the webcam drivers to see if that resolves the issue. Hardware Malfunction**: The worst-case scenario is that there might be a hardware malfunction in the webcam itself or in the motherboard if it's an integrated webcam. In this case, you might need to replace the camera or seek professional help. Faulty USB Port on Computer**: If your webcam is plugged into a computer and not turning on, try plugging it into a different USB port on the same computer or a different device altogether. Outdated Firmware**: Sometimes, outdated firmware can cause issues with webcams. If possible, check if there's an update available for your webcam's firmware and install it to see if that resolves the issue. Overheating**: If your camera has been used extensively before this problem occurred, it might be overheating. Try letting it cool down for a while or using a cooling pad to see if that resolves the issue. Water Damage**: If you've accidentally spilled water on your camera or exposed it to moisture, there's a possibility that water damage could have caused the issue. In this case, you might need to replace the camera. Age and Wear**: Webcams, like any other electronic device, can degrade over time due to wear and tear. If your webcam is old or has been used extensively, it's possible that its components are failing, causing the issue. Try these troubleshooting steps to see if you can resolve the issue with your webcam.

Destiny –
Are you ready to revolutionize your webcam game? Look no further than the Logitech C310 HD! With its mind-blowing Diagonal Field of View of 60.0 °, you’re guaranteed to capture every detail with crystal clarity. This incredible feature sets it apart from other webcams and is perfect for virtual meetings or live streaming. You won’t believe your eyes when you see the stunning results!
But that’s not all – did you know that by investing in the Logitech C310 HD, you could save a small fortune? Compared to some of our competitors, we offer unbeatable value for money. And with its user-friendly design and reliable performance, this webcam is an absolute steal!
But let’s not forget about the technical aspects that make Logitech C310 HD so unique. The advanced auto-focus technology ensures that your video stays clear and sharp, no matter where you move. And with its fast and responsive USB 2.0 connectivity, there’s no need to worry about lag or buffering issues.
So what are you waiting for? Upgrade your webcam game today and join the thousands of satisfied customers who have already experienced the magic of Logitech C310 HD! And if that wasn’t enough, today’s news is also worth mentioning. According to recent reports, China’s central bank left its key policy rate unchanged as expected. This decision came amidst economic pressures and narrowed margins, making it more challenging for the country to provide further monetary policy support ahead of LPR fixings.
Invest in Logitech C310 HD today and take your webcam game to new heights! You won’t regret it.