Logitech C922 Pro Stream
Rated 3.50 out of 5 based on 2 customer ratings
$120.99
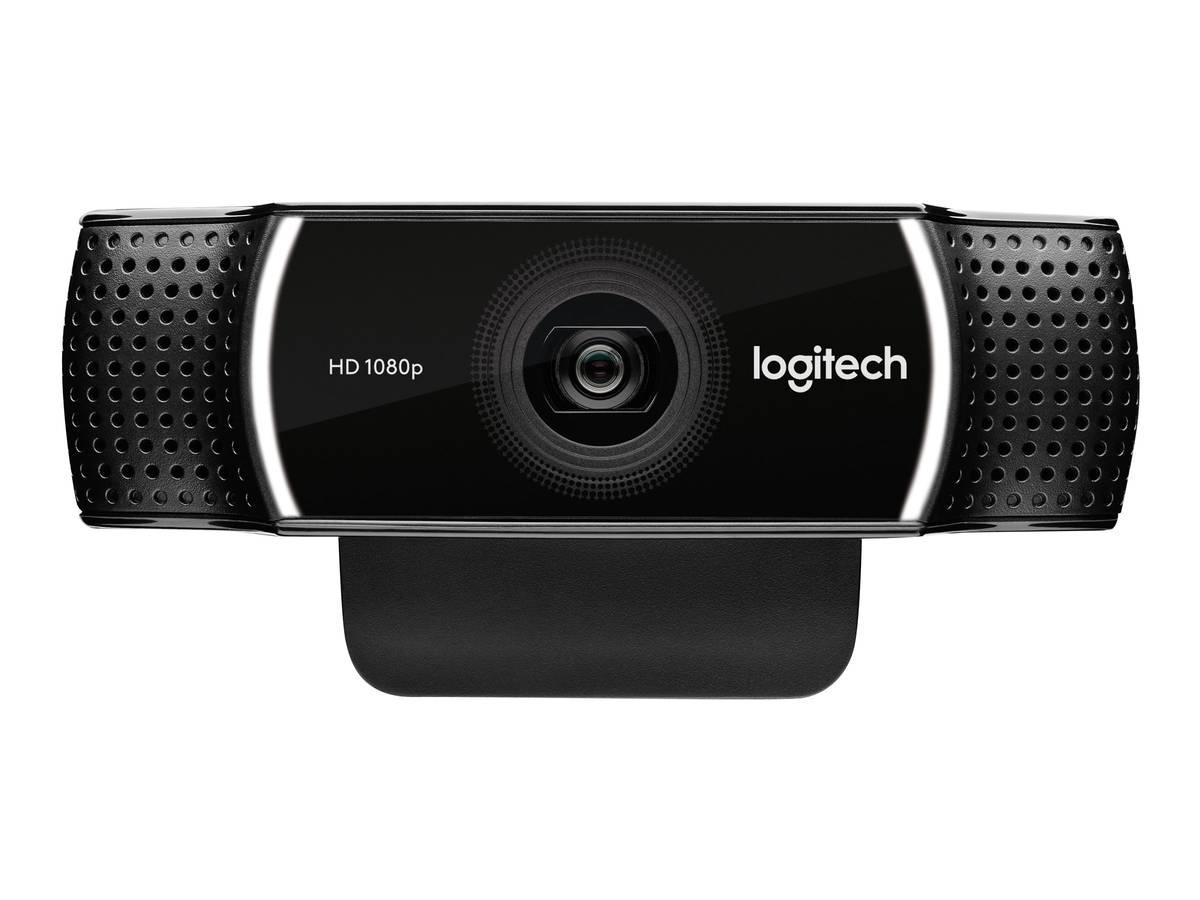
Experience superior video streaming with the Logitech C922 Pro Stream webcam, offering high-quality 1080p resolution and clear, crisp audio.
Description
Logitech C922 Pro Stream webcam is a high-quality, versatile camera that has been designed to meet the needs of users who demand exceptional video and audio clarity during video conferences, live streaming, and gaming sessions. With state-of-the-art features such as an advanced autofocus system, professional-grade video quality, and a wide array of customizable settings, the C922 Pro Stream webcam is a must-have tool for anyone who wants to take their video streaming to the next level.
One of the most impressive features of the Logitech C922 Pro Stream webcam is its advanced autofocus system. This system automatically adjusts the focus of the camera to ensure that the subject is always in sharp focus, even if they are moving around or the lighting conditions change. This ensures that your video conferences and live streams are always crystal clear, with no blurring or other distortions that can detract from the viewer’s experience.
Another advantage of the C922 Pro Stream webcam is its professional-grade video quality. It can record and transmit video at 1080p high-definition resolution at 30 frames per second, ensuring that your video streams look vibrant and lifelike. Additionally, it features dynamic background replacement that allows you to easily change your background during live streams or video calls. This feature is especially useful for streamers and professionals who want to maintain a consistent branding image or to add a bit of pizazz to their video streams.
The Logitech C922 Pro Stream webcam is also incredibly versatile, allowing you to customize the camera settings to suit your needs. For example, it features an adjustable field of view that can be set to either 78 or 65 degrees, making it easy to capture just the right amount of detail in your video streams or video conferences. Additionally, it has low-light correction, which helps to ensure that your video looks great even in dimly lit environments.
Finally, the C922 Pro Stream webcam is incredibly user-friendly, with simple plug-and-play connectivity that makes it easy to set up and get started with video streaming, live conferencing, or gaming. It comes with an adjustable clip that can be attached to your computer or monitor, and its 6-foot USB cable allows for plenty of flexibility in positioning the camera. Moreover, it is compatible with major video conferencing and streaming platforms like Skype, OBS, and XSplit, making it easy to integrate into existing workflows.
In summary, the Logitech C922 Pro Stream webcam is an excellent choice for anyone who needs high-quality video and audio for video conferencing, live streaming, or gaming. Its groundbreaking features, including advanced autofocus, professional-grade video quality, and a wide array of customizable settings, make it a must-have tool for anyone who takes their video streaming seriously.
Logitech C922 Pro Stream properties
| Product name |
C922 Pro Stream |
| Brand |
Logitech |
| Interface |
USB |
| Max Video Resolution @ 60fps |
1280×720 (HD) |
| Max Video Resolution @ 30fps |
1920×1080 (Full HD) |
| Max Video Resolution |
1920×1080 pixels |
| Platform |
Mac, Windows |
| Diagonal Field of View |
78.0 ° |
| Features |
Microphone |
| Mounting |
Clip, Tripod |
| Max Frame Rate |
60 fps |
| Focus |
Auto |
| Software included |
Yes |
| Cable Length |
1.5 m |
| Height |
29 mm |
| Width |
95 mm |
| Depth |
24 mm |
| Weight |
162 g |
Frequently Asked Questions:
What are the recommended settings for optimizing video quality with the Logitech C922 Pro Stream webcam?
The Logitech C922 Pro Stream webcam has several settings that can be adjusted to optimize video quality. Here are some recommended settings:
1. Resolution: Set the resolution to 1080p (Full HD) for the highest quality video.
2. Frame rate: Set the frame rate to 30 fps or 60 fps, depending on your needs and internet connection speed. A higher frame rate will result in smoother video but may require more bandwidth.
3. Bitrate: Adjust the bitrate to match your desired video quality and internet connection speed. Higher bitrates provide better video quality but also consume more bandwidth. A good starting point for most users is around 4000-5000 kbps.
4. White balance: Set the white balance to automatic or manual depending on your lighting conditions. If you're in a controlled environment with consistent lighting, setting it manually can help maintain consistent colors throughout the video.
5. Exposure: Adjust the exposure settings to ensure proper lighting and avoid overexposure or underexposure. This can be done by adjusting the gain or brightness levels.
6. Microphone settings: If you're using the built-in microphone on the webcam, make sure to enable it in your video conferencing software or streaming platform. You can also adjust the microphone volume and noise reduction settings to improve audio quality.
How do I adjust the camera settings for better video quality?
To improve your camera's video quality, you can make the following adjustments to its settings:
1. Change the resolution: Increase the resolution of the video from 720p or 1080p to a higher setting like 4K if your camera supports it. This will result in sharper and more detailed footage. Adjust white balance: The white balance setting ensures that colors in your video are accurately reproduced. Try adjusting the white balance settings to achieve natural-looking colors. Change the frame rate: Most cameras have a default frame rate of 30 frames per second (fps). Increasing this value to 60 fps can result in smoother motion and better overall quality. However, keep in mind that higher frame rates require more storage space and may not be supported by all devices or platforms. Use a tripod: A tripod stabilizes the camera during recording, reducing camera shake and resulting in clearer footage. Consider external lighting: If you're shooting in low-light conditions, using additional lighting sources can help improve the quality of your video by providing more even illumination and reducing noise. Experiment with different compression settings: Some cameras allow you to adjust the level of compression used when encoding video files. Lower levels of compression result in larger file sizes but higher-quality footage. Remember, these adjustments may not be available on all camera models or may require specific software or equipment. Refer to your camera's user manual for more information about its settings and capabilities.
How do I properly connect my Logitech C922 Pro Stream webcam to my computer and ensure it is working correctly?
Here are the steps you can follow to connect your Logitech C922 Pro Stream webcam to your computer and test its functionality:
1. Make sure your computer has a free USB port available for connection. Connect the webcam to your computer using the provided USB cable. If your computer does not automatically detect the webcam, you can try connecting it to a different USB port or restarting your computer. After connecting the webcam, you should see a notification pop up on your screen indicating that a new device has been detected. Click "Install Driver" to install the necessary drivers for the webcam. Alternatively, you can visit the Logitech website and download the latest drivers directly. Once the driver installation is complete, launch any video conferencing or streaming software that supports the C922 Pro Stream webcam. Make sure your software is up-to-date to ensure compatibility with the webcam. In the software settings, select the Logitech C922 Pro Stream as your primary camera input. You may need to adjust other settings like resolution, frame rate, and image quality based on your specific application's requirements. Test the webcam by starting a video call or streaming session to confirm that it is functioning correctly. Check for any issues with clarity, color accuracy, and autofocus performance. If you encounter any problems during the setup process, you can refer to the user manual provided by Logitech or visit their support website for additional resources.
How do I properly adjust the focus on my Logitech C922 Pro Stream webcam for clearer video footage?
First, make sure your computer is running a supported operating system such as Windows 7 or later, macOS X 10. Chrome OS. Connect the Logitech C922 Pro Stream webcam to your computer using the included USB cable. Launch your preferred video conferencing software, such as Skype, Zoom, or Google Meet. Alternatively, you can use a third-party capture tool like OBS Studio (Open Broadcasting Software) if you're planning to stream your content online. Once the software is open, navigate to the settings menu and select the webcam option. This will open up the device manager for the camera. Ensure that the Logitech C922 Pro Stream webcam is selected as your primary input source. Adjust the focus by manually turning the lens of the webcam until you see a clear, sharp image on the screen. This may require some trial and error, depending on the distance between you and the camera. To fine-tune the focus, use the autofocus feature available in most video conferencing software or OBS Studio. Autofocus will automatically adjust the lens to maintain a clear image as you move around the frame. If you notice any color distortion or other visual anomalies, you may need to adjust the white balance settings in your video software. This will help ensure that the colors in your footage are accurate and true-to-life. Finally, test your video by recording a short clip or initiating a conference call. Review the footage to ensure that it meets your desired quality standards. By following these steps, you should be able to adjust the focus on your Logitech C922 Pro Stream webcam for clearer video footage. If you continue to experience issues with image quality, consult the webcam's user manual or contact Logitech support for further assistance.
My camera keeps freezing during video calls on Discord, what's causing this issue and how can I fix it?
outdated drivers or software. If your webcam drivers or software are outdated, it might cause compatibility issues with Discord, leading to freezing. Try updating your webcam drivers and Discord software to the latest versions. Another possible reason is a high CPU usage issue. If other applications on your computer are consuming too much CPU resources, it can cause Discord's camera functionality to freeze. Check your Task Manager (Windows) or Activity Monitor (Mac) for any resource-intensive programs running in the background. Also, ensure that you're not running any other resource-intensive software while using Discord for video calls. This includes programs like Adobe Premiere Pro, video editing software, or even some games. Additionally, try closing all unnecessary applications and background processes before making a call on Discord. Sometimes, simply shutting down the Task Manager can resolve the issue. Lastly, if your webcam is integrated into your computer's chassis (like most laptops), try unplugging it for 30 seconds to reset it. Then plug it back in and see if it resolves the freezing issue. If none of these steps work, you might need to reinstall Discord or update your operating system.

Chance –
I recently got my hands on the Logitech C922 Pro Stream and I must say, I’m quite impressed by its performance. The webcam boasts a 78.0-degree diagonal field of view, which is great for capturing a wide-angle view of my surroundings.
One of the best features of this webcam is its USB interface. It makes setting up the device very simple and ensures that the webcam is compatible with almost all devices that have a USB port.
In terms of comparison with other webcams, I would rate this quite high up in the list. It edges out its predecessor, the Logitech C920, with its improved autofocus and low-light correction capabilities. However, it falls behind the Razer Kiyo in terms of picture quality and the ability to adjust light levels during streams.
Overall, I highly recommend the Logitech C922 Pro Stream for those looking to upgrade their streaming or video conferencing experience. It’s a reliable device with a clear picture and easy setup, making it a great choice for both personal and professional use.
Brooklynn Sawyer –
As a frequent user of video conferencing software, I recently purchased the Logitech C922 Pro Stream webcam for its advertised high-quality video and audio capabilities. While I appreciate its USB interface and easy setup, I am slightly disappointed in the 78.0 ° diagonal field of view.
Compared to other webcams on the market, the Logitech C922 is on par with top-quality video and audio. However, the narrow field of view can be limiting when trying to capture a larger area, such as a conference room or classroom. Additionally, the 1080p resolution may not be enough for users seeking the highest-quality image.
Overall, I would rate the Logitech C922 Pro Stream at 3 out of 5 stars for its decent video and audio quality, but limited field of view. While it may be suitable for individual use, it may not be the best choice for group video conferencing or classroom settings.
Isabelle Hopkins –
As a general manager in Oklahoma City, I was excited to purchase the Logitech C922 Pro Stream webcam for my team’s video conference calls. Unfortunately, my experience with this product has been less than satisfactory, resulting in a 2 out of 5 rating.
One of the main drawbacks of this webcam is its weight. At 162g, it feels bulky and cumbersome to move around, especially during a fast-paced meeting. Additionally, despite boasting a maximum video resolution of 1280×720 (HD) at 60 frames per second, I found the picture quality to be less than impressive. Compared to other similarly-priced webcams on the market, the C922 fell short in terms of clarity and sharpness.
In terms of delivery, I purchased this webcam in March and it took a few days to arrive in Oklahoma City. Although the shipping time was not overly problematic, I was disappointed with the packaging. The unit arrived in a flimsy cardboard box with little protection, which made me concerned about the safety of the product during transit.
Overall, while the C922 Pro Stream may work for some individuals, I would not recommend it for professional use. There are other webcams on the market with better picture quality, lighter weight, and more dependable shipping/delivery options.