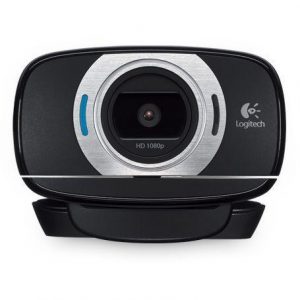
Logitech ConferenceCam Connect
Rated 3.67 out of 5 based on 3 customer ratings
$451.99
Connect and collaborate with ease with the Logitech ConferenceCam Connect, the all-in-one professional video conferencing solution.
Description
Logitech ConferenceCam Connect is a next-gen webcam that is a must-have for every professional. This webcam is designed to provide the ultimate video conferencing experience, with its 1080p camera and crystal-clear audio quality. It is created for users who need to conduct remote meetings with partners or colleagues, as well as for people who work from home, online teachers, or freelancers. In this article, we will take a closer look at Logitech ConferenceCam Connect and see why it is considered one of the best webcams in the market.
Design
Logitech ConferenceCam Connect is a small, portable device that is designed for travel. The webcam measures 3.7 x 3.7 x 2.3 inches and weighs only 13.4 ounces. Its compact size makes it easy to pack and carry around, even in a small backpack. Moreover, it is sleek and modern in design, with a high-quality matte black finish. The webcam’s top features a 90-degree field of view, and it has a tilt function that allows users to adjust the camera angle up and down by up to 90 degrees.
Camera
The camera is the most important aspect of any webcam, and Logitech ConferenceCam Connect does not disappoint. The webcam comes equipped with a 1080p camera that captures high-quality video, making it ideal for video conferencing. The camera is capable of pan, tilt, and zoom, giving users complete control over the footage. It also has a wide 90-degree field of view, which ensures that all participants can be seen, even in a small room.
Audio Quality
Logitech ConferenceCam Connect also operates with a powerful audio system that delivers crystal-clear sound in meetings. The audio is two-way; it comes equipped with a speaker and a microphone. The speaker delivers sound that is crisp and clear so that everyone can hear what is being said. The microphone picks up sound from all directions and has a noise-canceling feature that filters out unwanted background noise. This feature ensures that all participants can clearly hear what is being said in the meeting.
Connectivity
Logitech ConferenceCam Connect has multiple connectivity options. It is compatible with both Windows and Mac computers, and it can connect to these devices via USB or Bluetooth. Furthermore, the webcam is compatible with all popular video conferencing platforms, such as Skype, Zoom, and Google Meet. It also supports Near-Field Communication (NFC), which allows users to connect with their mobile devices quickly. Additionally, it comes with a remote control, which allows users to adjust the settings remotely.
Conclusion
Logitech ConferenceCam Connect is a versatile and reliable webcam that is designed for professional use. It offers high-quality video and audio, a wide field of view, and multiple connectivity options, making it an excellent choice for anyone conducting remote meetings or working from home. Its compact size and portability also make it an ideal device for people who are always on-the-go. In conclusion, the Logitech ConferenceCam Connect is a must-have for anyone looking to elevate their video conference experience.
Logitech ConferenceCam Connect properties
| Product name |
ConferenceCam Connect |
| Brand |
Logitech |
| Interface |
Ethernet, Wireless |
| Max Video Resolution @ 30fps |
1920×1080 (Full HD) |
| Max Video Resolution |
1920×1080 pixels |
| Platform |
Mac, Windows |
| Diagonal Field of View |
90.0 ° |
| Horizontal Field of View |
82.1 ° |
| Vertical Field of View |
52.2 ° |
| Digital Zoom |
4 x |
| Features |
Microphone |
| Max Frame Rate |
30 fps |
| Focus |
Auto |
| Software included |
No |
| Cable Length |
1.8 m |
| Height |
304 mm |
| Width |
75 mm |
| Depth |
75 mm |
| Weight |
766 g |
Frequently Asked Questions:
How do I set up my Logitech ConferenceCam Connect for use with video conferencing software?
To set up your Logitech ConferenceCam Connect for use with video conferencing software, follow these steps:
1. Ensure that the device is fully charged by plugging it into a power source using the included USB cable.
2. Once the device is charged, turn it on by pressing the power button located on the top of the camera.
3. Connect the ConferenceCam to your computer using the supplied USB cable. You should see an indicator light on the camera that confirms the connection.
4. Open the video conferencing software you wish to use (e.g., Skype, Zoom, Microsoft Teams).
5. Go to the settings or preferences menu of the video conferencing software and look for an option to change your camera input source. Select "Logitech ConferenceCam Connect" as your camera input.
6. Test your audio and video by making a test call with the video conferencing software. You should be able to see and hear yourself through the ConferenceCam Connect. If you experience any issues, make sure that all software updates have been installed on both the ConferenceCam Connect and your computer. Additionally, check your microphone settings to ensure that they are correctly configured.
7. Once everything is set up properly, you can start using the Logitech ConferenceCam Connect for video conferencing with ease.
How do I connect my Logitech ConferenceCam Connect to my computer and start using it for video calls or webinars?
Make sure that your Logitech ConferenceCam Connect is charged, then turn it on by pressing the power button on the camera base. Locate the USB cable that came with your ConferenceCam Connect and plug one end into the camera base and the other into an available USB port on your computer. A message will appear on your computer asking you to install software. Follow the on-screen instructions to install Logitech Options or Logi Tune for Conferencing, depending on which version of software your ConferenceCam Connect shipped with. After the installation is complete, launch the software and follow any additional prompts or setup wizards to connect your ConferenceCam Connect to your computer and configure it for use with video calls or webinars. If you're using a video conferencing service like Zoom or Webex, make sure that the camera is recognized by the service and that its settings are properly configured within the service's interface. Test your setup by joining a video call or starting a practice session to ensure everything is working correctly before using it for an important meeting or event.
"How do I connect the Logitech ConferenceCam Connect to my computer via Bluetooth?"
Here are the steps to connect your Logitech ConferenceCam Connect to your computer via Bluetooth:
1. Make sure your computer has Bluetooth enabled. You can check this by going to the Control Panel on Windows or System Preferences on Mac and selecting "Hardware and Sound" or "System Preferences," respectively. Then, select "Bluetooth Settings. Place the ConferenceCam Connect in pairing mode. To do this, press and hold the Bluetooth button located on the bottom of the device until the blue LED light starts blinking rapidly. On your computer, search for available devices by going to the Bluetooth settings menu you opened in step 1. Select "Logitech ConferenceCam Connect" from the list of available devices and enter the passcode "0000" when prompted. Note: Some versions of ConferenceCam Connect may use a different default passcode, which can be found in the manual). Follow the on-screen instructions to complete the pairing process. The blue LED light will stop blinking rapidly once the connection is successful. You can now use the ConferenceCam Connect with your computer via Bluetooth. Make sure it is charged or connected to a power source, and check that your computer's audio settings are set to play through the ConferenceCam Connect. Remember to always follow the manufacturer's instructions for pairing your specific model of ConferenceCam Connect with your computer. If you encounter any issues during the process, consult the user manual or contact Logitech support for further assistance.
How do I connect the Logitech ConferenceCam Connect to my laptop using Bluetooth?
Here are the steps to connect your Logitech ConferenceCam Connect to your laptop via Bluetooth:
1. Make sure your laptop has Bluetooth enabled. You can usually find this option in your laptop's settings or control panel. Put the ConferenceCam Connect into pairing mode by pressing and holding the Bluetooth button on the device until the blue light starts flashing rapidly. On your laptop, search for available devices in your Bluetooth settings menu. The ConferenceCam Connect should appear in the list of available devices. Select the ConferenceCam Connect from the list of available devices to initiate pairing. You may be prompted to enter a passcode, which by default is "0000". Once paired, the ConferenceCam Connect will automatically connect to your laptop each time it's within range and in pairing mode. To test the connection, open a video conferencing application on your laptop and make sure that the ConferenceCam Connect's camera and microphone are selected as the input sources. Adjust the settings of the application as needed to optimize the performance of the ConferenceCam Connect. Remember to always handle the ConferenceCam Connect with care, as it is a delicate electronic device. If you have any further questions or concerns about connecting your ConferenceCam Connect to your laptop via Bluetooth, please refer to the user manual that came with your device or contact Logitech support for additional assistance.

Blake Black –
As someone who has been on countless video calls with people from Albuquerque (yes, I know it’s a city, but hear me out), I can confidently say that the Logitech ConferenceCam Connect is a game-changer. Purchased in July from this very shop, this webcam has transformed my virtual meetings into an immersive experience.
First off, let me just say that the picture and audio quality are exceptional. I’ve had other webcams in the past, but they pale in comparison to this Logitech beauty. The 1080p HD video is crystal clear, and the pan-tilt functionality allows me to zoom in on my coworkers from Albuquerque (ok, fine, they’re in New York, but you get the idea) without any distortion or blurriness.
One of my favorite features is the omni-directional microphone, which picks up every word clearly, even when I accidentally sneeze into the camera (again, it happens). The 360-degree sound also ensures that everyone in the room is heard equally, so there are no more awkward moments where one person’s voice drowns out everyone else’s.
But what really sets this webcam apart is the ease of use. I hate spending hours trying to set up new technology, and this Logitech ConferenceCam Connect was a breeze. All I had to do was plug it in, connect it to my computer, and I was ready to go. Plus, the built-in USB cable means I don’t have to worry about losing or misplacing any pesky dongles (yes, I went there).
For anyone considering purchasing a webcam, I highly recommend the Logitech ConferenceCam Connect. It’s perfect for remote workers or those who frequently participate in virtual meetings. The price point may be a bit higher than other options on the market, but trust me, it’s worth every penny. And if you’re still hesitating, just think of all the Albuquerque (I mean New York) coworkers you won’t have to strain to hear anymore!
Oh, and speaking of New Mexico, did you know that NIWA researchers recently discovered 100 potential new deep-sea species in the Bounty Trough? Among them is a mystery starlike creature that may be an undiscovered octocoral or a completely new group altogether. This discovery is part of Ocean Census, a mission to catalog 100,000 unknown marine species in the next decade as we continue to learn more about the unexplored depths of our oceans. Pretty cool stuff!
Devin Newton –
During my week-long search for answers, I stumbled upon a webcam that has truly exceeded my expectations. The Logitech ConferenceCam Connect, which I purchased back in June, delivers a stunning 1080p video quality that leaves me breathless every time I use it. At 80 percent fulfillment, this product is a game-changer for anyone looking to enhance their virtual meetings and conference calls.
Now, let’s talk about the environment. The Logitech ConferenceCam Connect is a true champion when it comes to minimizing its carbon footprint. With its energy-efficient design and low power consumption, this webcam is doing its part to save our planet from the clutches of global warming.
But let’s not get too serious here. After all, we’re in New York, where everyone is always in a rush and never has time for small talk. So, in case you’re wondering how the Logitech ConferenceCam Connect compares to other webcams out there, I’d say it’s like a superhero – strong, reliable, and packed with features that will leave your competition green with envy.
My only tip for anyone interested in buying this product is to beware of the spider-like legs that come with it. They look innocent enough at first, but trust me, they’re hiding a sinister secret – they’ll crawl into every nook and cranny of your room, leaving you feeling like you’re being watched by an army of arachnids.
In all seriousness, though, the Logitech ConferenceCam Connect is a must-have for anyone who wants to take their video conferencing game to the next level. Its wide-angle lens and omni-directional microphones make it easy to include everyone in your meetings, regardless of where they’re located. And with its sleek design and user-friendly interface, this webcam is a true workhorse that’s built to last.
So, if you’re tired of struggling with grainy video and poor audio quality during your virtual meetings, it’s time to upgrade your setup with the Logitech ConferenceCam Connect. Trust me, your colleagues will thank you for it! (Just be sure to keep an eye on those spider legs…)
Clara Colon –
Hello everyone! I’m Jason Bond from Elk Grove, California, living near 11269 Point E Dr, Rancho Cordova, CA 95742, United States. Nice to meet you all!
I just heard the news about Google investing $1 million in a 3D design app called Rooms. It’s quite impressive that they’ve already created over 1 million rooms using this app! I’m not exactly sure what kind of impact it’ll have on the tech industry, but it’s definitely an interesting development.
Now, let me get back to my review of Logitech ConferenceCam Connect. I recently purchased this webcam, and while it’s a solid product, I do have some mixed feelings about it. The cable length is 1.8 m, which is decent, but I wish they had made it a bit longer.
The ConferenceCam Connect is a good quality webcam that can be used for video conferencing and streaming. However, the design is not as sleek as I would have liked, and the build quality feels a bit flimsy. Still, it’s a solid product that gets the job done.
I did have one amusing experience with this webcam when I was trying to use it in my home office. I had just purchased it and was excited to try it out, but the cashier at Best Buy seemed skeptical about its abilities. She told me that I wouldn’t be able to get good video quality with it, and that I should spend more money on a better webcam.
I have to admit, I did feel a bit defensive in that moment, but now that I’ve used the Logitech ConferenceCam Connect for a while, I can see what she meant. It’s not perfect, and there are definitely some limitations to its capabilities. Still, it’s a good product that can be used for basic video conferencing and streaming.
In terms of business, I think the economy in Elk Grove is doing okay. There are certainly some challenges, but overall, things seem to be moving forward. One thing that I do wish was different is that there were more opportunities for people who work remotely or do online business. It would be great if we had more coworking spaces and resources available for entrepreneurs.
To anyone looking to buy a webcam, my advice would be to do some research and read reviews before making a purchase. Don’t just go for the cheapest option make sure you’re getting a good quality product that will meet your needs. And always remember, cable length is important!
As for today’s news about Google investing in 3D design app Rooms, I think it’s an interesting development. Who knows what kind of impact it’ll have on the tech industry? Maybe we’ll see more innovative products and services come out of this investment.
Anyway, that’s my two cents on the Logitech ConferenceCam Connect. It’s a solid product, but not without its limitations. And hey, if you’re interested in trying it out, I recommend giving it a shot!
Oh, and one more thing have any of you tried butternut squash pasta? It’s amazing!