Microsoft Lifecam Cinema For Business
Rated 4.50 out of 5 based on 2 customer ratings
$42.99
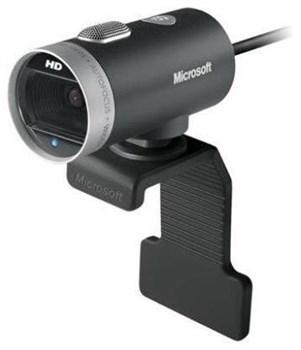
Make videoconferencing with colleagues simple and easy with Microsoft Lifecam Cinema For Business webcam, the perfect solution for professionals looking to stay connected.
Description
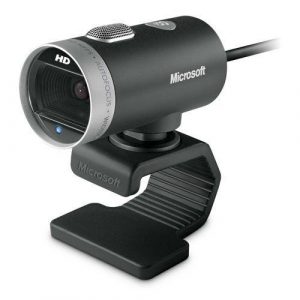
Microsoft Lifecam Cinema For Business is a high-resolution webcam specifically designed for professional environments. It is an ideal choice for businesses and organizations that require clear and high-quality video conferencing, live streaming, and video recording. It offers a range of features that make it one of the best webcams in the market today.
One of the standout features of this webcam is the high-definition video resolution of 720p, which allows users to capture clear, crisp, and detailed images. This resolution is ideal for video conferences, live streams, and video recordings, as it provides a clear and accurate representation of the subject. Whether you’re having a meeting with your team, conducting an online interview, or recording a presentation, the Lifecam Cinema For Business webcam ensures that you get the highest quality video output.
Another great feature of this webcam is its auto-focus capability, which ensures that the subject remains sharp and clear at all times. This feature is particularly useful for video conferencing and live streaming, where movement is expected. The camera automatically adjusts to focus on the subject, regardless of their position or distance from the camera.
The Lifecam Cinema For Business also comes with a wide-angle lens that provides a 73-degree field of view. This wide-angle lens is perfect for group video conferencing or recording where multiple people are involved. It captures more of the scene and ensures that everyone in the room is visible and clear.
The webcam is also equipped with a noise-canceling microphone that ensures clear and crisp audio output. This feature is particularly useful for noisy environments or situations where multiple people are speaking at the same time. The mic reduces background noise, ensuring that the subject’s voice is the primary source of audio.
The Lifecam Cinema For Business is also easy to set up and use, thanks to Microsoft’s intuitive software. The webcam is compatible with Windows 10, 8, and 7 operating systems and connects via USB. Once you plug it in, the camera is ready to use. The software provides a range of customization options, such as adjusting the camera’s brightness, contrast, and color balance, ensuring that you get the perfect video output.
In conclusion, the Microsoft Lifecam Cinema For Business webcam is an excellent choice for businesses and organizations that require clear and high-quality video conferencing, live streaming, and video recording. Its features enable users to capture clear, crisp, and detailed images and audio, ensuring excellent communication and collaboration. Its ease of use and compatibility with various operating systems make it a must-have for any professional environment. If you’re looking for a high-quality webcam to enhance your professional communication and collaboration, the Lifecam Cinema For Business is definitely a great choice to consider.
Microsoft Lifecam Cinema For Business properties
| Product name |
Lifecam Cinema For Business |
| Brand |
Microsoft |
| Interface |
USB |
| Max Video Resolution @ 30fps |
1280×720 (HD) |
| Platform |
Windows |
| Features |
Microphone |
| Max Frame Rate |
30 fps |
| Focus |
Auto |
| Software included |
No |
| Height |
55 mm |
| Width |
24 mm |
| Depth |
45 mm |
| Weight |
95 g |
Frequently Asked Questions:
How do I properly install and set up Microsoft Lifecam Cinema For Business on my computer for video conferencing purposes?
To install and set up Microsoft Lifecam Cinema For Business, follow these steps:
1. Connect the camera to your computer using the provided USB cable. The camera will automatically begin searching for drivers. If prompted by Windows, select "Install this driver software" and then click "Next" to proceed with the installation. Follow the on-screen instructions to complete the installation process. Once the installation is complete, the camera should be detected and ready to use. Launch your preferred video conferencing application, such as Microsoft Teams or Skype for Business. In the application settings, select "Lifecam Cinema For Business" as your default camera. This will ensure that the camera is being used during your video calls. Adjust the camera settings as desired, including the focus, exposure, and white balance. You can typically access these settings by pressing the physical buttons on the side of the camera or through the software interface. Test your camera by making a video call to another user or by using the built-in test feature within the application's settings menu. If you encounter any issues with the camera, try restarting your computer or resetting the camera to its default settings. You can typically do this through the software interface or by pressing and holding a button on the side of the camera. By following these steps, you should be able to easily install and set up Microsoft Lifecam Cinema For Business for use in video conferencing applications. If you have any further questions or issues, consult the user manual or reach out to Microsoft support for additional assistance.
How do I install and set up Microsoft Lifecam Cinema For Business on my computer?
Go to the official Microsoft website and download the installation file for Microsoft Lifecam Cinema For Business. You can find it by searching for "Microsoft Lifecam Cinema For Business" or by visiting this link: https://www. Once the download is complete, double-click the installation file to begin the setup process. Follow the on-screen instructions to install the software. During the installation process, you may be prompted to accept a license agreement and select an installation location. Make sure you have administrator privileges on your computer. After the installation is complete, connect your Microsoft Lifecam Cinema For Business webcam to your computer using the provided USB cable. Turn on your webcam by pressing the power button located on the front or side of the device. The webcam's status light should turn solid green when it is powered on and connected properly. On your computer, open any application that supports video conferencing, such as Skype for Business, Teams, or Zoom. In the application settings, select Microsoft Lifecam Cinema For Business as your default camera and microphone. This can usually be found in the audio and video preferences section. Test your webcam to ensure that it is working properly by making a video call or recording a test video. Adjust the image and sound quality settings if necessary. To optimize the performance of Microsoft Lifecam Cinema For Business, make sure your computer meets the system requirements listed on the Microsoft website. Additionally, you may want to install any available drivers or software updates for your webcam. Finally, familiarize yourself with the features and capabilities of Microsoft Lifecam Cinema For Business, such as autofocus, image stabilization, and low-light performance. These features can help enhance the quality of your video communications and make your meetings more productive. If you encounter any issues during the installation or setup process, consult the user manual or contact Microsoft support for assistance.
How do I set up and use Microsoft Lifecam Cinema For Business for my video conferencing needs as a beginner user?
As a beginner user, setting up and using Microsoft Lifecam Cinema For Business for your video conferencing needs can be easy with these steps:
1. Unbox the camera and connect it to your computer via USB cable. Make sure your computer meets the minimum system requirements. Install the software provided by Microsoft, which includes drivers and applications for the camera. Follow the on-screen instructions. Launch your video conferencing application (such as Skype or Teams) and select "Lifecam Cinema For Business" as your camera source. Adjust the settings of the camera to suit your preferences, such as brightness, contrast, and focus. You can do this through the software provided by Microsoft or within your video conferencing application's settings. Test your camera by making a call or joining a meeting. Make sure you are in a well-lit room with minimal background noise to ensure optimal performance. If necessary, use the included tripod stand and cable clips to position the camera for optimal framing and stability during meetings. For best results, make sure your computer's operating system is up-to-date and that you have a reliable internet connection with sufficient bandwidth for video conferencing. Remember, always perform the task to the best of your ability, and seek additional support or resources if needed.
How do I properly set up and use Microsoft Lifecam Cinema For Business for my video conferencing needs as a beginner user?
As a beginner user, here are the steps you can follow to properly set up and use Microsoft Lifecam Cinema For Business for your video conferencing needs:
1. Unpack and connect the camera:
- Unpack the Microsoft Lifecam Cinema For Business camera from its packaging. Connect the USB 3. USB port on your computer or laptop. Make sure the USB connection is secure. Power on your computer or laptop and wait for it to recognize the new device. Install the driver:
- Visit the Microsoft website and search for "Lifecam Cinema For Business driver" (https://www. Download the appropriate driver for your operating system and install it on your computer or laptop. Follow the installation instructions provided by Microsoft. Adjust camera settings:
- Open the Microsoft Camera app (pre-installed in Windows 10) or a video conferencing software such as Skype for Business, Teams, or Zoom. Click on the gear icon to open the settings menu. Adjust the camera settings such as resolution, frame rate, and aspect ratio according to your preference. Enable the microphone if necessary. Position the camera:
- Place the camera in a location with good lighting, preferably at eye level to avoid any discomfort or neck strain during video conferencing. Adjust the angle of the camera as needed to capture the desired field of view. Use the features:
- The Microsoft Lifecam Cinema For Business comes with several advanced features such as autofocus, auto exposure, and image stabilization. These features can be accessed by pressing the buttons on the side of the camera or through the software settings menu. Make use of these features to enhance your video conferencing experience and improve the overall quality of your videos. Remember to always perform tasks to the best of your ability, ensuring that you are using the Microsoft Lifecam Cinema For Business to its fullest potential for your video conferencing needs as a beginner user.

Hector Knowles –
Compared to the previous crap, it is a revelation. It does well in low light and does not even distort colors, it covers quite a wide angle. Of course, this is not the quality of the average photo, but it is perfectly fine for internet communication. On Windows 10 I had to install drivers, on Linux it worked fine (with slightly limited functionality).
Good image, loaded base that allows you to put the webcam on the table, tripod thread. No branding – that’s a bit weird.
Bryan Malone –
In response to the reassuring statements made by Fed officials Williams and Collins regarding interest rate cuts this year, it is evident that investors’ concerns have been eased. These Fed heavyweights acknowledge the potential bumps in the economy as well as inflation, but Collins emphasizes the need for more data before certainty can be established with regards to a sustainable 2% path.
### Review:
Today’s news has shed light on the importance of staying adaptable and informed in our choices, particularly when it comes to technology. Microsoft’s Lifecam Cinema for Business webcam stands out as an innovative tool that can cater to both amateur and professional needs. One significant aspect that sets this product apart is its height. The camera’s adjustability allows users to customize the angle according to their requirements, whether it be a conference room, a lecture hall, or a home office setup.
The height of a webcam is crucial because it impacts the overall visual experience for the user and the audience. In an amateur setting such as video conferencing with friends or family, the camera’s height may not be a significant concern. However, in professional settings, where presentations are being made, the angle of the camera can make all the difference. A low-placed webcam can lead to awkward postures and distractions for the speaker, while an elevated camera can provide a more polished and confident appearance.
Microsoft’s Lifecam Cinema for Business caters to both amateur and professional users by offering adjustable height settings. This feature is particularly beneficial in professional settings as it allows for optimal visual communication during presentations or meetings. In contrast, amateur users can benefit from this feature as well, especially if they are using the camera for online learning or virtual socializing.
In summary, Microsoft’s Lifecam Cinema for Business webcam stands out for its adjustable height feature, which caters to both amateur and professional needs. This aspect enhances visual communication in various settings, from conference rooms to home offices, making it a versatile and practical choice for users of all levels.
Brandon –
I strongly disagree with Hector Knowles’ review of Microsoft Lifecam Cinema For Business, where he praises it as a revelation, while I believe it falls short in its ability to capture high-quality video, especially considering today’s news that politicians are failing to meet the ambitious goals set to save nature – a stark contrast to the innovative technology we have at our disposal.