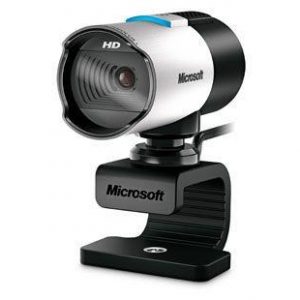
Microsoft LifeCam HD-3000 For Business
$17.99
Get the best of both worlds with Microsoft LifeCam HD-3000 For Business webcam – perfect for both video conferencing and remote work.
Description
Microsoft LifeCam HD-3000 for Business is a high-definition webcam that offers excellent video and audio quality for business meetings, webinars, and video conferencing. This webcam is designed to provide professional-grade video and audio quality, making it an ideal tool for businesses of all sizes.
One of the features of Microsoft LifeCam HD-3000 for Business is its 720p HD sensor. This sensor captures high-definition video with vivid colors and sharp details, providing a crisp and clear image of the user. Additionally, the webcam comes with a wide-angle lens that can capture a wide viewing angle, making it easier to include multiple participants in a single shot.
Another feature that makes Microsoft LifeCam HD-3000 for Business a great tool for business meetings is its noise-canceling microphone. This microphone filters out background noise to ensure clear audio for speaker and listener alike, which is vitally important if you’re in a busy office or even working from home.
The webcam itself is made out of high-quality materials, making it a durable and long-lasting piece of equipment. The design of the webcam is also compact and lightweight, making it a great option for professionals who need to bring their webcam with them on the go.
The Microsoft LifeCam HD-3000 for Business is also easy to set up. It comes with a universal attachment base that can be easily mounted on any monitor or laptop screen. Additionally, the webcam is compatible with popular video conferencing software such as Microsoft Teams, Skype, and Google Meet, making it easy for businesses to incorporate this tool into their existing workflow.
In conclusion, the Microsoft LifeCam HD-3000 for Business is an excellent choice for businesses that require high-quality video and audio for their meetings and video conferences. With its 720p HD sensor, wide-angle lens, noise-canceling microphone, and compatibility with popular video conferencing software, this webcam sets the standard for professional-grade video communication across the board.
Microsoft LifeCam HD-3000 For Business properties
| Product name |
LifeCam HD-3000 For Business |
| Brand |
Microsoft |
| Interface |
USB |
| Max Video Resolution |
1280×720 pixels |
| Platform |
Windows |
| Features |
Microphone |
| Max Frame Rate |
30 fps |
Frequently Asked Questions:
What are the optimal settings for using Microsoft LifeCam HD-3000 Webcam in a Zoom meeting room?
To optimize the use of Microsoft LifeCam HD-3000 Webcam in a Zoom meeting room, follow these steps:
1. Familiarize yourself with the camera's features and capabilities by reading the user manual or online resources. Position the webcam at an optimal distance from the screen to ensure clear visibility of your face. Generally, a distance of about 6-12 inches (15-30 cm) is recommended. Adjust the camera settings to optimize lighting conditions in the room. If necessary, use additional lights or move the webcam to a brighter area. Position the webcam at eye level to ensure that your face appears centered and in focus on the screen. Adjust the image stabilization settings to reduce any shakiness caused by external movements. Test the camera and adjust settings as necessary during the meeting. If issues arise, use Zoom's remote control features to make adjustments quickly and easily. Overall, the key to optimizing a webcam for a Zoom meeting is to carefully consider lighting conditions, positioning, and image stabilization while maintaining clear visibility of your face on screen.
How do I troubleshoot connectivity issues with my Microsoft LifeCam HD-3000 For Business webcam?
If you are experiencing connectivity issues with your Microsoft LifeCam HD-3000 For Business webcam, follow these steps to troubleshoot the problem:
1. Ensure that the USB cable is securely connected to both the camera and your computer. Try using a different USB port on your computer to rule out any issues with the specific USB connection. Restart your computer and try connecting the webcam again. This can sometimes help resolve connectivity issues. Make sure that you have installed the latest drivers for the LifeCam HD-3000 For Business on your computer. You can download the latest drivers from the Microsoft website. Check to see if there is any software or applications running on your computer that may be conflicting with the webcam's connection. Try disabling these programs and restarting your computer to see if this resolves the issue. If you are using a laptop, try connecting an external monitor to ensure that the connectivity issue is not related to the laptop's display driver. Check the webcam's power indicator light to ensure that it is turned on and receiving power. If the light is not on, check to make sure the battery is installed correctly (if your model has a rechargeable battery). Try connecting the LifeCam HD-3000 For Business to a different computer or device to see if the issue is related to your specific computer's configuration. If none of these solutions work, contact Microsoft support for further assistance. They can help diagnose more complex connectivity issues and provide additional troubleshooting steps.
"How do I properly install and connect my Microsoft LifeCam HD-3000 For Business to my computer?"
To install and connect your Microsoft LifeCam HD-3000 For Business, follow these steps:
1. Firstly, ensure that your computer meets the system requirements for this webcam. Your computer should have Windows 7 or a later operating system, or a Mac running OS X El Capitan or later. Plug in the LifeCam HD-3000 For Business to an available USB port on your computer. You may feel a slight vibration as the driver software begins installing automatically. If the software does not install automatically, insert the installation CD into your computer's DVD drive or download the software from Microsoft's website. Follow the prompts to complete the installation process. Once installed, open any compatible application that supports video conferencing, such as Skype, Zoom, or Teams. You should be prompted to select your camera; choose "Microsoft LifeCam HD-3000 For Business" from the list of available devices. Adjust the camera settings according to your preference by opening the Windows Camera app or a compatible video conferencing software and clicking on "Settings. You can change the image orientation, brightness, contrast, saturation, sharpness, and other settings here. If you are using a laptop with a built-in webcam, it is recommended to disable it by navigating to the Device Manager (type "device manager" in the Windows search bar), locating your laptop's webcam, right-clicking on it, and selecting "Disable. This will ensure that your LifeCam HD-3000 For Business is used for video conferencing instead. Finally, test your camera by making a video call to a friend or colleague using the selected application. Adjust the settings as necessary until you are satisfied with the image and audio quality. By following these steps, you should be able to successfully install and connect your Microsoft LifeCam HD-3000 For Business to your computer for seamless video conferencing.
How do I properly install and set up my Microsoft LifeCam HD-3000 For Business webcam for use with Skype and other video conferencing software?
Connect the LifeCam HD-3000 For Business to your computer using the USB cable provided in the package. Make sure that your computer is running Windows 7, Windows 8/8. Windows 10 operating systems. Install the LifeCam HD-3000 For Business software by following these steps:
- Go to Microsoft's official website and download the latest version of the LifeCam HD-3000 For Business software. Double-click on the downloaded file to start the installation process. Follow the on-screen instructions to complete the installation. Open Skype or your preferred video conferencing software. Select the settings menu and choose the video settings option. In the video settings window, select the LifeCam HD-3000 For Business as your default camera device. Test your webcam by making a test call or recording a video to ensure that everything is working correctly. Adjust the camera settings such as brightness, contrast, and white balance according to your preferences. Close all open applications and restart your computer to apply the changes made in the setup process. Ensure that the webcam's privacy cover is closed when not in use for added security and privacy. Remember to perform the task to the best of your ability, following the instructions carefully and accurately. If you encounter any issues during the installation or setup process, consult the user manual or contact Microsoft support for further assistance.
My webcam is not detecting my face, even when I'm right in front of it. Is this a hardware issue or can it be resolved with software updates?
1. Update your drivers**: Ensure that your webcam drivers are up-to-date. Outdated drivers might cause compatibility issues with your operating system or other software. You can check for updates in your device manager or by visiting the manufacturer's website. Check your camera settings**: Make sure that your camera is set to the correct mode (e. Face detection" or "Auto focus"). This setting might be buried deep within your webcam settings, so take some time to explore and ensure it's enabled. Adjust your lighting**: Poor lighting can cause issues with face detection. Try adjusting the lighting in the room to see if that resolves the issue. Clean your webcam lens**: A dirty or dusty lens might prevent your camera from detecting your face. Gently clean the lens with a soft cloth and see if that makes a difference. Reinstall your drivers**: If updating your drivers doesn't work, try reinstalling them entirely. This will ensure that all settings are reset to default. Disable and re-enable your webcam**: Sometimes, simply disabling and re-enabling your webcam can resolve the issue. If none of these steps resolve the issue, it's possible that there's a deeper problem with your hardware or software configuration. In this case, you may need to consult with a professional for further assistance.

Reviews
There are no reviews yet.