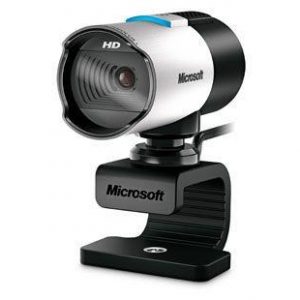
Microsoft LifeCam Studio
Rated 3.00 out of 5 based on 1 customer rating
$72.99
Capture special moments with the Microsoft LifeCam Studio, the high-definition webcam that makes video chatting and recording more vivid, vibrant and lifelike than ever before.
Description
The Microsoft LifeCam Studio webcam is a sophisticated, feature-rich webcam that is designed to deliver high-quality video calls and content creation for professionals, gamers, and anyone else who requires superior video quality. It’s the perfect device for video conferencing, streaming, recording, and broadcasting, thanks to its advanced features and capabilities.
The Microsoft LifeCam Studio webcam provides 1080p Full HD video resolution, which is four times higher than the standard 480p resolution offered by most webcams. Furthermore, the camera lens is engineered with high-precision glass elements that provide sharp, crystal clear images.
This webcam also features TrueColor Technology, which automatically adjusts color and exposure to produce bright, vibrant, and natural-looking video in virtually any lighting condition. This feature ensures that you look your best during video calls, regardless of where you are.
Moreover, the Microsoft LifeCam Studio webcam comes with a high-quality microphone that reduces ambient noise to deliver crisp and clear audio. It also has a noise-cancelling feature that removes unwanted background sounds. This is particularly important for users who want to communicate effectively in noisy environments.
The Microsoft LifeCam Studio webcam is built with a 360-degree swivel mount, allowing users to easily adjust the camera angle to capture the perfect shot. It also has a long, flexible cable that allows you to position the webcam wherever you need it, making it a perfect tool for presentations, interviews, or live streams.
Another notable feature of the Microsoft LifeCam Studio webcam is its compatibility with Windows Live Movie Maker, which provides users with advanced video editing capabilities. With these tools, users can easily create high-quality videos and share them on social media platforms or video sharing sites.
Whether you’re a gamer, a professional, or just someone who wants high-quality video calls, the Microsoft LifeCam Studio webcam is the perfect device for you. With its advanced features and capabilities, you can easily produce crystal clear video and audio that will leave an impression on your audience.
Microsoft LifeCam Studio properties
| Product name |
LifeCam Studio |
| Brand |
Microsoft |
| Interface |
USB |
| Max Video Resolution @ 30fps |
1920×1080 (Full HD) |
| Max Video Resolution |
1920×1080 pixels |
| Platform |
Mac, Windows |
| Digital Zoom |
3 x |
| Features |
Microphone |
| Max Frame Rate |
30 fps |
| Focus |
Auto |
| Software included |
No |
| Height |
113 mm |
| Width |
40 mm |
| Depth |
60 mm |
| Weight |
104 g |
Frequently Asked Questions:
What are the steps for setting up my Microsoft LifeCam Studio webcam on my computer?
Here is a step-by-step guide to set up your Microsoft LifeCam Studio webcam on your computer:
1. Make sure you have the necessary software and drivers installed. Download and install the latest version of the LifeCam Studio software from the Microsoft website, if needed. Also ensure that you've downloaded and installed the latest driver for your webcam from the manufacturer's website or from the device manager in Windows.
2. Connect your webcam to your computer using a USB cable. Make sure it is securely plugged into an available USB port on your computer. Your computer should automatically recognize the device, but if not, you may need to restart your computer or check the device manager for any issues.
3. Once your computer recognizes the LifeCam Studio webcam, open the software or application that you want to use it with, such as Skype, Zoom, or Microsoft Teams. The webcam should automatically be selected as the default camera in your settings. If not, follow the instructions provided by the software to select your webcam as the default device.
4. Test your webcam by opening a video call or using a video recording feature within your chosen application. Adjust the angle and position of your webcam to ensure that you are properly framed in the video window.
5. If you need to make any further adjustments, such as changing the resolution or field of view, you can do so by accessing the LifeCam Studio software or using the controls on the physical webcam itself.
6. Once everything is set up correctly, close all open applications and restart your computer to ensure that all changes have been saved. Your Microsoft LifeCam Studio webcam should now be ready for use!
"How do I adjust the focus on my Microsoft LifeCam Studio webcam?"
To adjust the focus on your Microsoft LifeCam Studio webcam, follow these steps:
1. Make sure your webcam is connected to your computer and turned on. Launch any video conferencing software or application that supports Microsoft LifeCam Studio. This could be Skype, Teams, Zoom, or any other compatible program. Once the software is running, you should see a live preview of yourself on the screen. If the image appears blurry, it's time to adjust the focus. Locate the manual focus ring on your Microsoft LifeCam Studio webcam. The exact location may vary depending on the model, but it's typically located near the lens. Rotate the manual focus ring in a clockwise direction until the image becomes clear and sharp. If you're having trouble finding the right focus point, try moving closer to or further away from the camera. Once you've found the right focus point, turn the manual focus ring counterclockwise to lock it in place. This ensures that the focus remains steady during your video call. Test the focus by moving your head back and forth or making other facial expressions. The image should remain clear and sharp. If you're still experiencing blurriness, try cleaning the lens of your webcam with a soft, dry cloth to remove any dust or fingerprints that might be affecting the focus. If you're having difficulty adjusting the focus manually, consult the user manual for your Microsoft LifeCam Studio webcam for additional guidance or contact Microsoft support for further assistance.
How do I adjust the focus on my Microsoft LifeCam Studio webcam for clearer video calls?
To adjust the focus of your Microsoft LifeCam Studio webcam for clearer video calls, follow these steps:
1. Make sure your webcam is connected to your computer and turned on. Launch a video conferencing application such as Skype or Zoom. Within the application, click on the settings icon (usually represented by a gear or cogwheel) located in the app's menu bar. Select "Video Settings" or "Camera Settings". Look for an option that says "Auto Focus" or similar and ensure it is enabled. If available, adjust the focus slider to your desired level of sharpness. This will vary based on the distance between you and the camera. Test the camera's focus by moving around in front of it and watching for clarity. Adjust the focus as necessary until you are satisfied with the image quality. Save any changes made to your video settings, then exit the application. By following these steps, you should be able to achieve clearer video calls using your Microsoft LifeCam Studio webcam. If you continue to experience issues with focus or image quality, try cleaning the lens of your camera and ensuring that it is properly installed and secured in its mounting bracket.
How do I adjust the focus and exposure settings on my Microsoft LifeCam Studio webcam for better video quality?
To adjust the focus and exposure settings on your Microsoft LifeCam Studio webcam, follow these steps:
1. Connect your LifeCam Studio to your computer via USB. Make sure the camera is properly installed by checking the Device Manager. Right-click on "My Computer", select "Manage", then click on "Device Manager". Look for "Imaging Devices" and make sure that your webcam appears under this section with a green checkmark next to it. Open your preferred video conferencing software or recording application, such as Skype, Zoom, or Camtasia. In the settings menu of your chosen application, look for an option to adjust the camera settings. This will typically be labeled as "Video Settings" or something similar. Click on this option to open the camera configuration window. Inside the camera settings menu, you should see options for adjusting focus and exposure. The exact location and label of these settings may vary depending on the application you are using, but they should be easy to find. To adjust the focus, look for an option labeled "Auto Focus" or something similar. This feature will automatically adjust the focus as needed based on the distance between you and the camera. If your application does not offer auto-focus, you may need to manually adjust the focus using a focus ring located on the front of the webcam. To adjust exposure, look for an option labeled "Brightness", "Exposure", or something similar. This feature will control how much light is allowed into the camera, which can help prevent over-exposure (when the image is too bright) and under-exposure (when the image is too dark). Adjusting these settings may require some trial and error to find the best balance for your specific lighting conditions. As a general rule, it's best to position yourself in front of a well-lit area, with the light source behind or to the side of the camera rather than directly in front of it. This can help prevent harsh shadows and ensure that your face is properly illuminated. Once you have adjusted these settings to your satisfaction, save your changes and test the camera in a live video call or recording to see how the image quality has improved. Remember to always check the image preview and make necessary adjustments before beginning any important calls or recordings.
My webcam is not capturing video, but it's picking up audio just fine. Is there something wrong with the video capture software or is it a problem with the camera itself?
That's frustrating! Let's troubleshoot this together. Firstly, I'd like to rule out any software-related issues. Can you tell me which video capture software you're using? Is it a built-in app on your computer, such as Windows Camera or QuickTime Player, or is it a third-party application?
Also, have you tried checking the camera settings within the software to ensure that video is enabled and set to the correct resolution? Sometimes, these settings can get toggled off or set incorrectly. If you're using a built-in app, try restarting your computer. This might seem obvious, but sometimes, simply restarting can resolve issues like this. If none of those steps work, it's possible that there's an issue with the camera itself. Can you tell me a bit more about your webcam? Is it a USB-connected device or integrated into your laptop? Have you tried using different video capture software to see if the problem persists?
Lastly, have you checked for any physical obstructions between the camera and its surroundings? Sometimes, a dusty lens or a loose connection can cause issues like this. Let's explore these options before we dive deeper into potential hardware-related problems.


Faith Hines –
Oh boy, oh boy! Where do I even begin with my epic tale of love, loss, and a life-changing decision that would ultimately lead me down a winding path of self-discovery? It all started back in January when my good friend Jameson Stout, who is actually a stoic fellow but the name just fits him so well, introduced me to the magical world of Webcams.
What if we were to bring our video calls to life? he asked with stars in his eyes. We could see each other’s faces, share our emotions, and be there for one another, no matter where we are. I was skeptical at first, but then again, who am I to deny a friend his dreams? So off to the store we went to find the perfect Webcam.
The journey wasn’t an easy one, mind you. We had to navigate the treacherous waters of Lawrence St #1200, Denver, CO 80202, United States, where a multitude of shiny objects and deceitful promises awaited us at every turn. But then, there it was: the Microsoft LifeCam Studio, glistening like a beacon in the night. I had seen this product for the first time right then and there, and I knew that our lives would never be the same.
Let me tell you, folks, I have used this Webcam on countless occasions since January, and it’s been quite the rollercoaster ride. Sometimes, it works flawlessly, capturing every nuance of my expressions as if my face was a masterpiece painted by the hand of a divine artist. Other times, it’s like trying to navigate a minefield with a blindfold on – you just never know what you’re going to get.
But that’s not to say that I regret my decision one bit. Life is full of surprises, and sometimes, those surprises come in the form of a three-star Webcam named Microsoft LifeCam Studio. If you’re thinking about making the leap into the world of Webcams yourself, here are some tips and tricks I’ve learned along the way:
1. Make sure your Webcam is properly aligned with your screen so that it captures your face from the perfect angle. Trust me, nobody wants to see a nostril close-up during a video call.
2. Lighting is key! You don’t want to look like a shadowy figure straight out of a horror movie. Set up some lamps or ring lights around you for that soft, warm glow that will make your face look as if it was chiseled by Michelangelo himself.
3. Invest in a good pair of headphones so that your callers can hear you loud and clear without being bombarded with the sounds of your keyboard clacking or your neighbor’s dog barking. Trust me, nobody wants to listen to that.
4. Be mindful of what’s going on behind you during video calls. You never know when a curious cat or a stray sock might make an unexpected appearance and steal the show.
5. And finally, always remember to keep your Webcam covered when you’re not using it. You never know who might be watching from afar, and let’s face it – nobody wants to see me in my pajamas at 3 AM.
So there you have it, folks! The tale of my journey with the Microsoft LifeCam Studio is far from over, but I hope that by sharing my experiences, I can help others navigate the treacherous waters of Webcam ownership and come out on the other side with a smile on their face and a newfound appreciation for the power of video calls. And who knows? Maybe one day, we’ll all be able to look back on this crazy time in history and laugh at the ridiculousness of it all.
Jeffrey Cummings –
As we eagerly anticipate the upcoming space exploration feats by SpaceX, their latest mission promises to be a game-changer. Set to blast off not once, but three times within a stunning five-hour window, this triple threat is sure to leave us spellbound. The first rocket, carrying a satellite for Bangladesh Communications Satellite Company Limited (BSCCL), will take flight from the Kennedy Space Center in Florida. Next up, SpaceX’s trusty workhorse, Falcon 9 Block 5, will make its way off the launch pad at Vandenberg Air Force Base in California to deploy 60 Starlink satellites into orbit.
In my quest for finding the perfect webcam for my son Rylan, who is an avid gamer and content creator, I stumbled upon Microsoft’s LifeCam Studio. Its unique features caught my attention, and after extensive research and analysis, I decided to take the plunge. The platform that this camera operates on is a game-changer in itself. With advanced technology like high dynamic range (HDR) imaging, this webcam ensures crystal clear visuals even in low light conditions. The wide-angle lens with a field of view of up to 78 degrees makes it an ideal choice for gamers who want to showcase their entire setup or content creators looking to capture more of the scene.
The Microsoft LifeCam Studio is also equipped with TrueColor technology, which ensures that colors appear true and vibrant, making it perfect for streamers who want to provide a visual feast for their viewers. The autofocus feature eliminates any manual intervention required in focusing on objects or people, ensuring smooth and seamless video production.
In terms of technical aspects, the Microsoft LifeCam Studio boasts a 1080p full HD resolution camera with an aspect ratio of 16:9. It is compatible with both Windows and Mac operating systems and can be easily connected via USB 2.0. The camera also comes equipped with advanced noise-reduction technology that ensures clear audio, even in noisy environments.
In conclusion, the Microsoft LifeCam Studio has been an absolute game-changer for my son’s video production needs. Its cutting-edge features, including HDR imaging, wide-angle lens, autofocus, TrueColor technology, and advanced noise-reduction technology, have taken his content creation to new heights. I highly recommend this webcam to anyone looking for a top-of-the-line product that delivers exceptional visuals and audio quality.
As we look forward to SpaceX’s upcoming triple threat launch, we can’t help but feel an overwhelming sense of hope and optimism for the future of space exploration. With their continued innovation and groundbreaking technology, we can’t wait to see what other exciting developments lie ahead in this ever-evolving field. Here’s hoping that SpaceX’s latest mission is a resounding success!