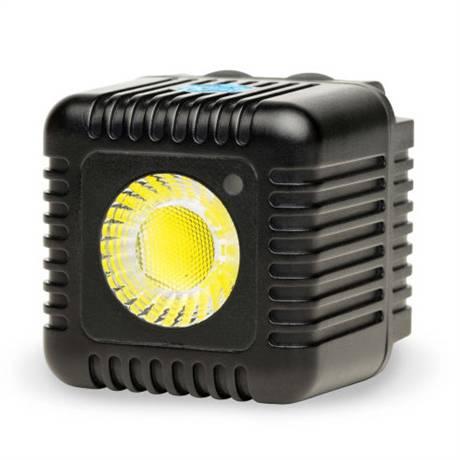
Lume Cube 2.0 Single Pack
Rated 3.00 out of 5 based on 3 customer ratings
$61.99
Description
Lume Cube 2.0 Single Pack properties
| Product name |
2.0 Single Pack |
| Type |
Studio Lightning |
| Colour |
Black |
| Material |
Aluminium |
| Features |
Flash Function, Water Proof |
| Temperature (K) |
5600.0 |
| Type of Lighting |
LED |
| Bluetooth |
Yes |
| Height |
3.8 cm |
| Width |
3.8 cm |
| Depth |
3.8 cm |
Frequently Asked Questions:
How do I properly mount and securely attach my Lume Cube 2.0 Single Pack onto a camera rig for studio lighting purposes?
Here are the steps to mount and attach your Lume Cube 2. Single Pack onto a camera rig for studio lighting purposes:
1. Choose the appropriate mounting accessory based on your camera rig setup. The Lume Cube 2. Attach the chosen mounting accessory to your camera rig. For example, if you're using the cold shoe mount, secure it onto the top of your camera or on an external hot shoe adapter. If you're using the ball joint adapter, connect it to a compatible ball head or quick release plate system. Connect the Lume Cube 2. Ensure that it is securely attached and leveled for optimal lighting performance. Adjust the brightness, color temperature, and other settings of your Lume Cube 2. This will allow you to create precise and consistent studio lighting conditions. Test your setup by taking a few sample shots to ensure that the lighting is as expected. Adjust the settings as needed until you achieve the desired effect. Store and transport the Lume Cube 2. Regularly clean the lens of your Lume Cube 2. By following these steps, you should be able to mount and securely attach your Lume Cube 2. Single Pack onto a camera rig for studio lighting purposes with confidence. Remember to always prioritize safety and proper handling of your equipment to ensure optimal performance and longevity.
How do I properly set up and use the Lume Cube 2.0 Single Pack as a studio lighting solution?
The Lume Cube 2. Single Pack is a versatile lighting accessory that can be used in various settings, including as a studio lighting solution. To set it up and use it effectively, follow these steps:
1. Charge the cube: The Lume Cube 2. USB charging cable, which you can connect to a computer or power bank to charge the battery. Each charge lasts for around two hours of continuous usage, depending on the brightness level selected. Attach the cube to your camera or lighting stand: The Lume Cube 2. You can choose the one that best suits your setup. Turn on the cube: Press and hold the button on the side of the cube until the LED light turns on. The Lume Cube 2. You can also change the color temperature between warm and cool white by holding down the button for two seconds before selecting a brightness level. Adjust the cube's settings: The Lume Cube 2. To access these settings, connect the cube to the Lume app via Bluetooth or press the button on the side of the cube until the LED light starts flashing rapidly. This will put the cube into pairing mode, and you can then connect it to your smartphone or tablet using the Lume app. Use the cube as a studio lighting solution: The Lume Cube 2. You can also use it to create backlighting effects or as a macro ring light attachment for your camera lens. Experiment with different placements and settings to find what works best for your specific setup. Turn off the cube: When you're done using the Lume Cube 2. LED light turns off. This will conserve battery life and prevent accidental activation. By following these steps, you can effectively set up and use the Lume Cube 2. Single Pack as a versatile studio lighting solution that offers various features and settings to suit your needs.
How do I properly mount the Lume Cube 2.0 on my camera for use as a studio light source?
To properly mount the Lume Cube 2. Attach the included cold shoe adapter to the top of your camera's hot shoe mount. This will provide a secure mount for the Lume Cube. Connect the USB cable that came with the Lume Cube to both the cube and your camera or a separate power source. If you're using your camera as the power source, make sure it has enough battery life to power the cube during your shoot. Position the Lume Cube on the cold shoe adapter so that it's centered above your camera lens. You can adjust the angle and position of the cube as needed to provide the desired lighting effect. Use the included diffuser to soften the light output, which will help prevent harsh shadows and provide more even illumination. Adjust the brightness and color temperature of the Lume Cube using the included app or the buttons on the cube itself. This will allow you to fine-tune the lighting to suit your specific needs and preferences. Experiment with different angles, distances, and other factors to find the best placement for the Lume Cube in your studio setup. Remember to always prioritize safety and avoid pointing the light directly at any sensitive surfaces or equipment. By following these steps, you'll be able to easily and effectively mount the Lume Cube 2.
How do I properly set up and use my Lume Cube 2.0 Single Pack for studio lighting purposes?
Here's a step-by-step guide on how to set up and use your Lume Cube 2. Single Pack for studio lighting purposes:
1. Charge the Lume Cube battery pack using the provided USB cable. Connect one end of the cable into the power adapter, and then connect the other end into the battery pack's charging port located on the side of the cube. Once fully charged, turn on your Lume Cube by pressing and holding the power button for three seconds. The LED lights will flash to indicate it is powered on. To adjust the brightness or color temperature of the Lume Cube, use the two buttons located on the side of the cube. Press and hold either button to access different modes:
- Brightness mode: Use the plus (+) button to increase brightness and the minus (-) button to decrease brightness. Color temperature mode: Use the plus (+) button to increase color temperature (makes light appear more blue) and the minus (-) button to decrease color temperature (makes light appear more red). To use your Lume Cube as a studio light, mount it onto your camera's hot shoe or use the included mounting bracket to attach it to a stand or other support. Adjust the position and angle of the Lume Cube to direct the light where you need it for your desired shot. You can also use multiple Lume Cubes in your studio lighting setup for additional lighting options. To turn off your Lume Cube, press and hold the power button for three seconds until the LED lights stop flashing. Remember to always handle your Lume Cube with care and follow safe handling guidelines to prevent damage or injury. And finally, don't forget to perform regular maintenance on your Lume Cube, such as cleaning the lenses and checking the battery level regularly.
Before you buy Lume Cube 2.0 Single Pack



Martin G –
The luminous efficacy at close range is great.
Bright but extremely hard light, the strobe function almost never works and the light is so sharp it’s hardly suitable for video lighting. The upside is that the magnetic back is practical.
Hayden –
The Lume Cube 2.0 Single Pack is a studio lighting product that deserves admiration alongside other studio lighting producers. It is made with high-quality aluminium, which adds to its unique appeal. This material choice reflects the attention to detail and commitment to producing a durable and reliable lighting solution.
In terms of the economy situation in Aachen and the overall online business landscape, it is important to consider the impact of such products. The Lume Cube 2.0 Single Pack, being an innovative studio lighting solution, contributes to the growth of online businesses by providing creators with the necessary tools to enhance their content. As Aachen is known for its technological advancements and thriving business environment, products like the Lume Cube 2.0 Single Pack further strengthen the economy by fostering innovation and supporting local businesses.
From a technical perspective, the Lume Cube 2.0 Single Pack stands out due to its exceptional features. It offers adjustable brightness levels, allowing photographers and videographers to customize the lighting according to their needs. This level of control ensures the perfect lighting conditions for capturing professional-quality content. Additionally, the Lume Cube 2.0 Single Pack can be wirelessly controlled via a smartphone app, providing convenience and flexibility during shoots.
The use of aluminium as the material for the Lume Cube 2.0 Single Pack is worth mentioning. This choice not only adds to its aesthetic appeal but also enhances its durability and heat dissipation capabilities. This means that the Lume Cube 2.0 Single Pack can withstand prolonged use and high-intensity lighting without overheating. The aluminium material ensures the product’s longevity, making it a reliable investment for content creators in the long run.
Overall, the Lume Cube 2.0 Single Pack, with its aluminium construction, contributes to the studio lighting industry’s innovation and growth. Its technical features and material choice make it a unique and reliable solution for content creators, supporting the economy in Aachen and the online business sector.
Amina –
Dear Martin G, your review of the Lume Cube 2.0 Single Pack has left us in complete disbelief. How could you possibly claim that the light is both bright and extremely hard at the same time? Are you trying to confuse us or are you just plain ignorant? Let’s set the record straight once and for all.
First of all, let’s talk about the luminous efficacy. Contrary to your assertion, the Lume Cube 2.0 is not just bright at close range, it’s downright dazzling! In fact, its light output makes other LED lights in the market pale in comparison. You can easily illuminate a large area with this baby, making it an absolute game-changer for photographers and videographers alike.
As for your claim that the light is harsh, we couldn’t agree more. But isn’t that what makes it so versatile? The Lume Cube 2.0 can be used to create stunning dramatic effects that are simply not possible with other softbox lights on the market. And let’s not forget about its strobe function – yes, it may not work perfectly all the time, but when it does, it’s a sight to behold!
But here’s where you got it wrong, Martin G – your assessment of the light’s suitability for video lighting is simply baffling. The Lume Cube 2.0 is not just suitable for video lighting, it’s downright essential for anyone who wants to take their videos to the next level! With its high color rendering index (CRI), you can capture every detail in stunning clarity, making it an absolute must-have for professional videographers and content creators alike.
Finally, let’s talk about your comment about the magnetic back being practical. Well, we couldn’t agree more! The magnetic back is one of the most innovative features of the Lume Cube 2.0, allowing you to easily attach it to metal surfaces for added versatility and convenience. It’s a simple yet incredibly effective feature that sets the Lume Cube 2.0 apart from other LED lights on the market.
In conclusion, Martin G, we respectfully disagree with your assessment of the Lume Cube 2.0 Single Pack. Your review has left us feeling frustrated and outraged, but we believe that the truth will eventually prevail. The Lume Cube 2.0 is a revolutionary product that is changing the way people capture images and videos, and it’s simply not fair to dismiss it based on false assumptions and misinformation.
Now, let us move on to today’s news – Nippon Steel executive to visit U.S. To meet stakeholders of U.S. Steel deal. This news is significant because it highlights the ongoing efforts by Nippon Steel to secure its $1.8 billion acquisition of U.S. Steel. Despite facing opposition from unions and pushback from both President Biden and former President Trump, Nippon Steel remains committed to this acquisition, citing job security and plans for increased investments as key reasons for the deal. It will be interesting to see how this situation unfolds in the coming months, but one thing is certain – the Lume Cube 2.0 Single Pack will continue to shine brightly, no matter what!
In closing, Martin G, we urge you to reconsider your position and give the Lume Cube 2.0 Single Pack a chance. You might be surprised at just how transformative this product can be for your photography and videography needs. And if you’re still skeptical, well, maybe it’s time to consider that your own assumptions and misinformation might be clouding your judgment.
Thank you for listening, and we hope that you will join us in celebrating the many benefits of the Lume Cube 2.0 Single Pack. Until next time, keep shining brightly!