Microsoft LifeCam Studio for Business
$51.99
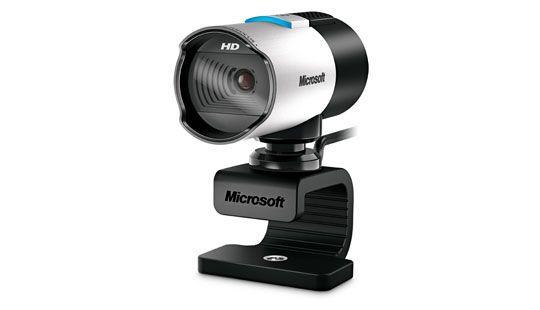
Get the Microsoft LifeCam Studio for Business Webcam and experience clear and crisp videoconferencing with HD video and crystal clear audio.
Description
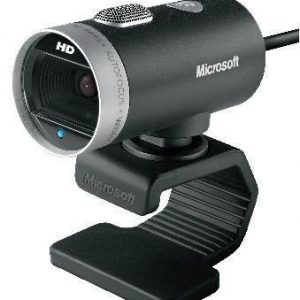
Microsoft LifeCam Studio is a business webcam that meets all the needs of video conferencing and online communication. It combines high-quality video and audio with an adjustable mounting system to deliver crystal-clear images in any situation.
Designed specifically for business use, the LifeCam Studio provides sharper, smoother video with 1080p HD widescreen video recording and a high-precision glass element lens. The webcam also features autofocus technology and a 360-degree rotation capability, allowing you to capture every detail with ease.
The LifeCam Studio features a high-fidelity microphone that filters out background noise and picks up your voice clearly. This ensures that you can hear and be heard during your online meetings. It also features an omnidirectional pickup pattern that ensures your audio is captured regardless of where you are located in the room.
The LifeCam Studio also has a flexible mounting system that can be adjusted to any angle, providing maximum versatility and convenience. This feature allows you to position the webcam anywhere on your desk or mount it on a tripod for easy setup and positioning.
Another advantage of the LifeCam Studio is that it is compatible with several video conferencing software platforms, including Skype for Business, Microsoft Teams, and Zoom. This makes it an ideal choice for businesses that use different communication tools and need a universal webcam solution.
In terms of security, the LifeCam Studio offers several features that keep your information safe. It has an integrated privacy shutter which can be closed when the webcam is not in use, preventing anyone from spying on you. Additionally, it also supports Windows Hello facial recognition technology, providing an extra layer of protection for your computer.
In summary, the Microsoft LifeCam Studio for Business is an ideal webcam solution for professionals who need crystal-clear video and audio quality, convenience, and versatility. It is a well-designed and sophisticated product that delivers high-quality performance while being an affordable option for most business setups.
Microsoft LifeCam Studio for Business properties
| Product name |
LifeCam Studio for Business |
| Brand |
Microsoft |
| Interface |
USB |
| Max Video Resolution @ 30fps |
1920×1080 (Full HD) |
| Max Video Resolution |
1920×1080 pixels |
| Platform |
Windows |
| Digital Zoom |
3 x |
| Features |
Microphone |
| Mounting |
Tripod |
| Focus |
Auto |
| Software included |
No |
| Height |
113 mm |
| Width |
40 mm |
| Depth |
60 mm |
| Weight |
104 g |
Frequently Asked Questions:
How do I properly install and set up Microsoft LifeCam Studio for Business on my computer running Windows 10 operating system?
Purchase the Microsoft LifeCam Studio for Business webcam from an authorized reseller or directly from Microsoft's online store. Ensure your computer meets the minimum system requirements:
- Operating System: Windows 7 (SP1), Windows 8. Windows 10 (version 1607 or later)
- Processor: Intel Core i3, i5, i7, or equivalent AMD processor
- Memory: 4 GB RAM
- Hard Disk Space: At least 50 MB of available hard disk space
- Display Resolution: 1280 x 768 or higher resolution monitor
3. Connect the LifeCam Studio webcam to your computer via USB cable. Make sure the webcam is properly inserted into an open USB port on your computer. The blue light on the front of the camera should turn on. If prompted by Windows, follow the on-screen instructions to install the necessary drivers and software for the LifeCam Studio. If Windows does not automatically detect the webcam, visit Microsoft's official website and download the latest driver package for your specific operating system. Follow the installation instructions provided in the package. Once the webcam is properly installed and recognized by your computer, launch any video conferencing software or application that supports the LifeCam Studio. The webcam should automatically be selected as the default input device. Adjust the camera's settings within the software, such as framing, brightness, and contrast, to achieve optimal picture quality for your specific environment. Consider installing the Microsoft LifeCam Software Suite, which provides additional features such as noise cancellation, image enhancement, and motion detection. This software can be downloaded from Microsoft's website at no extra cost. Test the camera's performance by initiating a video call with another user or recording a test video to review the picture quality and functionality.
"How do I ensure optimal video quality when using Microsoft LifeCam Studio for Business?"
To ensure optimal video quality when using Microsoft LifeCam Studio for Business, you should follow these steps:
1. Choose a well-lit room with plenty of natural light or use a desk lamp to brighten the area around your face. Avoid sitting with your back to a window as this will create unwanted shadows on your face. Position the camera at eye level to avoid an unflattering upward angle, which can make you appear shorter than you actually are. Adjust the height of the camera stand or use a separate monitor to achieve this. Use a high-quality broadband connection to minimize any delay in video streaming and prevent pixelation or buffering issues. Check your microphone settings to ensure that the sound quality is clear and audible. If necessary, use an external microphone for superior audio performance. Optimize your video compression settings by adjusting the bitrate and resolution to match the available bandwidth and the desired level of detail. Higher-resolution videos may require more bandwidth to stream smoothly, so it's essential to balance these factors. Enable the 'Noise Reduction' feature in the LifeCam Studio software to minimize any background noise or distractions from your environment. This will help ensure that your voice is clear and easy to understand. Test your video quality before starting your meeting or conference call to ensure that everything is working correctly. Check for any issues with lighting, camera positioning, audio levels, or other factors that may affect the overall video quality. By following these steps, you'll be able to enjoy optimal video quality when using Microsoft LifeCam Studio for Business, providing a more engaging and productive experience for all your virtual meetings and conferencing needs.
How do I properly install and set up Microsoft LifeCam Studio for Business on my computer?
Firstly, ensure that your computer meets the minimum system requirements for Microsoft LifeCam Studio:
- Windows 7 or higher (32-bit or 64-bit)
- Intel Core i3 or equivalent processor
- 2 GB RAM
- DirectX 9 compatible graphics card
- Available USB port
2. Download and install the latest version of Microsoft LifeCam Studio for Business software from the official Microsoft website. Connect your LifeCam Studio to an available USB port on your computer using the provided USB cable. Make sure that the camera is properly plugged in and is recognized by your operating system. Launch the Microsoft LifeCam Studio for Business software by double-clicking the desktop icon or searching for it in the Start menu. The application will automatically detect the connected camera, and you'll be prompted to install the latest driver if necessary. Follow the on-screen prompts to complete the installation process. You may be asked to restart your computer at this point. After rebooting your PC, open the LifeCam Studio software again and follow these steps:
- Click on "Settings" in the main menu. In the Settings dialog box, adjust the camera's resolution, frame rate, brightness, contrast, saturation, sharpness, white balance, and other video settings as per your needs. Additionally, you can customize the audio settings, such as volume, microphone sensitivity, and noise reduction. Once done, click "Save" to apply the changes. To test your camera's performance, click on the "Preview" button in the main menu or press the Windows key + R, type "mmsys. Run dialog box, and then select Microsoft LifeCam Studio from the list of available devices. If everything is working correctly, you should see a live video feed displayed on your screen. Use the on-screen controls to adjust the focus, zoom, and other features as desired. To save or share your recorded videos, use third-party software like Microsoft Stream, Skype for Business, Zoom, or other compatible programs that support LifeCam Studio. Make sure that you have proper permissions and settings configured within these tools to ensure optimal performance and security. If you encounter any issues or problems during the installation or setup process, refer to the official Microsoft support documentation or contact their technical assistance team for further assistance.
How do I properly install and set up Microsoft LifeCam Studio for Business on my computer?
Here are the steps to properly install and set up Microsoft LifeCam Studio for Business:
1. First, make sure that your computer meets the system requirements for the camera. You can find these requirements on the Microsoft website. Insert the installation CD into your computer's DVD drive. If you downloaded the software from Microsoft's website, follow the prompts to run the installer. Follow the on-screen instructions to complete the installation process. Choose the language and region settings that are appropriate for your location. Connect the LifeCam Studio to your computer using the supplied USB cable. The camera should automatically be detected by your operating system. If you're prompted to install drivers, follow the on-screen instructions. Otherwise, skip this step. Launch the Microsoft LifeCam Studio software by searching for it in the Start menu or by double-clicking the desktop shortcut that was created during installation. Follow the on-screen prompts to set up your camera. This may include adjusting the camera's settings, such as brightness and contrast, and configuring your microphone and speakers. Once you've completed setup, test your camera by making a video call or recording a video using the software. Make sure that the image and sound quality are satisfactory. If necessary, adjust the camera's settings to optimize performance for your specific use case. For example, if you're planning on using the camera in low-light conditions, you may want to increase the camera's sensitivity. Finally, close the Microsoft LifeCam Studio software and disconnect the camera from your computer. When you're ready to use it again, simply connect it and launch the software. Remember, always perform the task to the best of your ability and follow any additional instructions provided by Microsoft. If you encounter any issues during installation or setup, consult the product manual or contact Microsoft support for assistance.

Reviews
There are no reviews yet.