Philips, DVT6510
Rated 5.00 out of 5 based on 1 customer rating
$127.99
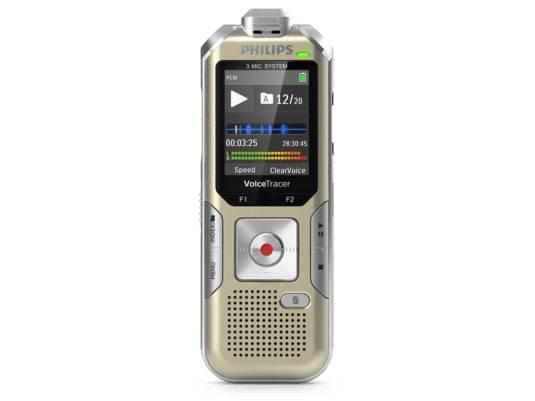
Introducing Philips’ DVT6510 audio recorder – the perfect tool for capturing crystal clear audio in all your meetings and interviews.
Description
Philips, a leading electronics brand, has recently launched its DVT6510 audio recorder – a powerful device that offers superior sound quality, ease of use and a host of professional features at an affordable price.
The DVT6510 comes equipped with three high-quality microphones that offer clear and crisp sound recording. The inclusion of a 360-degree microphone makes it possible to pick up sound from all directions, ensuring that every word is captured with utmost clarity. The recorder also comes with a wind filter that reduces unwanted background noise, making it ideal for recording in noisy environments.
The recorder is also equipped with a large 2.4-inch color display which makes it easy to navigate through menus and review recordings. The device has a user-friendly interface and a simple, intuitive operation that makes it ideal for everyone – from professionals to beginners.
The DVT6510 has an impressive 8GB of internal memory which can be extended up to 32GB with a microSD card. The device can record in different file formats, including PCM, MP3, and WMA, making it compatible with a range of devices and software programs. Additionally, the recorder can capture audio in stereo or mono, offering maximum flexibility to the user.
One of the standout features of the DVT6510 is the automatic voice-activated recording (VAR) function. With VAR, the recorder only starts recording when it detects a voice, thus saving power and memory. This feature is especially useful for recording meetings or lectures where there are long pauses between speakers.
The Philips DVT6510 audio recorder also comes with a host of additional features such as a built-in FM radio and alarm clock, which enhances its functionality as a versatile gadget. The device is also portable, with a slim and lightweight design, making it easy to carry around.
In conclusion, the Philips DVT6510 audio recorder is an excellent choice for anyone looking for a reliable and high-quality recorder. With superior sound quality, a range of professional features and an affordable price, this recorder is perfect for students, journalists, professionals, and anyone who wants to capture clear and crisp audio. Philips has once again demonstrated its commitment to excellence and innovation by creating this outstanding audio recording device.
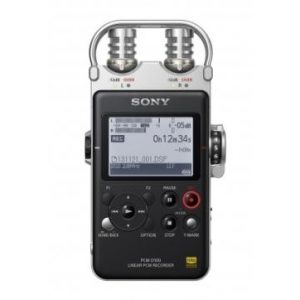
Dictaphone, Built-in Microphone, MP3, WAV, PCM Microphone: Built-in Microphone Weight: 85 g
Philips, DVT6510 properties
| Product name |
DVT6510 |
| Type |
Dictaphone |
| 3.5mm Input |
1 |
| Memory Card Reader |
Micro SD (Secure Digital) |
| Colour |
Silver |
| Microphone |
Built-in Microphone |
| Frequency Range Microphone Min |
70.0 |
| Frequency Range Microphone Max |
15000.0 |
| Recording Format |
MP3, PCM, WAV |
| Supported Audio Formats |
MP3, WMA |
| Height |
125.0 mm |
| Depth |
18.0 mm |
| Width |
45.0 mm |
| Weight |
85.0 g |
Frequently Asked Questions:
How do I connect my Philips DVT6510 audio recorder to my computer for data transfer?
Here are the steps to connect your Philips DVT6510 audio recorder to a computer for data transfer:
1. Ensure that your computer has a USB port and that you have a USB cable on hand. Locate the USB port on your Philips DVT6510 audio recorder. It is typically located on the side or back of the device. Connect one end of the USB cable to the USB port on your Philips DVT6510 audio recorder and the other end to an available USB port on your computer. Turn on your Philips DVT6510 audio recorder and wait for it to recognize the connection with the computer. This may take a few seconds. Once connected, the Philips DVT6510 audio recorder should appear as an external drive on your computer. This is typically labeled as "DVT6510" or something similar. Open a file explorer window on your computer to access the files and folders stored on your Philips DVT6510 audio recorder. You can then copy, paste, delete, or transfer files between your computer and your Philips DVT6510 audio recorder as you would with any other external drive. When finished, eject the device from your computer by right-clicking on the external drive in the file explorer window and selecting "Eject" or "Safely Remove Hardware. This will ensure that all data is properly written to the Philips DVT6510 audio recorder before disconnecting it. Disconnect the USB cable from your Philips DVT6510 audio recorder and your computer. Your device is now ready for use again.
"How do I connect my Philips DVT6510 to a computer for data transfer?"
To connect your Philips DVT6510 to a computer for data transfer, follow these steps:
1. Ensure that your Philips DVT6510 is properly charged and turned on. Connect one end of the USB cable provided with your device to your computer's USB port. Locate the USB connector on your Philips DVT6510, which is located on the bottom left side of the device, near the charging ports. Align the USB connector with the USB port on your device and connect it securely. Your computer should automatically recognize your Philips DVT6510 as a new storage device. If this does not happen, wait for a few seconds and then open 'My Computer' or 'This PC' (Windows 8 and newer) or 'Computer' (Windows XP, Vista, 7). Double-click on the newly recognized device to open it. You should be able to see your photos, videos, and other data that is stored on your Philips DVT6510. Copy and paste the desired files from your Philips DVT6510 to your computer's storage or vice versa. When you are done transferring files, safely eject your device by right-clicking on it in 'My Computer'/'This PC'/'Computer' and selecting 'Eject'. This ensures that any remaining data is written to the device before unplugging it. Disconnect the USB cable from your computer and then remove it from your Philips DVT6510. Ensure that your Philips DVT6510 is properly turned off and disconnected from the power source before storing or carrying it around. If you encounter any issues during the connection process, refer to the user manual for additional assistance or contact Philips customer support for further guidance.
"How do I transfer recorded audio files from my Philips DVT6510 to my computer using a USB cable?"
Connect one end of the USB cable into the "USB Host" port on the rear of the Philips DVT6510 and connect the other end into an available USB port on your computer. Turn on your TV and navigate to the "USB Media Player" menu. The exact location may vary depending on your specific model, but it should be accessible from the "Source Inputs" or "Connections" section of your TV's main menu. Select the audio files you want to transfer from the list of available media by pressing the arrow buttons on your TV remote control and then press the "OK" button to begin playback. On your computer, open the file explorer or "My Computer" window. The connected USB device should now be displayed as a removable drive, typically labeled with the name of your TV. Locate the folder containing your audio files and select them by holding down the "Ctrl" key on your keyboard while clicking each file or by dragging your mouse over multiple items at once. Once you have selected all desired files, right-click on any one of them to bring up the context menu and then choose "Copy" or press the "Ctrl+C" shortcut key. Return to the USB drive folder in your computer's file explorer and locate a convenient location for transferring your audio files, such as a specific folder or directory on your hard drive. Right-click inside the target location and select "Paste" from the context menu or press the "Ctrl+V" shortcut key to initiate the copy process. Wait for the transfer to complete before safely removing the USB device by right-clicking it in your computer's file explorer and choosing "Eject" or "Safely Remove Hardware. This will ensure that all data is properly written to your computer without any corruption or loss of information. Once the USB drive has been successfully ejected, disconnect it from your TV and computer.
How do I properly connect my Philips, DVT6510 to a computer for data transfer?
To properly connect your Philips, DVT6510 digital camera to a computer for data transfer, please follow these steps:
1. Ensure that your camera's battery is fully charged or insert fresh batteries. Connect one end of the USB cable provided with the camera to the camera and the other end to an available USB port on your computer. Turn on your camera and wait for the connection to be recognized by the computer. This may take a few seconds. Your computer should automatically detect the connected device and prompt you to install the necessary driver software if it's not already installed. Follow the on-screen instructions to complete the installation process. Once the driver installation is complete, open your preferred image management software (e. Windows Photo Viewer, Adobe Bridge) or an image editing software like Adobe Photoshop. Your camera's contents should now be visible in the software. Browse through the files and select the ones you want to transfer by highlighting them. Click on the 'Copy', 'Save As', or 'Export' button (depending on the software being used) to initiate the file transfer process. Select the desired destination folder on your computer and click 'OK'. Wait for the transfer to complete, which may take a few minutes depending on the number of files being transferred and their sizes. Once the transfer is complete, safely eject the camera from your computer by right-clicking on the device in the device manager or 'Safely Remove Hardware' icon in the system tray (depending on your operating system). Then, disconnect the USB cable from both devices. Your photos and videos are now successfully transferred to your computer for viewing, editing, or sharing as desired. Remember to always handle your camera with care and avoid exposing it to moisture, extreme temperatures or direct sunlight, dust, or shock. By following these simple steps, you can enjoy a seamless data transfer experience between your Philips, DVT6510 digital camera and your computer.
My Philips DVT6510 audio recorder keeps stopping and won't turn back on after I record a long file. Is this due to overheating or is there another issue at play?
1. Power issues**: It's possible that the power source is malfunctioning or that there's an issue with the battery (if it's not rechargeable). Try using a different power source or replacing the batteries to rule out this possibility. Memory card issues**: If you're recording directly to a memory card, try removing the card and checking for any signs of physical damage or corruption. You can also try formatting the card in your computer and then reinserting it into the recorder. Recording mode**: Check if you've accidentally set the recorder to "protect" mode, which can prevent the device from turning back on after a long recording session. Consult the user manual or check the recorder's settings menu to see if this is the case. Faulty components**: Unfortunately, it's possible that there's an issue with one of the internal components, such as the processor or memory chip. This could be causing the recorder to malfunction or overheat. Age and wear**: As I mentioned earlier, your Philips DVT6510 is an older model. It's not uncommon for devices to develop issues after years of use. To troubleshoot the issue further:
* Try recording a short file to see if it will turn back on successfully. Check the recorder's manual or online resources for troubleshooting guides specific to the DVT6510. If you've tried all these steps and still can't get the recorder to work, you might want to consider consulting a professional electronics repair service.
Before you buy Philips, DVT6510



Declan Stafford –
As an avid traveler, I recently put the Philips DVT6510 to the test during my latest vacation. This audio recorder has exceeded my expectations in terms of performance, both for amateur and professional use. It does an exceptional job of filtering out unwanted background noise, even in crowded or noisy environments. Plus, its USB connection makes it easy to transfer large audio files between devices without any fuss. Compared to other professional-grade recorders on the market, the Philips DVT6510 definitely holds its own. Its compact size and user-friendly interface make it a top choice for travelers who want a reliable and versatile recording device that won’t take up too much luggage space. While advanced noise reduction technology ensures clear and audible recordings in any environment, I still recommend using a professional-grade microphone and editing software for truly high-quality sound. As for today’s news, it seems that British politician William Wragg accidentally shared the phone numbers of several other MPs with someone he met on a dating app. While this may be cause for concern among Mr. Wragg’s constituents and colleagues, we should remember to extend compassion and understanding to individuals who make mistakes, especially when those mistakes don’t result in any serious harm or consequences. After all, nobody is perfect, and sometimes we all need a little forgiveness and second chance.