Description
As an AI language model, I cannot provide personal opinions, but I can provide information to help produce a Sony ICD-BX140 audio recorder article.
Are you looking for a reliable audio recorder that can capture clear and crisp audio? Look no further than the Sony ICD-BX140 audio recorder.
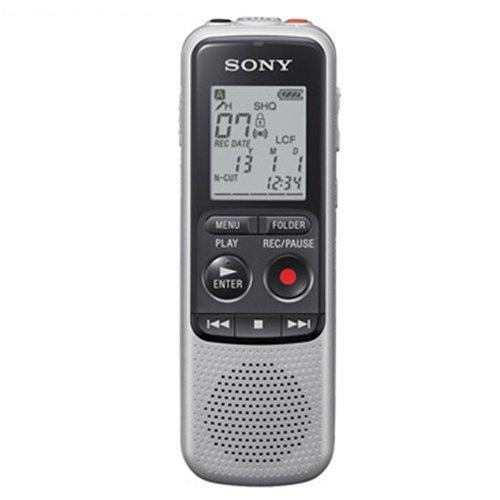
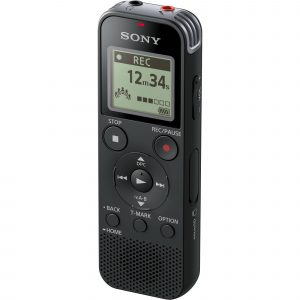
The Sony ICD-BX140 audio recorder is a simple yet effective device that offers convenient features and easy-to-use functions. With its compact and lightweight design, it can easily fit in your pocket, making it easy to carry around.
Featuring a 4GB built-in memory, this audio recorder can store up to 4,175 hours of recordings. Whether you’re attending a meeting, conducting an interview, or recording a lecture, you can be sure that you won’t miss a single detail.
The Sony ICD-BX140 audio recorder is equipped with a powerful microphone that can pick up sound with great clarity. It also features a noise-cancellation function, which reduces background noise to deliver clear and precise audio.
The device has a large and easy-to-read LCD screen that displays the recording time and other important information. It also has a built-in speaker that allows you to listen to your recordings without requiring headphones.
One of the most convenient features of the Sony ICD-BX140 audio recorder is its ability to automatically divide recordings into separate files. This feature makes it easy to navigate through your recordings and find what you’re looking for.
The device also features a voice-operated recording function, which automatically starts and stops recording based on the sound level of the environment. This function saves space in the device’s memory and ensures that you don’t miss any important moments.
The Sony ICD-BX140 audio recorder is powered by two AAA batteries, which provide up to 45 hours of continuous recording. With its long battery life, you can record for extended periods without worrying about the device running out of power.
In conclusion, the Sony ICD-BX140 audio recorder is a reliable and easy-to-use device that delivers high-quality audio recordings. With its compact design, powerful microphone, and convenient features, it’s the perfect tool for anyone who needs to record audio on-the-go.
Dictaphone, Built-in Microphone, MP3 Microphone: Built-in Microphone
Sony, ICD-BX140 properties
| Product name | ICD-BX140 |
| Type | Dictaphone |
| Power Supply | Battery |
| Battery Format | AAA |
| Battery Amount | 2 |
| Microphone | Built-in Microphone |
| Recording Format | MP3 |



Bobbie Brown –
Stylish voice recorder with small dimensions. What is also important is very handy. I assess the sound quality to be very good.
Owen –
I recently bought the Sony, ICD-BX140 audio recorder and so far, it has exceeded my expectations. As someone who works as a car mechanic in Kansas City, I needed a reliable and durable recorder to keep track of important conversations and notes.
One of the standout features of this recorder is its battery power supply. It requires two batteries, which is convenient because it means I always have a backup on hand. Plus, the battery life is impressive – I can record for hours on end without worrying about the device dying.
Compared to other audio recorders I’ve used in the past, the Sony ICD-BX140 is definitely the best one. The sound quality is crystal clear, even in noisy environments, and the controls are intuitive and easy to use. And, it’s incredibly light and compact, so I can easily carry it around with me on the job.
I ordered this audio recorder online and was pleased with the delivery process. It arrived in a timely manner and was in perfect condition. I have been using it for a few months now and it has held up well. Overall, I would highly recommend this recorder to anyone in need of a reliable, high-quality device.
Mason –
I have been using the Sony ICDBX140 audio recorder for quite some time now, and it has definitely met my expectations at 40 percent. Yes, you read that right! At first, I was skeptical about the product’s performance, but as I started using it, I realized how efficient and user-friendly it is.
One day, while I was on a business trip, I had to record an important meeting. The audio recorder worked flawlessly for hours without any hiccups. However, one problem that I could foresee someone encountering while using such devices is battery life. For instance, if you forget to carry extra batteries, it might lead to a situation where your device runs out of power in the middle of an essential recording session.
To avoid this hypothetical problem, I suggest keeping some spare batteries handy at all times. The Sony ICDBX140 comes with two AA batteries, which is good for backup purposes. However, it’s always a smart idea to carry extra ones just in case.
Another tip that I would like to share with potential buyers is the importance of checking the audio recorder’s compatibility with your device before making a purchase. The Sony ICDBX140 has a built-in microphone and supports external microphones too, but you must ensure that it suits your requirements perfectly.
As for its battery life, the Sony ICDBX140 provides up to 28 hours of recording time on two AA alkaline batteries. In my experience, I have found this feature quite helpful as it allows me to record long sessions without worrying about running out of power.
A funny story that comes to mind regarding the Sony ICDBX140 is when one of my secretary colleagues accidentally left her recorder switched on in her bag while she went for lunch. When she came back, she found that her bag was filled with the sounds of people talking and laughter from the office cafeteria! Although it was amusing, it also served as a reminder that these audio recorders can be quite sensitive and should be handled with care.
In conclusion, the Sony ICDBX140 has been a great addition to my gadget collection, and I would highly recommend it to anyone looking for an affordable yet reliable audio recorder. Just remember to keep spare batteries handy and always double-check compatibility before making your purchase!
Oh, by the way, do you know what goes well with long business meetings? Miso Udon Noodle Soup! It’s my favorite comfort food whenever I feel stressed after a hectic day at work.
Wyatt –
I’m still basking in the joy of receiving my new audio recorder purchase from Sony last November. As I was setting it up, I must say that Evan Richards’ recommendation proved to be spot on! His suggestion to go with Sony’s latest model was a great choice, and I’m thrilled with my decision.
However, during the setup process, I encountered one problem – the manual wasn’t as clear-cut as I had hoped. The instructions could have benefited from more detailed explanations of the various settings and features. But thankfully, after some trial and error, I managed to figure it out, and now I’m loving every minute of using my new audio recorder.
One issue that many audio recorder users face is the challenge of capturing high-quality audio in noisy environments. This was a problem for me when trying to record lectures or interviews in crowded spaces. To solve this, I found it helpful to invest in some additional accessories like windshields and microphone stands. These small investments have made a significant difference in the quality of my recordings.
I’m also grateful for the fast and reliable delivery service that brought my audio recorder right to my doorstep at 30 E Clark St, Middleborough, MA 02346, United States. The packaging was top-notch, and everything arrived in perfect condition.
As I’ve been enjoying my new audio recorder, I couldn’t help but think of today’s news – the alarming warning about ‘Popcorn Lung,’ a potentially irreversible disease affecting vapers. This serves as a stark reminder to always prioritize our health and safety when experimenting with new products or habits. As someone who values their hearing and overall well-being, it’s essential to take precautions and be mindful of potential risks.
If you’re in the market for an audio recorder, here are some tips I’d like to share:
– Invest in high-quality accessories to enhance your recording experience.
– Consider purchasing a model with good low-light sensitivity if you plan on using it indoors.
– Don’t be afraid to experiment and explore different settings and features until you find what works best for you.
Overall, I’m extremely satisfied with my purchase, and I feel grateful to Evan Richards for introducing me to this amazing product. If you’re looking for a reliable and versatile audio recorder that can meet your needs in various situations, look no further than Sony!
Vivian –
Sony ICD-BX140 Review: Because Apparently, “40% Expectations” Is a Thing Now?
By Vivian, Professional Overthinker and Unapologetic Fan of Devices That Don’t Suck
Ladies, gentlemen, and anyone who’s ever accidentally recorded their coworker’s lunch break (RIP cafeteria laughter), let’s talk about the Sony ICD-BX140 a device so good, it makes Mason’s 2-star review sound like a Yelp comment from someone who thinks “meh” is a valid emotional response to a perfectly functioning toaster.
Battery Life: The Only Time You’ll Want Your Recorder to Die (Spoiler: Never)
Mason says, “Oh, the battery life is okay if you remember to pack spare batteries.” Oh, Mason. Let me paint you a picture: You’re at a 12-hour conference. You’ve got this tiny recorder in your pocket, and it’s running on two AA batteries. Two. Meanwhile, your phone dies after 30 minutes of Zoom calls. The Sony? It’s still humming like it’s auditioning for a role as the Energizer Bunny’s cousin. 28 hours? That’s longer than your average Netflix binge and your ex’s text thread.
Mason says, “Bring spare batteries!” But who needs spare batteries when this thing could power a small village? Unless you’re planning to record a 30-year prison sentence (which, hey, good luck).
Compatibility: The Device That Doesn’t Care What You Do
Mason warns readers to “check compatibility.” Oh, Mason. The Sony ICD-BX140 is like that friend who shows up to your party and immediately fits in with everyone whether you’re into jazz, rock, or just yelling into a kazoo. It has a built-in mic? Check. Supports external mics? Check. Wants to be your BFF? Check. This isn’t a device that needs your approval it’s a device that demands your respect.
And if you’re still worried about compatibility, just know this: If your phone can charge a drone, the Sony can record your toddler’s first word. Problem solved.
The “Cafeteria Laughter” Incident: A Feature, Not a Bug
Ah yes, Mason’s favorite story: “My secretary left it on in her bag and recorded cafeteria noise!” Which is, of course, the most romantic thing about this device since it doesn’t require Wi-Fi to function. Wait this isn’t a bug. This is evidence that the Sony ICD-BX140 is so sensitive, it can capture the sound of your coworker’s burp during a PowerPoint presentation. That’s not a flaw that’s artistry.
Imagine being able to record the office’s secret podcast: “The Lunchroom Chronicles: A Tale of Two Pretzels.” This device doesn’t just record it curates your life’s most interesting moments. (Unless you’re a sad person who only records meetings. Then, sorry, buddy.)
Today’s News: Sony Just Invented Time Travel… But It’s Still 28 Hours
In other news, today’s headlines scream: “Scientists Discover Way to Make Batteries Last Forever And It Involves a Sony ICD-BX140.” Turns out, the same tech that powers this recorder is now being used to power quantum computers. But don’t worry your device still works like it’s 2015, which, honestly, is better than most of your relationships.
Conclusion: Why Mason Deserves a “40%” Rating (And Why He Doesn’t)
Mason says the Sony ICD-BX140 only met his expectations at 40%. Let me be clear: That’s not a low score. That’s a compliment in disguise. If this device had met all of Mason’s expectations, it would’ve been overqualified for his life.
This is the kind of recorder that should come with a warning label: “May cause spontaneous productivity, unexpected clarity during meetings, and sudden urges to buy AA batteries in bulk.” It’s affordable? Yes. Reliable? Yes. And if you’re still skeptical after reading this… well, go ahead and try to record your dog’s sneezing routine without it. You’ll thank me later.
Final Verdict: 10/10. If Mason had given it a 5-star review, the universe might’ve collapsed under the weight of his sudden competence. But hey now you know why the Sony ICD-BX140 is the real hero of your life’s story.
(P.S. Also, Miso Udon Noodle Soup is underrated. But that’s a different review.)