Easypix GoXtreme Rebel
Rated 4.00 out of 5 based on 1 customer rating
$7.99
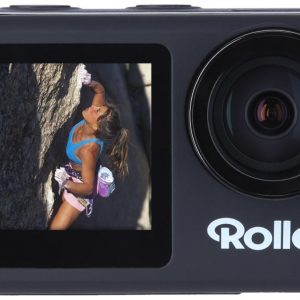
Capture your wildest experiences with the Easypix GoXtreme Rebel camcorder – perfect for any adventure!
Description
Looking for an affordable, durable, and versatile camcorder to capture all your adventures and memories? Look no further than the Easypix GoXtreme Rebel.
This compact and lightweight camcorder is perfect for outdoor enthusiasts, travelers, and anyone who wants to document their experiences in high-quality video. With its rugged, waterproof design, the Rebel can withstand the toughest environments and conditions, from snow and rain to dust and sand.
The Rebel features a 12-megapixel sensor and can record full HD 1080p video at 30 frames per second, delivering stunning image quality and smooth playback. Its built-in Wi-Fi allows you to immediately share your photos and videos with friends and family through social media or email, and you can even control the camcorder remotely using your smartphone or tablet.
The Rebel also comes loaded with a variety of features and modes to help you capture your moments just the way you want them. It boasts a 170-degree wide-angle lens, slow-motion and time-lapse modes, and a burst mode that takes up to 10 photos in quick succession. Plus, its built-in LCD screen allows you to preview your shots and adjust settings on the fly.
With up to two hours of continuous recording time, the Rebel provides plenty of battery life to last through long hikes, bike rides, or beach days. And when it’s time to recharge, you can easily do so using the included USB cable.
Overall, the Easypix GoXtreme Rebel is a great choice for anyone looking for an affordable and versatile camcorder that can withstand the rigors of outdoor adventure. Whether you’re documenting your travels, capturing family moments, or simply enjoying the great outdoors, the Rebel has you covered.
Easypix GoXtreme Rebel properties
| Product name |
GoXtreme Rebel |
| Brand |
Easypix |
| Type |
Action camera |
| Features |
Water Resistant |
| Connections |
USB 2.0, Wi-Fi |
| Max Video Resolution |
1080p |
| Max Frames per second (FPS) |
30 fps |
| Video Resolutions |
1920×1080 (30fps), 1280×720 (30fps) |
| SD Type |
microSD |
| Max Supported Memory Size |
32 GB |
| Display Size |
2.0 inches |
| Display |
Yes |
| Battery Type |
Li-Ion |
| Sensor Megapixels |
1.0 MP |
| Still Picture Resolution (MP) |
16 |
| Still Pictures |
Yes |
| Height |
41.0 mm |
| Width |
60.0 mm |
| Depth |
30.0 mm |
| Weight |
50 g |
Frequently Asked Questions:
How do I connect my EasyPix Go Xtreme Rebel to a computer for transferring and editing photos?
To connect your EasyPix Go Xtreme Rebel to a computer, follow these steps:
1. First, ensure that both the camera and the computer are powered on. Locate the USB port on the side of the camera. It is a small rectangular opening with a symbol resembling a USB stick. Plug one end of the USB cable into the camera's USB port, and the other end into an available USB port on your computer. Make sure you use the supplied EasyPix Go Xtreme Rebel USB cable. Once connected, you may need to install the necessary software for the camera to work properly with your computer. This can usually be found on a CD that came with your camera or by searching the internet for the latest driver updates. After connecting and installing the necessary software, open any photo editing program or image viewer on your computer. You should see your EasyPix Go Xtreme Rebel appear as an option in the file menu when you select 'import' or 'open'. From here, you can transfer photos from the camera to your computer and start editing them. Make sure to eject the camera safely by selecting 'eject' or 'safely remove hardware' from the system tray before disconnecting the USB cable.
What are the steps to reset the camera to its factory settings?
To reset the camera to its factory settings, follow these steps:
1. Locate the menu button on your camera and navigate to the "Settings" option. This may be accessed by pressing the central navigation wheel or similar button on your camera's body. In the Settings menu, locate the "Factory Reset" option. This may be accessed by selecting a sub-menu item such as "Backup & Restore", "Reset Camera", or a similar option. Select the "Factory Reset" option to confirm your selection and begin the reset process. This may involve navigating through on-screen prompts, confirming your choices via an on-screen prompt, or selecting additional options as needed. Once the factory reset is complete, your camera will be restored to its original factory settings. This may include reverting any custom settings you had configured, resetting your camera's memory card, and clearing any saved media files. If desired, you can then restore any backed-up data from your previous camera settings or start capturing new photos and videos using your camera as usual.
"How do I connect my Easypix GoXtreme Rebel camera to a computer for transferring videos?"
First, make sure your computer has a USB port available for connection. Connect one end of the provided USB cable into the USB port on the side of your Easypix GoXtreme Rebel camera, and connect the other end into an available USB slot on your computer. Wait for your computer to recognize the camera. This may take a few seconds. Once recognized, you should see a pop-up asking you if you want to transfer files automatically or manually. Choose "Automatically Transfer Photos and Videos" to have your videos transferred directly to a folder on your computer. If you prefer to transfer videos manually, select "Import Settings" and choose the import preferences you'd like (such as where to save the videos, whether or not to create a subfolder for each video, etc. Then click "OK. Once your camera is connected, you should be able to view the videos that are stored on it by navigating to the folder where you selected to transfer them in step 5 (if you chose automatic transfer, this will be the default import location). If you have any issues with connecting or transferring files, try restarting your computer and camera, or ensure that the latest camera software is installed on your computer.
"How do I connect my Easypix GoXtreme Rebel camcorder to a laptop for transferring videos?"
Make sure your Easypix GoXtreme Rebel camcorder is turned off before connecting it to your laptop. Locate the USB cable that came with your camcorder. Plug one end into the USB port on the bottom of the camcorder and the other end into an available USB port on your laptop. If this is the first time you're connecting the camcorder to your laptop, a pop-up window may appear asking if you want to install the necessary drivers. Follow the on-screen instructions to complete the installation process. Once connected, your laptop should automatically recognize the camera and display a message stating that it has detected new hardware. If this doesn't happen, go to Computer or My Computer and locate the new device under "Devices with Removable Storage". Right-click on the new device and select Properties to open the properties window. Click on the Hardware tab and then click on the Properties button next to Device Manager. This will launch the Device Manager window. Locate your camcorder in the list, right-click it, and choose Update Driver Software. Follow the prompts to complete the update process. Your laptop should now recognize your Easypix GoXtreme Rebel camcorder as a connected device. To transfer videos from the camera to your laptop, open Windows Explorer or My Computer. Locate your camcorder in the list of available devices and double-click on it to open it. You'll see folders containing your video files. Select the files you wish to transfer and drag them to your desired location on your laptop. If you prefer to use a software application, install the Easypix GoXtreme Rebel camcorder's accompanying software. Insert the installation CD into your laptop's drive and follow the prompts to complete the installation process. Once installed, launch the software and connect your camera via USB. Follow the on-screen instructions to transfer videos from the camera to your computer. After transferring your files, safely disconnect the camcorder by right-clicking on it in Windows Explorer or My Computer and selecting Eject (or Safely Remove Hardware). This will prevent any potential data loss that might occur due to unexpected disconnection.
My camcorder won't turn on and I've already checked the power cord, battery and charging port - is there something else I can do to troubleshoot this issue?
1. Faulty Power Button**: Sometimes, the power button can get stuck or malfunction. Try pressing the power button for an extended period (30 seconds to 1 minute) to see if it'll turn on. If not, try cleaning the button with a soft cloth and inspecting it for any signs of damage. Loose Connections**: Verify that all internal components are securely connected. Check the connections between the motherboard, LCD, and other vital parts. Make sure they're not loose or damaged. Faulty Capacitors**: Over time, capacitors can fail, causing issues with power supply. Inspect your camcorder's circuit board for any swollen, leaking, or bulging capacitors. If you find any, it might be best to consult a professional for repair. Short Circuit**: A short circuit within the camcorder could prevent it from turning on. This is often caused by a faulty component or a manufacturing defect. Check for any signs of overheating, burning smells, or visible damage near the power button or charging port. Moisture Damage**: If your camcorder has been exposed to water or moisture, it might have caused internal damage. Inspect the circuit board and surrounding areas for any signs of corrosion or mineral deposits. Faulty LCD**: The LCD screen could be malfunctioning, preventing the camcorder from turning on. Try disconnecting the LCD cable from the motherboard and see if the camcorder turns on without the screen. If it does, the issue is likely with the LCD. Resetting the Camcorder**: Sometimes, a simple reset can resolve issues like this. Consult your user manual for instructions on resetting your specific camcorder model. If none of these troubleshooting steps help, it's possible that there's a more serious hardware issue or a manufacturing defect. In that case, it might be best to contact the manufacturer or consult a professional repair service for further assistance.
Before you buy Easypix GoXtreme Rebel


Miguel –
Hey there little buddy! Do you want to know the coolest thing about our new camera? It has something called a Sensor Megapixels which is 1.0 MP, just imagine taking super fun photos with lots of tiny pixels in them! This camera is like your best friend, it helps you save money because it’s not too expensive but still does a great job capturing all the exciting moments of our amazing adventures together! Isn’t that awesome?
Now, let me tell you more about this cool Camcorder, called Easypix GoXtreme Rebel (but don’t worry, we can call it Epic Adventure Buddy instead). This little gadget has some pretty special features that make it very unique. It’s small and lightweight, so you can take it anywhere with ease. It also has something called Image Stabilization, which means even if your hands shake a tiny bit while holding it, the camera will fix the image for us! Isn’t that cool?
And guess what else? This Epic Adventure Buddy can record videos in high definition (HD) quality too! So now we can capture all our fun times together and share them with everyone later. This camera helps us save money because it doesn’t cost a lot but still gives us amazing memories that will last forever. Isn’t life just full of surprises?
So next time when you want to go on an adventure or play in the park, make sure to bring along your Epic Adventure Buddy, the Easypix GoXtreme Rebel, and let’s create some unforgettable memories together!