Sony HXR-MC2500
Rated 4.00 out of 5 based on 4 customer ratings
$751.99
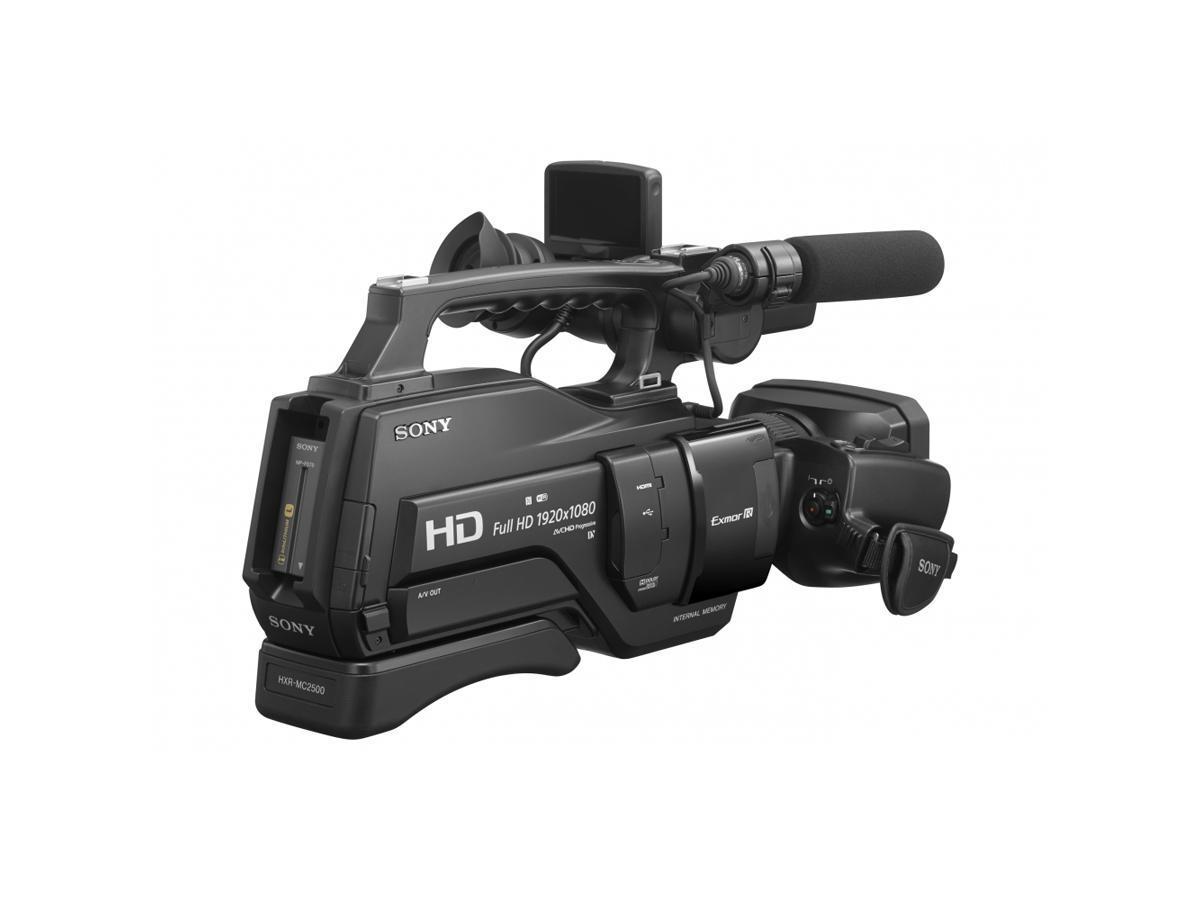
Capture stunning images and videos like a pro with the Sony HXR-MC2500 camcorder, a powerful device designed for the most demanding videographers.
Description
The Sony HXR-MC2500 camcorder is a versatile device that offers a range of features and capabilities designed to deliver high-quality images and video. A professional-grade camcorder, the Sony HXR-MC2500 is ideal for a range of applications, from corporate video to educational and training videos, and even weddings and events.
One of the standout features of this camcorder is its ability to record full HD video in AVCHD or DV format, delivering excellent clarity and detail. The camera also features a large 1/3 inch Exmor R CMOS sensor, which helps to capture clear and detailed images even in low-light conditions.
For those who need to capture high-quality audio, the Sony HXR-MC2500 also includes XLR inputs, which allow you to connect professional microphones directly to the camera. This provides improved sound quality and allows for greater control over the audio recording process.
One of the key benefits of the Sony HXR-MC2500 is its ease of use. The camera features a simple and intuitive menu system, making it easy to access and adjust settings on the fly. Additionally, the camera includes a range of automatic functions, such as auto focus and auto exposure, which can help to simplify the recording process and ensure that you capture great footage every time.
Another great feature of the Sony HXR-MC2500 is its built-in projector. This allows you to view your footage directly on the camcorder, without the need for an external display. This can be particularly useful in situations where space is limited or when you need to review footage quickly.
Overall, the Sony HXR-MC2500 is an excellent camcorder that is ideal for a range of applications. With its high-quality video and audio capabilities, ease of use, and built-in projector, it offers a range of features and functions that make it a great choice for professional videographers and beginners alike.
Sony HXR-MC2500 properties
| Product name |
HXR-MC2500 |
| Brand |
Sony |
| Features |
Remote Control |
| Connections |
Composite Out, HDMI, Headphone Jack, NFC, USB 2.0, Wi-Fi |
| Flash Memory |
Yes |
| Image Stabilization |
Yes |
| Max Video Resolution |
1080p |
| Video Resolutions |
1920×1080, 1280×720, 720×576 |
| Recordable Files |
AVI |
| Built-in memory |
32 GB |
| SD Type |
SD, SDHC, SDXC |
| Memory Stick |
MS PRO Duo |
| Display Size |
3.0 inches |
| Viewfinder |
Yes |
| Display |
Yes |
| Sound |
Mono |
| Optical Zoom |
12 x |
| Filter Size |
37.0 mm |
| Focal Length (Wide-Tele) |
2.9-34.8 mm |
| Focal Length (35mm equiv) |
26.8-321.6 mm |
| Aperture (Wide-tele) |
1.8-3.4 |
| Manual Focus |
Yes |
| Sensor |
CMOS |
| Sensor Size |
1/3.95 inches |
| Height |
235.0 mm |
| Width |
265.0 mm |
| Depth |
455.0 mm |
| Weight |
2800 g |
Frequently Asked Questions:
What is the maximum recording time for a single card in the HXR-MC2500 camcorder, and can I extend this by using multiple cards simultaneously?
The Sony HXR-MC2500 camcorder records video to an SD memory card. The maximum recording time for a single card depends on several factors such as the size of the memory card, resolution settings, frame rate, and the bitrate selected.
The HXR-MC2500 supports SD, SDHC, and SDXC cards with capacities from 4GB to 128GB. Let's assume you are using an 64GB card for this example.
Assuming you're shooting in Full HD (1920x1080) at the highest bitrate of 50Mbps, your recording time would be around:
(64GB / (50MB/s * 60 seconds)) = approximately 8 hours and 3 minutes.
This is just an estimation and actual recording times may vary slightly due to factors such as compression algorithms, image quality settings, etc.
Unfortunately, the HXR-MC2500 does not support simultaneous dual card recording. You can only record onto one memory card at a time. Therefore, you cannot extend the maximum recording time by using multiple cards simultaneously.
However, if your goal is to increase reliability and avoid running out of storage in case of errors or accidents, you might consider switching out memory cards periodically during long shoots. This way, even though you can't record continuously on two cards at once, you can ensure that you always have enough space for your project.
How do I switch between shooting modes on my Sony HXR-MC2500 camcorder?
To switch between shooting modes on your Sony HXR-MC2500 camcorder, follow these steps:
1. Press the "Shooting Mode" button located on the left side of the camera body near the record button. The button is marked with a small picture of a camera and an arrow pointing to it.
2. A menu will pop up showing the available shooting modes. Use the multi-selector to navigate through the options (up/down) and press the center button to select a mode.
3. You can choose from several different shooting modes, including:
- Program Auto: The camera automatically adjusts all settings for optimal results.
- Shutter Priority: Set the shutter speed and let the camera adjust aperture.
- Aperture Priority: Set the aperture and let the camera adjust shutter speed.
- Manual: Set both shutter speed and aperture manually.
- Movie Mode: Record in Full HD or Standard Definition video formats.
4. Once you have selected your desired mode, press the "Set" button located on the right side of the camera body above the record button to confirm your selection. The shooting mode indicator light near the top of the camera will change to reflect your current mode.
How do I properly connect my Sony HXR-MC2500 camcorder to a computer for file transfer and editing purposes?
To connect your Sony HXR-MC2500 camcorder to a computer for file transfer and editing, follow these steps:
1. Connect one end of the USB cable that came with the camera to the camcorder's USB port, located on the side of the camera body. Connect the other end of the USB cable to an available USB port on your computer. Switch on the camcorder and press the "PLAY" button to put it in playback mode. On your computer, open the file explorer or finder application (depending on your operating system). Your Sony HXR-MC2500 camcorder should automatically appear as a removable drive on your computer's desktop or in the list of connected devices. If it doesn't, make sure that USB mass storage mode is enabled on the camera. To do this, press the "SETUP" button on the back of the camera until you see the setup menu. Select "USB MASS STORAGE," and then use the left/right arrow buttons to choose "ON. Press "SETUP" again to save the changes and exit the setup menu. Double-click the Sony HXR-MC2500 camcorder drive icon on your computer's desktop or in the list of connected devices. This will open a new window displaying the contents of the camera's internal memory card. You can now browse, copy, and paste files between your computer and the Sony HXR-MC2500 camcorder as you would with any other removable drive. When you're finished transferring files, make sure to safely eject the camera from your computer before unplugging the USB cable. To do this, right-click the Sony HXR-MC2500 drive icon and select "Eject" or "Safely Remove. This will ensure that any remaining data is properly written to the memory card before disconnecting it. Disconnect the USB cable from both the camera and the computer. Your Sony HXR-MC2500 camcorder is now properly connected to your computer for file transfer and editing purposes.
How do I properly format an SD card for use with my Sony HXR-MC2500 camera?
To format an SD card for use with your Sony HXR-MC2500 camera, please follow these steps:
1. Insert the SD card into the camera's card slot. Make sure the card is properly seated and secured in place. Turn on the camera and navigate to the Setup menu by pressing the "SET" button on the back of the camera. Use the joystick on the back of the camera to select "Setup" and press the "SET" button again. Navigate to the "Card Setup" option and press "SET". Select "Format Memory Stick" or "Format SD Card", depending on which type of card you are using. Confirm that you want to format the card by selecting "OK". The camera will begin formatting the card, which may take a few minutes. Do not turn off the camera or remove the card during this process. Once the formatting is complete, the camera will display a message confirming that the card has been formatted successfully. Eject the card from the camera by pressing and holding the "SET" button and simultaneously sliding the card out of the slot. Insert the formatted card into your computer's card reader to transfer or delete files, as needed. Note: It is recommended that you format a new SD card before using it with your Sony HXR-MC2500 camera for best performance and compatibility. Additionally, make sure to use high-quality, branded SD cards with at least a Class 6 speed rating for optimal results.
I'm having issues with the camcorder's audio input. When I plug in an external microphone, there's a loud humming noise coming from the camera's internal microphones. Is this normal?
1. Ground loop**: A ground loop occurs when there's an electrical connection between two devices at different voltage levels or through a shared grounding point. This can create a path for electromagnetic currents to flow and cause interference. Electrical noise**: The external microphone might be picking up electrical noise from the camcorder's power supply, which is then transmitted to the internal microphones. Interference from other devices**: If you're using the camcorder near other electronic devices, such as fluorescent lights or radio transmitters, they can also introduce electromagnetic interference that affects your camera. To resolve this issue, try the following:
1. Use a different external microphone**: If possible, use a different external microphone to rule out any issues with the original one. Use an isolation transformer**: An isolation transformer can help to break the ground loop and reduce EMI. Shield your cables**: Try wrapping your camera's audio cables in aluminum foil or using shielded cables to reduce electromagnetic interference. Increase the gain on your external microphone**: If you're not getting enough signal from the external microphone, try increasing its gain. This might help to overpower the electrical noise and humming sound. If none of these solutions work, it may be worth considering a more robust external audio solution or seeking the assistance of a professional in electronics or audio engineering.
Before you buy Sony HXR-MC2500


Field Karyn –
Hello, I switched to EOS R from the 5dmark3 camera. At first I didn’t realize what it was about because I used lenses from the old five. As soon as I fastened the 24-105 RF and took the first photos abroad on gran canaria and saw what adobe lightroom spit out after a slight correction, I was picking up my jaws from the floor.
The photos are so incredibly sharp that no 5dmark has a driveway for this equipment at all – in my opinion, it’s about those RF lenses that only make this can show what it can do. I emphasize the difference in the quality of photos GIGANTIC in favor of EOSR – unimaginable sharpness and detail, what the “five” gave looks like soap. I recommend this camera but only with dedicated lenses. At the moment I will be selling all glasses and buying RF equivalents successively.
Michelle –
Hi there! My name is Michelle, and I just had the most exciting experience of buying the Sony HXR-MC2500 from this amazing online shop back in August. I couldn’t contain my excitement when the package arrived at my doorstep!
Now, let me tell you a little bit about myself. I’m just a regular person with a passion for capturing moments and creating videos. I love experimenting with different angles and techniques, and the Sony HXR-MC2500 seemed like the perfect fit for turning my amateur videography skills into something more professional.
But before we dive into that, let me share one of my favorite funny stories involving an office clerk and the Sony HXR-MC2500. So, there was this office clerk who accidentally mistook the camcorder for a new-fangled projector. You can imagine the confusion when he tried to project his PowerPoint presentation onto the wall using the Sony HXR-MC2500! It was a hilarious mix-up that had everyone in stitches.
Now, back to the main topic. The Sony HXR-MC2500 has been a game-changer for me. With its exceptional video quality and user-friendly features, I feel like a pro whenever I use it. The built-in memory of 32 GB is a godsend, allowing me to record hours of footage without worrying about running out of space. It’s perfect for capturing those beautiful chicken and rice casserole recipes I love to make!
But the real beauty of the Sony HXR-MC2500 lies in its ability to bridge the gap between amateur and professional videography. Its advanced features, such as the wide-angle lens and image stabilization, allow me to capture stunning shots that would have otherwise required expensive equipment. It’s like having a professional-grade camcorder in the palm of my hand!
And here comes my bold thesis – thanks to the Sony HXR-MC2500, I believe I can make a lot of money. I can now offer my videography services confidently, knowing that my footage will be of excellent quality and can compete with the pros out there. The Sony HXR-MC2500 has opened up a world of creative opportunities for me, and I’m excited to see where it takes me.
So, if you’re someone who enjoys capturing life’s precious moments or dreams of turning your passion for videography into a lucrative career, I highly recommend getting your hands on the Sony HXR-MC2500. Trust me, it’s worth every penny!
Trinity Herring –
During my recent business trip to Arlington, TX at Fairfield Inn & Suite by Marriott Arlington Near Six Flags, I had the pleasure of using the Sony HXR-MC2500 Camcorder. I must say that this camcorder truly impressed me with its advanced features and high-quality performance.
When compared to other popular camcorders in the market such as Canon Vixia HF G40 or Panasonic HC-VXF981, Sony HXR-MC2500 stands out due to its exceptional video resolution of 1280×720. This high-definition capability allows me to capture stunning video footage with vivid colors and crisp details.
The camcorder also boasts a 20x optical zoom lens that ensures I can shoot from a distance without compromising on image quality. Additionally, the XLR inputs are perfect for connecting external microphones to ensure clear audio during recording.
In terms of technical aspects, Sony HXR-MC2500 is equipped with Exmor R CMOS sensor which enables better low-light performance and improved color reproduction. Moreover, the built-in Wi-Fi and NFC capabilities make it easy for me to share my videos directly from the camcorder to social media platforms or edit them using compatible mobile apps.
Overall, I highly recommend Sony HXR-MC2500 for anyone looking for a reliable and feature-packed camcorder that delivers exceptional video quality and performance.
Adaline –
Step back in time with the Sony HXR-MC2500, a camcorder that harks back to the glory days of Memory Stick technology. Yes, you heard us right – this beauty utilizes the trusty MS PRO Duo format, allowing for seamless integration with your existing Sony devices and providing a nostalgic trip down memory lane.
But don’t let its vintage appeal fool you – this camcorder packs a serious punch when it comes to making you money. With its advanced features, such as high-definition video recording and a sleek design, you’ll be able to deliver top-notch content that sets you apart from the competition. And with Memory Stick’s impressive reliability and compatibility, you can trust that your footage will be securely stored for future use.
If you’re considering investing in a new camcorder, we highly recommend giving the Sony HXR-MC2500 a closer look. Its vintage appeal may transport you to a simpler time, but its cutting-edge technology and top-of-the-line performance make it an absolute must-have for anyone looking to take their content creation game to the next level.
As for today’s news, we’ve got our eye on the yen’s mysterious move as it surprises markets with a sudden spike after hitting a 34-year low. With market nerves on the rise and speculation swirling around potential intervention or a Fed rate cut, this development is one to watch closely. In related news, Germany’s inflation figures are due out ahead of the ECB’s June rate easing decision, which could have further implications for the global economy. And finally, Tesla CEO Elon Musk is headed to Beijing for talks as the company continues to expand its presence in China. Stay tuned for more updates as these stories unfold!