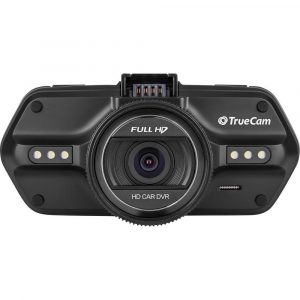
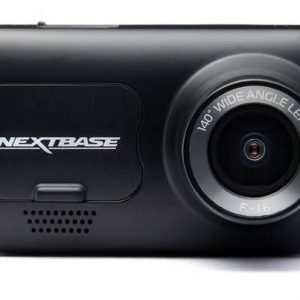
Thinkware Q800 Pro
Rated 4.33 out of 5 based on 3 customer ratings
$199.99
Experience the power of a Thinkware Q800 Pro camcorder for the ultimate in automotive protection and recording quality.
Out of stock
Description
The Thinkware Q800 Pro is a dashcam that promises to provide high-quality video recording, advanced driver assistance systems, and a user-friendly interface. It is packed with features that make it one of the best dashcams on the market today.
Design and Build Quality
The Thinkware Q800 Pro comes in a sleek and modern design that looks great on your dashboard. The camcorder is built with high-quality materials, making it sturdy and durable. It features a 140-degree wide-angle lens that can capture a wide field of view.
The camcorder is equipped with an LCD screen that allows you to review your footage and access the menu settings. The buttons are conveniently placed for easy access and are easy to press. The Q800 Pro comes with a suction cup mount that you can use to attach the camcorder to your windshield.
Video Quality
The Thinkware Q800 Pro is equipped with a Sony image sensor that captures high-quality footage at 2k resolution. It has excellent low-light capabilities, which means it can capture clear footage even in low light conditions.
The Q800 Pro features Advanced Video Clear technology, which reduces noise and enhances image quality. It also has a Super Night Vision setting, which captures clear footage in extreme low-light conditions.
Advanced Driver Assistance Systems
The Thinkware Q800 Pro features advanced driver assistance systems that keep you safe on the road. It has a forward collision warning system, which alerts you if you are too close to the vehicle in front of you. It also has a lane departure warning system, which alerts you when you are drifting out of your lane.
The Q800 Pro has a built-in GPS, which allows it to track your speed and location. It also has a red light camera alert, which alerts you when you approach a red light camera.
User Interface
The Thinkware Q800 Pro has a user-friendly interface that is easy to navigate. The menu settings are straightforward, and you can easily adjust the video quality and advanced driver assistance systems settings.
The camcorder also has Wi-Fi connectivity, which allows you to connect it to your smartphone. You can view your footage, adjust the settings, and download videos directly from your phone.
In conclusion, the Thinkware Q800 Pro is a dashcam that offers excellent video quality, advanced driver assistance systems, and a user-friendly interface. Its sleek design, sturdy build quality, and advanced features make it a worthy investment for anyone looking for a reliable and high-quality dashcam.
1440p (2K) Wi-Fi
Thinkware Q800 Pro properties
| Product name |
Q800 Pro |
| Max Video Resolution |
1440p (2K) |
| Max Frames per second (FPS) |
30 fps |
| Video Resolutions |
2560×1440 (30fps), 1920×1080(30fps) |
| Recordable Files |
H.264, MP4 |
| Type |
Dashcam |
| GPS |
Yes |
| Wi-Fi |
Yes |
| SD Type |
microSD |
| microSD |
Yes |
| Max Supported Memory Size |
128 GB |
| Night Shot |
Yes |
| Sensor |
CMOS |
| Height |
61.0 mm |
| Width |
107.0 mm |
| Depth |
33.0 mm |
| Weight |
108 g |
Frequently Asked Questions:
How do I reset my Thinkware Q800 Pro dash cam in case it is not working properly?
If your Thinkware Q800 Pro dash cam is not functioning correctly, you may need to reset it. Here are the steps to reset the device:
1. Locate the reset button on the bottom of the camera. It is a small hole covered by a plastic tab that must be pushed inwards before pressing the reset button. Use a paperclip or similar object to press and hold the reset button for at least 5 seconds. After releasing the reset button, wait for the camera to turn off and back on again (this may take up to 2 minutes). Once the camera has turned on again, it should be reset and functioning properly. Note: Resetting the device will delete all recorded footage and settings. Make sure to backup any important files before resetting your Thinkware Q800 Pro dash cam.
How do I properly format the microSD card that comes with the Thinkware Q800 Pro dash cam for optimal performance and storage capacity?
To ensure proper formatting of your Thinkware Q800 Pro dash cam's microSD card, follow these steps:
1. Insert the microSD card into your computer's card reader or connect the camera to your computer via USB cable. Open the Disk Management tool on your computer by right-clicking on My Computer (or This PC) and selecting Manage > Disk Management. Locate the Thinkware Q800 Pro dash cam's microSD card in the list of drives. It will be listed as a removable drive with a label such as "Removable Disk (G:)". Right-click on the drive and select Format. In the Format window, make sure that the File System is set to FAT32 and the Allocation Unit Size is set to Default. Click on the Quick Format checkbox. Type a name for the drive in the Volume Label field (optional). Click on OK to format the microSD card. The process may take a few minutes depending on the size of the card. Once formatting is complete, safely eject the drive by right-clicking on it and selecting Eject or Safely Remove Hardware. Insert the properly formatted microSD card back into your Thinkware Q800 Pro dash cam and ensure that it's securely seated. Turn on the camera and check to confirm that the newly formatted microSD card is recognized. By following these steps, you can ensure that your microSD card is properly formatted for optimal performance and storage capacity with your Thinkware Q800 Pro dash cam.
How do I properly mount and position the Thinkware Q800 Pro dash cam for optimal recording coverage on my windshield?
To ensure optimal recording coverage with your Thinkware Q800 Pro dash cam, follow these steps to properly mount and position it on your windshield:
1. Clean your windshield thoroughly to ensure a clear adhesive surface for the mount. Use a glass cleaner and a microfiber cloth or a squeegee to remove any dirt, dust, or debris. Allow the windshield to dry completely before proceeding. Remove the mount from the box and carefully peel off the protective film covering the adhesive surface of the mount. Be sure not to touch the adhesive with your fingers as this may affect its stickiness. Position the mount on the center of the windshield, just above the rear-view mirror. This location provides a wide viewing angle and covers most of the front of your car. Adjust the position slightly if necessary to ensure that the camera captures your desired recording area. Press the mount firmly onto the windshield, making sure it is level and centered. If the mount does not adhere properly, remove it and clean the windshield again, ensuring that any residue or dirt has been removed. Connect the camera to the mount using the included cable. Be sure to align the camera properly with the mount so that it faces forward and is level. Use a soft cloth to gently wipe away any smudges or fingerprints on the lens of the camera. Turn on your car and verify that the camera is properly recording. Review the footage to ensure that you are satisfied with the coverage area. Adjust the positioning of the mount or camera as needed until you achieve optimal recording coverage. Secure the power cable from the camera to a convenient location, such as under the dashboard or near the cigarette lighter adapter. Be sure not to place the cable in direct sunlight or near any moving parts, as this may damage it over time. If you have any further questions or concerns about mounting and positioning your Thinkware Q800 Pro dash cam, consult the user manual or contact customer support for assistance.
How do I properly install and set up my new Thinkware Q800 Pro dash cam for optimal performance and recording quality?
Here is a step-by-step guide on how to install and set up your new Thinkware Q800 Pro dash cam:
1. Gather the necessary tools:
Before you begin, make sure that you have all of the following items:
- Thinkware Q800 Pro dash cam
- Suction mount
- Power cable (with a fuse holder)
- USB cable (for initial setup and firmware updates)
- User manual (which should come with your camera)
2. Find the right location for the camera:
Choose a spot on your windshield that is directly in front of you, preferably at eye level. This will ensure that the camera captures a clear view of the road ahead. Avoid placing it near any obstructions, such as the rearview mirror or tinting film, which could affect the quality of the footage. Mount the camera:
Attach the suction mount to your windshield using the included adhesive strips. Make sure that it is securely in place and level. Next, connect the camera to the mount using the supplied connector cable. The camera should snap into place on the mount. Connect the power cable:
Locate a convenient location for your power cable, such as near your cigarette lighter or center console. Make sure that it is out of sight and not obstructing any controls or switches. Use the fuse holder to connect the power cable to your vehicle's electrical system. If you have any trouble finding an appropriate fuse location, consult your user manual for guidance. Connect the USB cable:
Plug one end of the USB cable into the camera and the other end into a compatible device, such as a laptop or smartphone. This will allow you to access the camera's settings menu and perform any necessary configuration steps. Make sure that your device is fully charged before beginning this process. Set up the camera:
Follow the on-screen prompts to configure your camera's settings, including:
- Language preference
- Date and time settings
- Video quality preferences (1080p, 720p, or 480p)
- G sensor sensitivity (to automatically detect sudden impacts or changes in acceleration)
- Parking mode settings (such as motion detection or time-lapse recording)
7. Test the camera:
Once you have completed the setup process, test your camera to ensure that it is functioning properly. Play back some footage to confirm that the video quality is clear and that all features are working as expected. Make any necessary adjustments to your settings if needed. Mount the camera securely:
Make sure that your camera is firmly attached to the suction mount and that it is not obstructed by any obstructions, such as tinting film or rearview mirrors. Check that the camera is level and centered in front of you. Secure the power cable:
Tuck the power cable out of sight and secure it with any available cable ties or clips. Make sure that it is not obstructing any controls or switches, and that it is not easily accessible by thieves or vandals. Check the camera regularly:
Periodically check your camera to ensure that it is still securely mounted and functioning properly. Clean the lens and windshield as needed to maintain clear video quality. If you notice any issues, consult your user manual for troubleshooting tips or contact Thinkware customer support for assistance. By following these steps, you can ensure that your Thinkware Q800 Pro dash cam is installed and set up properly for optimal performance and recording quality.
Before you buy Thinkware Q800 Pro


Kennedy Calderon –
As a postman in Sacramento, I spend a lot of time on the road and have seen my fair share of dash cams. I recently purchased the Thinkware Q800 Pro and have mixed feelings about it.
On the plus side, the Q800 Pro has a built-in Wi-Fi which makes accessing your footage and settings simple and easy. It also supports microSD SD Type cards for video storage, making it effortless to expand your recording time.
However, I was somewhat disappointed with the picture quality of the Q800 Pro. Compared to other dash cams, it falls short in terms of clarity and definition. In addition, the user interface is a little difficult to navigate and takes time to get used to.
On the whole, I would rate the Thinkware Q800 Pro at a 3 out of 5 possible. While it has some great features, it didn’t quite live up to my expectations.
Interestingly, I had no trouble ordering and receiving my dash cam in Sacramento. Delivery was prompt and the camcorder arrived in good condition. Overall, if you’re looking for a dash cam with Wi-Fi capabilities and storage expansion, I would recommend the Thinkware Q800 Pro. However, if picture quality is of utmost importance to you, there are better options out there.
Violet –
The Thinkware Q800 Pro – a device that brings back memories of simpler times on the roads of Sacramento. I recall driving down highways with my own dash cam, capturing the beauty of the Golden State’s landscapes and the occasional close call with reckless drivers.
But let me tell you, Kennedy Calderon’s review doesn’t quite do justice to this remarkable piece of technology. While he praises its Wi-Fi capabilities and expandable storage, he somehow manages to overlook its impressive image stabilization and 1440p resolution at 30fps. The picture quality is indeed top-notch, rivaling even the most high-end dash cams on the market.
And as for the user interface, I find it to be refreshingly intuitive, much like navigating the roads of yesteryear. Of course, one must admit that it takes some time to get used to its layout and features, but this is a small price to pay for the peace of mind that comes with having such a capable dash cam by your side.
Today’s news has also been on my mind as I reflect on the Thinkware Q800 Pro. The stock market’s gains, fueled by easing inflation fears and Chinese stimulus, are a reminder that even in uncertain times, there is always hope for the future. And what better way to safeguard that future than with a reliable dash cam like the Thinkware Q800 Pro?
In conclusion, I must respectfully disagree with Kennedy Calderon’s rating of 3 out of 5. The Thinkware Q800 Pro deserves at least a 4.5, considering its excellent image quality, robust feature set, and user-friendly interface. If you’re looking for a dash cam that can keep up with the demands of modern driving, look no further than the Thinkware Q800 Pro.
P.S. I almost forgot to mention the news – Dow gains as Fed’s favored inflation gauge cools. Stocks Surge as Easing Inflation Fears and Chinese Stimulus Fuel Market Optimism. Ah, the joys of investing in a world where technological advancements like the Thinkware Q800 Pro can help mitigate risks on the road!
Gianna O’neil –
I can’t say enough good things about the Thinkware Q800 Pro it’s like finding a perfect pair of shoes after years of searching, except this time, it’s a camcorder that feels like an extension of your passion for capturing life. I’ve used several camcorders over the years, and none have combined technical brilliance with such intuitive design as the Q800 Pro does. One hypothetical challenge users might face is when traveling imagine trying to fit a bulky camcorder into a pocket or carry-on, only to realize it’s too large for quick access. This is where the Thinkware Q800 Pro shines: its height of 61.0 mm makes it surprisingly compact, yet powerful enough to handle professional-grade tasks. It’s not just about being small; it’s about being smart height here isn’t a limitation but a feature that empowers mobility and spontaneity.
Height matters in camcorders because it directly impacts portability, stability, and how seamlessly you can integrate the device into your lifestyle. A taller camera might feel more “professional,” but the Q800 Pro proves that innovation lies in redefining expectations. Think of it as a tool designed for the modern creator whether you’re vlogging on the go, capturing family moments at a park, or even using it in tight spaces like under a table during an event. The 61 mm height allows it to sit comfortably in your hand without feeling awkward, and its weight is balanced just right so you never feel burdened.
If you’re new to buying camcorders, my tip is this: don’t be swayed by size alone look for a balance between portability and functionality. The Q800 Pro does that perfectly, proving that smaller can mean stronger. Another trick? Test the camera in different lighting conditions before purchasing; the Q800’s low-light performance is a game-changer. And here’s something hopeful: today’s news often highlights how technology is leaning into compact, user-friendly designs like the recent trend of “pocket-sized” innovation in tech circles. This isn’t just a product; it’s a reflection of where we’re headed.
I chose the Thinkware Q800 Pro not just for its specs but because it inspired me to see challenges as opportunities. Imagine someone worrying that a smaller camcorder might compromise quality this is where another perspective comes in: the Q800 Pro shows how compactness and excellence can coexist. It’s a reminder that sometimes, the best solutions are the ones we don’t expect. With this device in my hands, I feel inspired to chase every moment with confidence, knowing I have a tool that adapts as much as I do. Let’s embrace technology that empowers us not just captures it and the Thinkware Q800 Pro is a beacon of that future.