Olympus OM-D E-M1 Mark III
Rated 4.33 out of 5 based on 3 customer ratings
$1,374.99
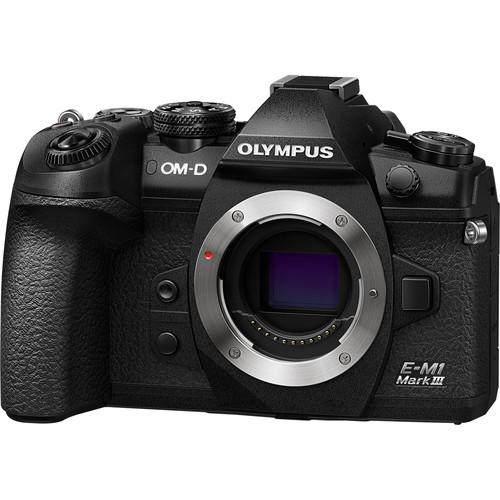
Capture every moment with the powerful Olympus OM-D E-M1 Mark III that offers professional-grade image quality and advanced autofocus capabilities.
Description
The Olympus OM-D E-M1 Mark III is a mirrorless digital camera that is designed for professional photographers and enthusiasts alike. It boasts a range of features that make it versatile and reliable for any shooting situation.
One of the standout features of the OM-D E-M1 Mark III is its autofocus system. It has a 121-point cross-type on-chip phase detection autofocus system that provides exceptional speed and accuracy. It can track moving subjects with ease, making it perfect for sports and action photography.
Another great feature of the OM-D E-M1 Mark III is its image stabilization system. It has a 5-axis in-body image stabilization system that can compensate for up to 7.5 stops of camera shake. This means you can shoot handheld at much slower shutter speeds than you would be able to with other cameras, resulting in sharper images.
The OM-D E-M1 Mark III has a 20.4-megapixel Live MOS sensor that delivers stunning image quality with rich detail and vibrant colors. It also has a high-speed TruePic IX processor that provides fast and responsive performance. The camera can shoot at up to 60 frames per second with the electronic shutter, making it perfect for capturing fast-moving subjects.
Other notable features of the OM-D E-M1 Mark III include its weather-sealed body, which makes it resistant to dust, moisture, and cold temperatures; its dual SD card slots for extra storage and backup; and its fast USB-C charging.
The camera also has a range of shooting modes, including a silent mode for discreet shooting, a Live Composite mode for long exposures of up to 6 hours, and a High Res Shot mode that combines multiple shots to create a single high-resolution image.
In conclusion, the Olympus OM-D E-M1 Mark III is a powerful and versatile digital camera that is perfect for professional photographers and enthusiasts. It offers exceptional autofocus and image stabilization, outstanding image quality, and a range of features that make it suitable for any shooting situation. Whether you’re shooting sports, wildlife, landscapes, or portraits, the OM-D E-M1 Mark III is a camera that can deliver outstanding results.
Mirrorless Interchangeable Lens Cameras, Live MOS, Four thirds (4/3), 60-1/8000, 20.4 MP, Bluetooth, Wi-Fi, 504g
Olympus OM-D E-M1 Mark III properties
| Product name |
OM-D E-M1 Mark III |
| Type |
Mirrorless Interchangeable Lens Cameras |
| Lens |
Body only |
| Compatible lenses |
Olympus Micro Four Thirds |
| Ports |
HDMI, USB |
| Memory Cards |
SD, SDHC, SDXC |
| Features |
Bluetooth, Wi-Fi |
| Viewfinder |
Electronic (EVF) |
| Shutter Speed |
60-1/8000 bps |
| Continuous Drive |
10, 15, 18, 60fps |
| Auto Focus |
Yes |
| AF points |
121 |
| Image Stabilization |
Yes |
| Manual Focus |
Yes |
| Max Picture Resolution |
5184×3888 pixels |
| Image File Format |
JPEG, RAW |
| Flash |
External |
| Flash Sync Speed |
1/250 sec |
| Battery Type |
Lithium ion |
| Display Size |
3.0 “ |
| Display Resolution |
1037000 pixels |
| Max Video Resolution |
3840×2160 (4K) |
| Video resolutions (fps) |
3840×2160 (24, 25, 30fps), 1920×1080 (24, 25, 30, 50, 60, 112fps), 1280×720 (24, 25, 30, 50, 60fps) |
| Video File Format |
MOV |
| Audio File Format |
PCM |
| Sensor Type |
Live MOS |
| Sensor Format |
Four thirds (4/3) |
| Effective Pixels |
20.4 MP |
| Total Pixels |
21.8 MP |
| ISO Rating |
200-25600 |
| Weight |
504.0 g |
| Dimensions (HxWxD) |
91x134x69 mm |
Frequently Asked Questions:
How do I set up my Olympus OM-D E-M1 Mark III for the first time and what are the basic settings I should know about?
Congratulations on your new Olympus OM-D E-M1 Mark III! Here is a step-by-step guide to help you set up your camera for the first time, including some basic settings you may want to know about.
**Step 1: Charge the Battery**
Before using your camera, make sure the battery is fully charged. Plug in the USB cable provided and connect it to a power source. The charging process can take several hours.
**Step 2: Install Software**
Download and install the Olympus Workspace software on your computer if you haven't already done so. This software will allow you to manage your photos, create slideshows, and perform basic edits.
**Step 3: Set Up Your Camera**
1. Turn on your camera by pressing the power button located on the top right side of the body.
2. Select the language and region settings using the navigation buttons.
3. Choose your preferred shooting mode (e.g., P, A, S, M) using the mode dial.
4. Set the ISO sensitivity to Auto or a specific value (e.g., 100, 200, 400) using the ISO button and navigation buttons.
5. Adjust the white balance using the WB button and navigation buttons if needed.
6. Configure the autofocus settings by pressing the AF button and navigating through the options using the arrows.
7. Set the exposure compensation (±3 stops) using the EV button and navigation buttons if desired.
8. Choose your preferred focus area using the Fn1 or Fn2 buttons and navigate through the options using the arrows.
9. Adjust the drive mode (single shot, continuous shooting, self-timer) using the Drive button and navigation buttons.
**Step 4: Basic Settings**
Some basic settings you may want to know about:
1. Image Quality: Choose between JPEG or RAW format for your images. JPEGs are smaller in size but have lower quality, while RAW files are larger but retain more image data.
2. Shutter Speed: Use a fast shutter speed (e.g., 1/500) to freeze motion and a slow shutter speed (e.g., 1/60) for low-light conditions or blurred background effects.
3. Aperture: Choose a wide aperture (e.g., f/2.8) for shallow depth of field and a narrow aperture (e.g., f/11) for more depth of field.
4. Exposure Compensation: Use this feature to adjust the exposure up or down (+/-3 stops). This can be especially useful in high-contrast lighting situations.
5. Autofocus Area: Select the focus area that best suits your subject (e.g., single point, group of points, all points).
6. Metering Mode: Choose between evaluative, center-weighted, or spot metering depending on your shooting conditions.
7. Image Stabilization: Enable image stabilization to reduce camera shake and improve image quality, especially when shooting at slower shutter speeds.
By following these steps and adjusting the settings as needed, you will be ready to start capturing amazing photos with your new Olympus OM-D E-M1 Mark III!
How do I properly adjust the autofocus settings on my Olympus OM-D E-M1 Mark III for portrait photography?
To ensure optimal focus performance when shooting portraits with your Olympus OM-D E-M1 Mark III, you should follow these steps to adjust its autofocus settings:
1. Go to the camera's menu system and select "AF/MF Settings". Choose "Custom AF" from the list of options and then select "C-AF+TR" (continuous autofocus with tracking) for your autofocus mode. This allows you to use both continuous autofocus and face detection technology simultaneously, providing fast and accurate focusing on moving subjects like children or pets as well as stationary ones like adults. In the same menu, select "Face/Eye Detection" to enable this feature. Make sure it is set to "On". This ensures that your camera can recognize human faces and eyes within the frame, allowing for more precise focusing on the subject's eyes instead of other less important areas like their nose or forehead. To further refine the focus performance in portrait photography, navigate back to the main "AF/MF Settings" menu and select "Focus Priority". Choose "Release" from the list of options to prioritize image capture over autofocus accuracy. This ensures that your camera will fire the shutter as soon as the exposure meter indicates a proper exposure, even if focus has not yet been achieved. This is especially useful in fast-paced portrait photography where capturing the moment is more important than getting perfectly sharp images. Lastly, you may want to adjust the focus point placement to better suit your desired compositional style. You can do this by navigating to the "Custom AF" menu and selecting "Focus Point". Here, you can choose between various options such as "3x3", "5x5", and "9x61" grids, depending on your preference for the number of focus points and their distribution across the frame. By following these steps, you will be able to optimize your Olympus OM-D E-M1 Mark III's autofocus settings for portrait photography, resulting in faster and more accurate focusing on your subjects while still allowing you to prioritize image capture over autofocus accuracy when necessary.
How do I properly connect my Olympus OM-D E-M1 Mark III camera to Wi-Fi and transfer images wirelessly?
Follow these steps to connect your Olympus OM-D E-M1 Mark III camera to Wi-Fi and transfer images wirelessly:
1. Ensure that the camera's Wi-Fi function is enabled. To do this, go to the camera's menu, select "Wi-Fi" from the list, and then choose "Wi-Fi settings. From here, you can toggle the Wi-Fi function on or off. Connect your camera to a compatible network. This can be done by selecting "Network Setup" within the Wi-Fi settings menu, and then choosing the desired network from the list of available connections. If the network requires a password, enter it using the camera's controls. Once connected, you can transfer images wirelessly. To do this, go to the camera's playback mode by pressing the "play" button on the back of the device. From here, select the image(s) that you want to transfer by highlighting them and then pressing the "OK" button in the bottom right corner of the screen. Next, press the "Menu" button on the camera's back panel to open the settings menu. Then, select "Transfer (Wi-Fi)" from the list and follow the on-screen instructions to transfer your selected images to a compatible device or wireless network. If you want to use the Olympus Image Share app to wirelessly transfer images, make sure that the app is installed on your smartphone or tablet, and then connect both devices to the same Wi-Fi network as your camera. From there, launch the app and follow the prompts to pair it with your camera. Once paired, you can select the images that you want to transfer using the app's interface, and then choose where you would like to save them on your mobile device. If you prefer to connect your camera directly to a computer via Wi-Fi, make sure that both devices are connected to the same network, and then access your camera's FTP server settings by going to the "FTP transfer" option within the camera's menu. Follow the on-screen instructions to set up a connection between your camera and your computer using an FTP client program. Once connected, you can transfer images wirelessly from your camera to your computer over the network. Note that this method may require additional setup steps depending on the specific FTP client program being used.
How do I switch between manual and automatic focus mode on my Olympus OM-D E-M1 Mark III camera?
To switch between manual and automatic focus mode on your Olympus OM-D E-M1 Mark III camera, follow these simple steps:
1. Make sure that your camera is in shooting mode by pressing the power button on the top right of the camera until the lens starts to extend. Locate the AF/MF switch on the back of your camera's body, just above and behind the viewfinder. This switch has two positions: A (for auto focus) and M (for manual focus). To switch from automatic to manual focus mode, move this switch to the M position. Alternatively, you can also press the AF/MF button on the back of your camera's body, just below the viewfinder, to toggle between these two modes quickly. Once in manual focus mode, use the focusing ring on your lens to adjust focus manually. You may need to zoom in to ensure that your subject is in sharp focus before taking the picture. To switch back to automatic focus mode, simply move the AF/MF switch back to the A position or press the AF/MF button again.
I've set my camera to shoot in manual mode, but the live view is not reflecting the changes I'm making to the aperture and shutter speed settings. What could be causing this issue?
1. Camera Buffering**: When you make changes to manual mode settings, it can take a moment for the camera to process and apply those changes. This is especially true if you're making rapid-fire adjustments. Try waiting a few seconds or taking your hand off the camera to see if the live view updates after a brief delay. Camera's "Live View Lag"**: Some cameras, particularly older models, may experience a slight delay between adjusting settings and seeing those changes reflected in the live view. This is usually due to the camera's processor struggling to keep up with rapid adjustments. Exposure Compensation**: If you've applied exposure compensation (e. Try resetting the exposure compensation and see if that resolves the issue. Metering Mode**: Ensure that your camera is in a "Matrix" or "Multi-Segment" metering mode, which is typically used for manual mode shooting. If you're in spot metering mode, it might not be updating live view as expected. Camera Firmware/Software**: Outdated firmware or software can cause issues with live view functionality. Check if there are any updates available for your camera and install the latest version if necessary. Lens Compatibility**: Some lenses might have compatibility issues with manual mode shooting, especially when it comes to live view. Try using a different lens or checking the manufacturer's documentation for any known issues related to this specific lens. Camera Settings Conflicts**: If you've applied other settings, such as flash exposure compensation or white balance adjustments, these might be interfering with your manual mode settings. Try resetting those settings and see if that resolves the issue. To troubleshoot further, I'd recommend checking your camera's user manual for specific instructions on adjusting manual mode settings while in live view. If none of these suggestions help, it may be worth reaching out to a local camera shop or the manufacturer's support team for assistance.
My camera's Wi-Fi connection is not stable when I'm using it with my smartphone, can you tell me why this might be happening and how I can fix it?
1. Physical Distance**: The distance between your camera and smartphone can significantly impact the stability of the connection. If they are too far apart, the signal may weaken, causing dropped connections or poor video quality. Interference from Other Devices**: Other electronic devices in your vicinity can interfere with the Wi-Fi signal. This includes other wireless routers, cordless phones, microwaves, and even neighboring Wi-Fi networks. Try moving your camera to a location where it's away from potential sources of interference. Camera's Wi-Fi Signal Strength**: The strength of your camera's Wi-Fi signal might be too weak to maintain a stable connection with your smartphone. This could be due to the camera's Wi-Fi chip being outdated or the antenna design not being optimal for your environment. Smartphone's Wi-Fi Settings**: Your smartphone's Wi-Fi settings might be configured to prioritize other networks over your camera's network, causing the connection to drop. Try checking your smartphone's Wi-Fi settings and see if there are any options that can help improve the connection with your camera. Now, let's talk about potential fixes:
1. Restart Your Camera**: Sometimes, a simple reboot of your camera can resolve connectivity issues. This will reset its Wi-Fi settings and may improve the connection with your smartphone. Update Your Camera's Firmware**: If your camera's firmware is outdated, it might be causing the connectivity issues. Check the manufacturer's website for any available updates and follow their instructions to update your camera's firmware. Use a Wi-Fi Range Extender**: A Wi-Fi range extender can help boost the signal strength of your camera's network, improving the connection with your smartphone. Check Your Smartphone's Compatibility**: Make sure that your smartphone is compatible with your camera's wireless protocol (e. GHz or 5 GHz). If you're using a different frequency than what your camera supports, it may cause connectivity issues. To further troubleshoot the issue, can you tell me more about your setup? For example:
* What type of camera are you using?
* How far apart are your camera and smartphone?
* Have you noticed any other devices in the area that might be causing interference?
This information will help me provide a more tailored solution to fix your connectivity issues.
Before you buy Olympus OM-D E-M1 Mark III



Johnido –
The first impression is very good, we’ll see how it comes out in action. The workmanship is solid, it can be held firmly in your hand, although with a larger lens diameter it may not be ergonomic for the grip.
There is one thing I didn’t like at first, and that’s that the charging socket plug is quite unfortunate. When charging, you need to place it carefully so as not to break the cable from the socket.
High-class equipment and capabilities, so all you need is a good glass for the set to enjoy the professionalism that SONY serves
Rex Walker –
I’m using too briefly to express myself … but it looks and feels even more functional than it looks.
I’ve used the Nikon d5100 before – the d750 has everything my predecessor does but does everything better. You don’t have to run through the menu to set the parameters – all under a button. It is a block … but the FX must have the size 🙂
It has the function of FX, DX and something in between. Useful when you have a barrel on DX – even in the viewfinder it shows how to crop so that there is no vignette (or it will automatically crop)
I will not say more because it will only come out in the wash 🙂
Vera Stephens –
Buying the Olympus OM-D E-M1 Mark III Digital cameras was a good experience. The camera came with all its accessories and I got it on time, thanks to the online shop’s fast delivery service. It is a powerful camera, easy to use, with great features that help me take professional quality photos and videos.
Olympus OM-D E-M1 Mark III is a fantastic camera for saving the planet because of its power efficiency. This digital camera uses less energy compared to other cameras in the market. It has a low power consumption mode, which saves energy when not in use and an electronic viewfinder that turns off automatically when not needed. Also, its Live MOV Sensor technology helps reduce energy by capturing images at a higher speed without using much battery power.
Thanks to Olympus OM-D E-M1 Mark III, I can make a lot of money. This camera is perfect for professional photographers and videographers. It has the best features and capabilities that allow me to capture high-quality photos and videos. With its Live MOV Sensor technology, it captures images at a faster speed without using much battery power, which makes it possible for me to shoot more pictures without having to recharge the camera or change batteries frequently.
Amateur users can also benefit from this camera because of its easy-to-use interface and advanced features that help improve their photography skills. The Olympus OM-D E-M1 Mark III has a Live MOV Sensor, which is great for beginners as it helps them understand how the camera works, capture better images, and make good use of the camera’s capabilities.
The sensor type in the Olympus OM-D E-M1 Mark III is a Live MOV Sensor. This technology captures images at a higher speed without using much battery power. It is perfect for photographers who need to shoot quickly and capture every moment. Its high-speed shooting capability allows me to get the best shots in any situation.
Killian –
While Vera Stephens may be satisfied with her purchase of the Olympus OM-D E-M1 Mark III, I cannot say that I share her enthusiasm. Firstly, let’s talk about the issue of environmental sustainability. While it’s true that this camera has low power consumption, it’s not enough to offset the fact that electronics are a major contributor to e-waste. The majority of these devices end up in landfills or recycling centers, which is detrimental to the environment. Moreover, the production and disposal of electronic devices have a significant carbon footprint. In light of this, I believe it’s crucial for manufacturers to prioritize sustainability by using eco-friendly materials, implementing recycling programs, and designing products that are easy to repair or upgrade instead of throwing them away after a few years.
Secondly, the idea that this camera can help earn money is dubious. While it’s true that professional photographers and videographers will benefit from its advanced features, I’m skeptical that amateur users can make significant profits from using this camera. Photography is a highly competitive industry, and it takes years of experience and practice to establish oneself as a successful photographer. The Olympus OM-D E-M1 Mark III may help improve one’s photography skills, but it’s not a magic bullet that guarantees financial success.
Lastly, while the camera’s Live MOV Sensor technology is impressive, I question its practicality. High-speed shooting capability is essential in certain situations, but in others, it may not be necessary or desirable. For example, in low light conditions, slower shutter speeds and higher ISO settings may produce better results than rapid-fire bursts.
In summary, while the Olympus OM-D E-M1 Mark III has its strengths, I believe that manufacturers must prioritize sustainability and user experience over marketing gimmicks. As consumers, we should also consider the environmental impact of our purchases and be cautious not to fall for exaggerated claims about profitability or productivity.
Today’s news is a mixed bag. The Asian markets saw losses following Wall Street’s turbulent day, but Chinese economic data was positive. The US dollar rose against the euro, which dropped to $1.0775. Health insurers took a hit due to lower Medicare rates, while Tesla’s stock fell due to fewer Q1 deliveries than expected. Bitcoin also experienced a 5.4% drop in value.