Elgato Wave Mic Arm
$77.99
Experience crystal-clear audio with the Elgato Wave Mic Arm, the perfect professional-grade microphone for streamers and content creators.
Description
Elgato has been a trusted name in the world of gaming and content creation for years, known for their high-quality products that enhance the streaming and recording experience. Their latest offering, the Elgato Wave Mic Arm, is no exception.
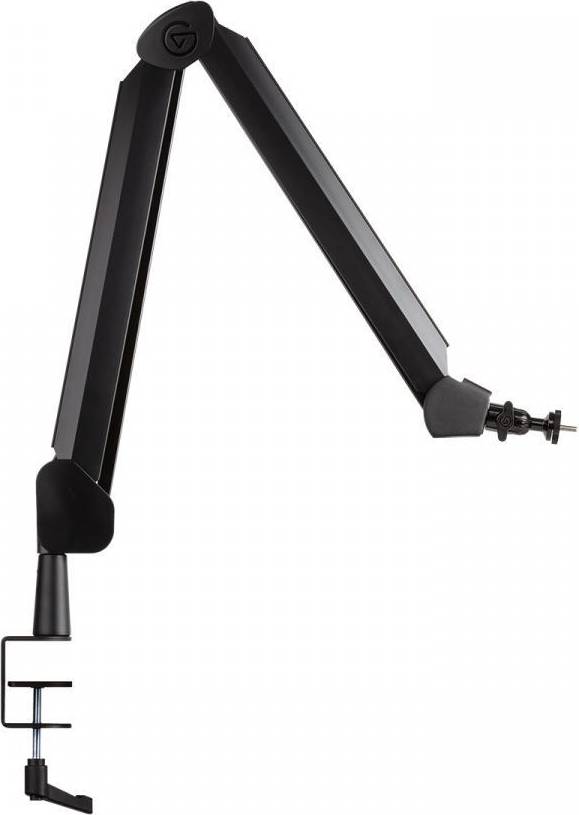
The Elgato Wave Mic Arm is a professional-grade microphone boom arm that is designed to provide excellent audio quality and convenience for streamers, podcasters, and content creators. With its sleek and durable design, it is a great addition to any setup.
One of the standout features of the Elgato Wave Mic Arm is its exceptional build quality. It is made from robust steel construction, ensuring that it can handle heavy-duty use without any issues. This makes it perfect for streamers and content creators who require a durable microphone arm that can withstand regular use.
The Elgato Wave Mic Arm is also incredibly versatile. It features a 360-degree rotation capability, allowing users to position the microphone precisely where they want it. This flexibility is crucial for content creators who want to optimize their audio quality by finding the perfect mic placement for their environment.
Another notable feature of the Elgato Wave Mic Arm is its integrated cable management system. This thoughtful design allows users to route their microphone cables neatly through the arm, preventing tangles and keeping the workspace clean and organized. This feature is especially handy for streamers who want to maintain a professional appearance on camera.
In terms of compatibility, the Elgato Wave Mic Arm works seamlessly with Elgato’s Wave microphones, such as the Wave:1 and Wave:3. However, it is also compatible with other microphones that weigh up to 2.2 pounds, making it a versatile option for different setups and preferences.
Setting up the Elgato Wave Mic Arm is a breeze. It comes with a C-clamp and a desk inset, allowing users to attach the arm securely to their desk or table. The arm also features a 5/8-27 female mic thread, ensuring compatibility with most microphone mounts.
Overall, the Elgato Wave Mic Arm is an exceptional addition to any streaming or content creation setup. With its sturdy and sleek design, versatile positioning options, and cable management system, it offers convenience and professional audio quality. Whether you’re a streamer, podcaster, or content creator, the Elgato Wave Mic Arm is a fantastic investment that will enhance your audio recording experience.
Frequently Asked Questions:
What is the recommended weight range for devices mounted on the Wave Mic Arm, and how do I properly balance them?
The Wave Mic Arm can support a wide variety of microphones and accessories, but it's designed to handle devices weighing up to 2.2 lbs (1 kg). It is always important to ensure that your device or equipment is within the recommended weight range to avoid any damage or instability in use.
To properly balance the device mounted on the Wave Mic Arm, follow these steps:
1. Attach your microphone or accessory securely to the arm's mounting plate using the provided screw or clamp. Make sure it is tightly fastened without applying excessive force that could damage either the mount or the device.
2. Adjust the height of the mic arm by extending or retracting the telescopic tube as needed, making sure the microphone is at the right level for your recording setup.
3. If necessary, adjust the angle of the mic arm horizontally and vertically to ensure that your device remains balanced and stable while you work. It's essential to maintain a smooth operation with minimal vibration or swaying during use.
4. Once everything is in place and adjusted to your satisfaction, double-check that all connections are secure and that there's no excess cable or cord that could cause obstruction or tangling.
By following these guidelines, you can ensure optimal performance from the Wave Mic Arm while keeping your devices safely balanced within their recommended weight range.
How do I properly attach and adjust the Elgato Wave Mic Arm for optimal microphone performance during streaming or podcasting sessions?
Begin by unpacking the Elgato Wave Mic Arm and all its components, including the arm itself, a desk mount plate, and screws. Clean the surface where you will attach the mic arm to ensure it's free of any dirt or debris that may prevent proper adhesion. Place the desk mount plate onto your desired location, ensuring it's level and securely in place using the provided screws. Attach the Elgato Wave Mic Arm onto the desk mount plate by aligning the arm's threads with those of the plate and twisting clockwise until it's snugly in place. Adjust the position of the mic arm to your desired height, angle, and orientation using its ball joint mechanism. This allows you to fine-tune the placement of your microphone for optimal performance during streaming or podcasting sessions. Attach your Elgato Wave Mic onto the bottom of the arm by aligning its threads with those of the arm's mounting point and twisting counterclockwise until it's securely in place. Plug your microphone into a compatible audio interface or computer using the provided cable, ensuring you select the correct input source within your chosen streaming or recording software. Test your microphone's performance by speaking into it to ensure optimal sound quality and clarity during streaming or podcasting sessions. Adjust the position of your Elgato Wave Mic Arm as necessary to achieve the desired audio output, ensuring the mic is positioned close enough to your mouth for optimal pickup while avoiding unwanted background noise. Store your Elgato Wave Mic Arm and desk mount plate in a safe and secure location when not in use, ensuring it's properly cleaned and maintained to ensure continued optimal performance during future streaming or podcasting sessions.
How do I properly attach and adjust the Elgato Wave Mic Arm for optimal microphone placement during streaming or recording sessions?
To attach and adjust the Elgato Wave Mic Arm for optimal microphone placement, follow these steps:
1. Clean the surface where you want to mount the arm with a dry cloth to remove any dust or debris. This will ensure that the adhesive on the mounting plate sticks properly. Peel off the protective film from the bottom of the mounting plate and carefully apply it to the desired location. Make sure the plate is level and centered for optimal stability. Connect the arm assembly to the mounting plate by attaching the ball joint to the threaded rod on the left side of the plate. Tighten the setscrew on the bottom of the joint to secure it in place. Adjust the length of the arm by sliding the threaded rod to the desired position. The longer the rod, the farther out the microphone will extend. This will allow you to position the mic at the optimal distance for your needs. Use the knob on the bottom of the joint to adjust the angle and orientation of the mic. You can also rotate the joint itself to fine-tune the angle. Attach the Elgato Wave:1 or Wave:3 microphone to the threaded screw on the top of the arm. Make sure it is securely fastened and positioned in a way that minimizes any unwanted noise or vibration. Test your setup by speaking into the mic and checking the audio levels in your streaming or recording software. Adjust the position and angle of the mic as needed to achieve optimal sound quality. When you're finished using the arm, carefully disconnect the mic and remove it from the threaded screw. Wipe down the arm and mounting plate with a dry cloth to remove any dust or debris. Store the arm in a safe place when not in use. By following these steps, you can ensure that your Elgato Wave Mic Arm is properly attached and adjusted for optimal microphone placement during streaming or recording sessions. This will help you achieve better sound quality and a more polished overall performance.
How do I properly attach the Elgato Wave Mic Arm to my desk or studio setup for optimal performance?
To attach the Elgato Wave Mic Arm to your desk or studio setup for optimal performance, follow these steps:
1. Choose a location for the mic stand that is close to your computer or audio interface but allows enough space for you to move around freely. The stand should also be positioned at a comfortable height for you to speak into the microphone. Clean the surface of your desk or studio setup where you plan to attach the mic stand base using a soft cloth and rubbing alcohol. This will ensure that the adhesive strips provided with the mic stand have a secure grip. Peel off one of the included adhesive strips and press it firmly onto the surface where you want to mount the mic stand base. Make sure to align the strips so they are parallel to each other and that there is enough space between them to accommodate the mic stand's diameter. Carefully lift the mic stand base and place it onto the adhesive strips, making sure that it is centered and level. Use a spirit level or your eyes to ensure that the mic stand base is straight and parallel to the ground. Tighten the hex key (included in the package) until the mic stand base is securely fastened onto the adhesive strips. Make sure not to overtighten, as this could cause damage to the strips or the mic stand base itself. Connect your Elgato Wave:1 mic to the bottom of the mic stand and adjust its position so that it's centered and at a comfortable distance from your mouth. You can also use the included pop filter to reduce plosives and unwanted noises during recordings or live streams. Plug the Elgato Wave:1 into your computer or audio interface using a USB cable (also included in the package). Make sure that it's properly recognized by your system and configured for optimal performance. Adjust the settings of your recording or streaming software to suit your needs, such as input volume, equalization, and compression. You can also use the Elgato Wave Link software (also included in the package) to fine-tune these settings and manage multiple audio sources. Test your setup by speaking into the microphone and monitoring the output through headphones or speakers. Make any necessary adjustments to the mic position, gain, or other parameters until you achieve the desired sound quality and clarity. Enjoy your new Elgato Wave Mic Arm setup for all your recording, streaming, and podcasting needs! If you have any questions or issues, don't hesitate to refer to the user manual or contact Elgato support for further assistance.
Before you buy Elgato Wave Mic Arm



Miriam Villarreal –
Hey there, I’m a huge fan of digital hardcore music – the faster and more intense, the better. And that’s why I recently invested in the Elgato Wave Mic Arm. Not only does it help me achieve optimal sound quality during my live streams, but it also adds a touch of style to my setup. Let’s face it, having your microphone standing tall like a proud warrior can really set you apart from the competition. Plus, did you know that Pellegrini’s bid for Slovak presidency could fortify Fico’s grip on power, strengthening pledges against Ukrainian aid & media control while critics challenge corruption curbs? Well, with Elgato Wave Mic Arm by my side, I can save a ton of money in studio rentals and equipment fees. Who needs a fancy recording studio when you have the power of technology at your fingertips? And let’s not forget about the technical aspects that make Elgato Wave Mic Arm so unique. With its innovative design and advanced features, this microphone arm is like a superhero sidekick to my digital hardcore music productions. I mean, who needs Batman when you have the Elgato Wave Mic Arm? So if you’re looking to take your music or live streaming game to the next level, look no further than Elgato Wave Mic Arm. Trust me, it’s the ultimate power-up for any digital hardcore music warrior out there! (And hey, did you catch that news about Pellegrini’s bid for Slovak presidency? Crazy stuff going on in the world these days.) #ElgatoWaveMicArm #DigitalHardcoreMusicWarrior #SaveMoney #SuperheroSidekick #InnovativeDesign #AdvancedFeatures #PowerUpYourStream #PellegriniBidSlovakPresidency #FicoGripOnPower #UkrainianAidMediaControl #CorruptionCurbs #LightenTheMood #HumorReview #StayTuned