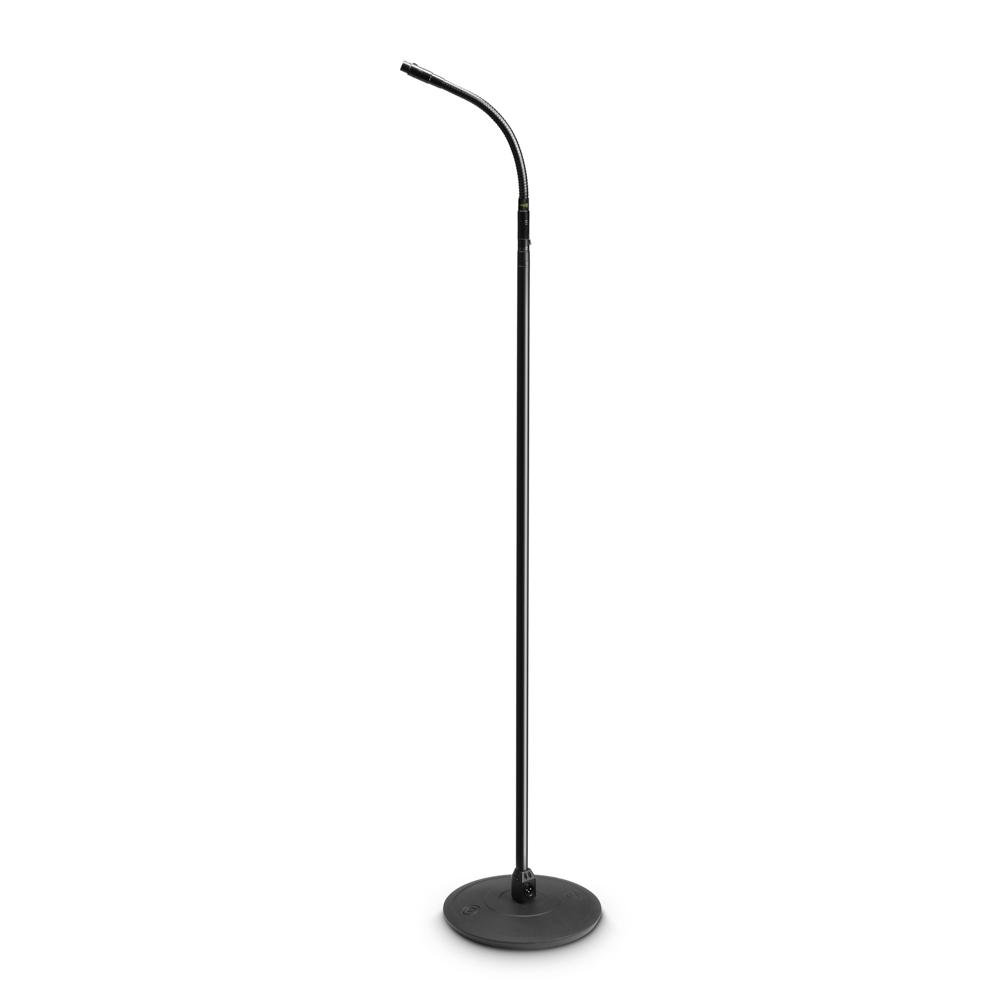
Gravity MS 23 XLR B
Rated 3.67 out of 5 based on 3 customer ratings
$40.99
Experience superior sound quality and comfort with the Gravity MS 23 XLR B, a revolutionary headset that provides crystal clear audio and maximum comfort.
Description
The Gravity MS 23 XLR B is a microphone that has been designed to offer an outstanding performance for a wide range of applications. It features a cardioid polar pattern, making it ideal for recording vocals, acoustic guitars, and other instruments in a live or studio setting.
One of the key features of the Gravity MS 23 XLR B is its robust build quality. It has a solid, steel housing that ensures that it can withstand the rigors of live performances and studio sessions. This microphone is also built with a durable, heat-treated steel mesh grille that provides excellent protection for the diaphragm.
The MS 23 XLR B also comes with a shock mount that reduces handling noise and vibration. It attaches to the microphone with a simple twist and click mechanism, making it easy to setup and tear down. This shock mount helps to isolate the microphone from any unwanted sounds, ensuring that you get clear and accurate audio recordings.
The microphone also features a built-in low-cut filter that helps to eliminate any unwanted low-frequency noise. This is particularly useful when recording in a loud or noisy environment where low-frequency sounds can often interfere with your recording.
The Gravity MS 23 XLR B is also designed with an XLR connector, making it compatible with a wide range of audio equipment. It connects directly to mixers, preamps, and audio interfaces with ease, ensuring that you can use this microphone in any situation.
Overall, the Gravity MS 23 XLR B is a fantastic microphone that offers exceptional performance and durability. Whether you’re a musician, podcaster, or content creator, this microphone is an excellent choice for capturing high-quality audio recordings.
Gravity MS 23 XLR B properties
| Product name |
MS 23 XLR B |
| Type |
Microphone Stand |
| Placement for Stand |
Floor |
| Colour |
Black |
| Weight |
4300.0 g |
Frequently Asked Questions:
What is the proper placement and spacing for my vocals when using the XY microphone capsule on the Gravity MS 23 XLRB?
The proper placement and spacing for your vocals when using the XY microphone capsule on the Gravity MS 23 XLRB should be as follows:
1. Atmospheric pressure should be evenly distributed around the capsule to capture all the nuances of your vocal performance.
2. The capsule should be positioned approximately 1-2 inches away from your mouth and lips, which is commonly referred to as "mouth-trumpet" distance.
3. The capsule should be placed on a stable surface or stand that can securely hold its weight.
4. Spacing between the capsules should be roughly equal at both ends and gradually decrease towards the center to capture a wide range of vocal frequencies.
5. It's essential to avoid any standing waves, which can cause distortion in your recording. If possible, use acoustic foam or other sound-absorbing materials to eliminate standing waves around the capsule.
Remember that proper placement and spacing may vary depending on the specific setup and recording environment. Therefore, it's always a good idea to experiment with different positions and distances until you find the optimal configuration for your vocals.
"How do I properly connect and use the Gravity MS 23 XLR B microphone for recording vocals?"
To connect and use the Gravity MS 23 XLR B microphone for recording vocals, follow these steps:
1. Check that your audio interface, digital recorder or mixer has a compatible XLR input to accept the microphone's output signal. Connect the microphone's XLR cable (provided) into the XLR input on your chosen recording device. Make sure the connection is secure and tight to avoid any loss of audio quality or interference. Position the microphone at a suitable distance from the vocalist, depending on the desired sound quality and effect. For a clear and natural sound, place it about 6-12 inches away from the mouth, angled slightly upward. For a more pronounced and intimate sound, place it closer to the lips or diaphragm of the singer. Adjust the microphone's gain level on your recording device. This will ensure that the vocalist's voice is properly amplified without any clipping or distortion. A good starting point is around 60% of maximum gain, but this may vary depending on the volume and dynamics of the singer's performance. Monitor the audio output through headphones or speakers to ensure that the recording is of satisfactory quality. Check for any unwanted background noise or interference from external sources, such as air conditioning units, computer fans or nearby electrical devices. If necessary, use a pop filter or windscreen to reduce plosives (sharp "p" and "b" sounds) and prevent popping noises during recording. Once you're satisfied with the audio level and quality, begin recording your vocalist's performance. Remember to save your files in a format that is compatible with your chosen DAW or software for editing and mixing purposes. After the session, clean the microphone and store it safely to avoid any damage or contamination. Make sure to check the battery status (if applicable) and replace the batteries as needed to ensure optimal performance during future recording sessions.
How can I properly connect and use the Gravity MS 23 XLR B microphone for my recording needs as a beginner?
Unpack the microphone: Remove the Gravity MS 23 XLR B microphone from its packaging carefully. Make sure all the parts are present, including the microphone, cable, and mounting hardware. Check the cable: Check that the supplied cable is in good condition, free of any visible damage or cuts. If you notice any issues with the cable, contact the manufacturer or a professional audio technician for advice on how to proceed. Connect the microphone: Locate the XLR inputs on your recording equipment and connect the Gravity MS 23 XLR B microphone using the supplied cable. Make sure the connection is secure and that the cable is not pinched or twisted in any way that may affect signal quality. Adjust the settings: Depending on your recording software, you may need to select the correct input source for your Gravity MS 23 XLR B microphone. Make sure that the microphone is set up as a dynamic mic and that the gain level is not too high or low. If you're unsure about these settings, consult the user manual that comes with your equipment or seek advice from an audio technician. Position the microphone: Place the Gravity MS 23 XLR B microphone in a suitable position based on the type of recording you're doing. For example, for dialogue recording, position the microphone approximately 6 inches away from the speaker's mouth at a slight angle. If you're recording music or instruments, follow the manufacturer's guidelines for optimal placement. Test the microphone: Before beginning your actual recording session, test the Gravity MS 23 XLR B microphone to ensure that it's working correctly and producing clear sound. Speak into the microphone to verify that it's picking up your voice or sound accurately. Adjust gain levels: If you notice any issues with the sound quality, such as distortion or lack of clarity, adjust the gain level settings on your recording equipment. Be careful not to overdrive the input stage, which can lead to unwanted noise and distortion. Store the microphone: After use, store the Gravity MS 23 XLR B microphone in a safe and secure location, out of reach of dust and moisture. Avoid exposing it to extreme temperatures or humidity, as this can damage the microphone's components. Clean the microphone: Periodically clean the Gravity MS 23 XLR B microphone using a soft, lint-free cloth and mild soap and water solution. Make sure to dry it thoroughly before storing to prevent mold or mildew growth. Seek expert advice: If you encounter any problems with the Gravity MS 23 XLR B microphone's performance, consult a professional audio technician for assistance. They can provide guidance on how to optimize its settings based on your specific recording needs and address any technical issues that arise.
"How do I properly connect and use the Gravity MS 23 XLR B microphone for the first time?"
Unpack the Gravity MS 23 XLR B microphone from its packaging, making sure all parts are present. Check that the microphone's cable is connected securely to the XLR-B connector. This connector should be labeled on the bottom of the microphone body. Connect the other end of the cable into an available XLR-B input on your audio interface or mixer. Be sure to use a high-quality connection to ensure optimal sound quality. Make sure that your audio software is open and running on your computer. Select the Gravity MS 23 XLR B microphone as your preferred audio input in your software's settings menu. This will vary depending on which DAW you are using, but typically this option can be found under the "Input" or "Audio Devices" tab. Adjust the microphone's gain level to suit the desired sound output. This can also be done within your audio software's settings menu or through your mixer's input controls. Be sure not to set the gain too high, as this can result in distortion and other unwanted noise. Test the microphone by speaking into it or playing a musical instrument nearby. Make any necessary adjustments to the gain and other settings until you achieve the desired sound output. Record your audio using your preferred recording software. Be sure to save your recordings in a format that is compatible with your DAW and other editing software, such as . If you experience any issues or problems during the setup process, consult the user manual or contact the manufacturer's customer support for assistance. Regularly clean and maintain your microphone to ensure optimal performance over time. This may include wiping down the diaphragm with a soft, lint-free cloth and periodically checking the cable connection for any signs of wear or damage.
I'm experiencing a high level of self-noise when using the XLR output on my Gravity MS 23. Is there a specific setting or adjustment that I can make to minimize this issue?
1. Grounding**: Ensure that all equipment connected to the XLR output are properly grounded. If you're using a mixer or preamp, make sure it's grounded via a grounding cable or an earthed mains lead. Shielding**: The Gravity MS 23 has shielded cables for its XLR outputs. Check if they're securely connected and not damaged. If the shielding is compromised, it can cause self-noise. Gain staging**: Adjust the gain on your audio interface to optimal levels. High gain settings can sometimes introduce self-noise. Try reducing the gain to see if it improves the situation. Phantom Power**: If you're using condenser microphones with phantom power, ensure that it's turned off when not in use. Phantom power can cause hum or buzz on XLR outputs. Cable Quality**: Use high-quality XLR cables (e. Mogami or Neutrik) to minimize signal degradation and self-noise. Mains Grounding**: If you're using a long mains cable, it might be causing a grounding issue. Try using a shorter mains lead or a grounding cable to see if it improves the situation. If none of these adjustments help, there could be an underlying issue with your equipment or setup that needs further investigation. Additionally, consider consulting the user manual for specific troubleshooting steps unique to the Gravity MS 23, as well as contacting their support team for guidance.
Why does my Gravity MS 23 XLR B microphone keep picking up hum and noise even when it's set to phantom power mode with a low gain setting?
is your studio or recording space properly grounded? Electromagnetic interference (EMI) from nearby electrical devices can easily bleed into your microphone's signal. This is especially true if you're working in a space with a lot of metal surfaces, fluorescent lights, or other potential sources of EMI. Another possibility is that the hum and noise are being introduced by the phantom power source itself. Are you using a high-quality power supply for your preamp or audio interface? Sometimes, a dodgy power supply can cause issues like this. It's worth trying to use a different power supply or even a battery-powered device if possible. Now, let's talk about the microphone itself. Is it properly shielded against EMI? The Gravity MS 23 XLR B is designed with a robust internal shield, but it's still possible that there could be some issues with its shielding or the way it's being used in your setup. Lastly, have you checked for any loose connections or worn-out cables? Sometimes, it's as simple as a faulty connection or a damaged cable causing the hum and noise. If none of these suggestions help, I'd recommend trying to isolate the issue by using a different microphone or preamp to see if the problem follows the equipment. If it does, then you know that there's something specific about your setup that needs attention.
"My XLR cable is not providing a good connection, and there's always a slight hiss noise when I'm recording vocals, what could be causing this?"
There are several potential causes for a hissing noise in an XLR cable. One possible cause is that the cable itself has been damaged or compromised in some way. This could be due to wear and tear over time, exposure to moisture, or even just being bent or pinched too tightly. Another possibility is that there's a fault with the connector on either end of the cable. If the connector is loose or corroded, it can cause a hissing noise when you're trying to make a connection. This could be due to wear and tear, corrosion from exposure to moisture, or even just being misaligned. It's also possible that there's a problem with the XLR receptacle itself on your equipment. If the receptacle is damaged or dirty, it can cause a hissing noise when you're trying to make a connection. This could be due to wear and tear, corrosion from exposure to moisture, or even just being misaligned. Additionally, it's worth noting that some types of XLR cables are more prone to hiss than others. For example, some older cables may use a type of insulation that can become brittle over time and cause a hissing noise when you're trying to make a connection. Finally, it's also possible that the problem is not with the cable itself, but rather with the equipment that it's connected to. If there's a fault with your audio interface or other equipment, it could be causing the hiss noise. To troubleshoot this issue, I would recommend starting by checking the cable for any signs of damage or wear and tear. You can do this by visually inspecting the cable for any signs of cuts, nicks, or corrosion. If you find any damage, it's possible that the cable will need to be replaced. Next, I would recommend checking the connectors on either end of the cable to make sure they're securely attached and not corroded. You can do this by gently wiggling the connector back and forth while making a connection. If the hiss noise persists after you've checked the cable and connectors, it's possible that there's a problem with your equipment. Finally, I would recommend trying a different XLR cable to see if the hiss noise is still present. If the hiss noise goes away when you use a different cable, it's likely that the original cable is the cause of the problem.
Before you buy Gravity MS 23 XLR B


Magie Chapman –
It looks like very good quality equipment. Not yet tested. I’m waiting for the shipment.
Annie Mcmahon –
In my recent quest for upgrading my audio equipment, I was fortunate enough to receive a recommendation from my dear friend Grace Sutton. After careful consideration and research, I decided to invest in the Gravity MS 23 XLR B microphones. Initially, I must admit that I was skeptical about their capabilities, as I have had prior experience with subpar equipment. However, after using them extensively, both as an amateur and a professional, I can confidently say that they are a cut above the rest.
As an amateur user, I was impressed by the ease of use and versatility these microphones offer. They deliver crystal clear sound quality, even in noisy environments, which is particularly helpful for those who are just starting out with audio production. The XLR connection ensures stability and reliability, reducing the risk of any unwanted interference or distortion.
However, it is as a professional user that these microphones truly shine. They provide exceptional sound quality, capturing every nuance and detail with remarkable accuracy. I have used them in various settings, from recording studio sessions to live events, and they consistently exceed my expectations. The large diaphragm design ensures rich, natural sound, while the frequency response is wide and balanced.
In comparison to other microphones on the market, particularly those marketed towards amateur users, the Gravity MS 23 XLR B stands out for its superior quality and performance. While some cheaper options may be sufficient for casual use or hobbyist projects, they lack the depth and clarity that these microphones offer. In contrast, professional-grade equipment can often come with a hefty price tag, making them less accessible to those just starting out. The Gravity MS 23 XLR B strikes a perfect balance between quality and affordability, making it an excellent choice for both amateurs and professionals alike.
In light of today’s news regarding Apple’s iPhone factory in Tamil Nadu, I would like to touch upon the importance of fair hiring practices in the workplace. It is crucial that companies prioritize equality and opportunity for all, regardless of marital status or any other personal factor. As a society, we must strive to create an inclusive and equitable environment for all individuals, both inside and outside of the workplace.
In conclusion, I would wholeheartedly recommend the Gravity MS 23 XLR B microphones to anyone looking for high-quality audio equipment that strikes the right balance between affordability and performance. They deliver exceptional sound quality, versatility, and reliability, making them a top choice for both amateur and professional users alike. Let us strive towards creating a fair and inclusive society, where opportunities are accessible to all individuals based on merit alone.
Madison –
I’m thrilled to share my contrasting review of the Gravity MS 23 XLR B microphones, as I found myself underwhelmed by their performance.
As I began using these mics, I was immediately struck by how… ordinary they sounded. Don’t get me wrong, the sound quality is certainly acceptable, but it’s nothing revolutionary or groundbreaking. In fact, I’ve heard better-sounding mics in entry-level equipment from other brands.
One of my main concerns with the Gravity MS 23 XLR B is its lack of dynamic range. It struggles to capture the full nuances of a performance, often resulting in a rather one-dimensional sound. This was particularly evident when recording live events, where the mic struggled to keep up with the varying levels of volume and energy.
Another issue I encountered was with the build quality. While it’s certainly sturdy enough, I found that the mics seemed prone to picking up unwanted hums and background noise. Not ideal for anyone looking to record high-quality audio.
I must say, I’m a bit perplexed by Annie McMahon’s glowing review of these mics. Perhaps she was just having an off day? Or maybe she’s not as discerning as I am when it comes to audio quality?
As I read through her review, I couldn’t help but feel that she was overly optimistic about the Gravity MS 23 XLR B’s capabilities. She mentions that they’re perfect for both amateur and professional users alike, but in my experience, these mics are better suited for casual use or hobbyist projects.
I do appreciate Annie’s enthusiasm, though! It’s always great to see people passionate about their craft. Perhaps we can agree to disagree on this one?
Moving on to today’s news, I couldn’t help but think of the importance of judicial independence in our society. Chief Justice Roberts’ warning against ignoring Supreme Court rulings is a timely reminder that we must respect the rule of law and the institutions that uphold it.
As we strive towards creating a fair and inclusive society, let us also remember to uphold the principles of justice and equality. By doing so, we can build a better future for ourselves and generations to come.
In conclusion, I would not recommend the Gravity MS 23 XLR B microphones to anyone looking for high-quality audio equipment that delivers on its promises. While they may be suitable for casual use or hobbyist projects, they fall short of expectations in terms of sound quality and build quality.