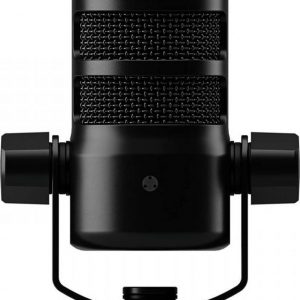
Elgato Wave 3
$94.99
Experience professional-grade audio quality with the Elgato Wave 3 microphone, designed to enhance your streaming, podcasting, and voiceover sessions.
Description
Elgato, a leading brand in the gaming and streaming industry, has recently launched their newest addition to their lineup of high-quality products – the Elgato Wave 3 microphone. This microphone is specifically designed for content creators, streamers, and gamers who are looking for professional-level audio quality.
One of the standout features of the Elgato Wave 3 microphone is its exceptional audio clarity. Equipped with a built-in condenser capsule and a digital mixing solution called the Wave Link software, this microphone provides users with studio-grade sound. Whether you are streaming, recording podcasts, or conducting online meetings, the Wave 3 microphone ensures that your voice is captured in crisp and clear detail.
Another impressive feature of the Elgato Wave 3 microphone is its versatility. This microphone is not limited to just one application. It can be used with various platforms such as Twitch, YouTube, and Discord, making it a perfect choice for streamers and content creators who rely on multiple platforms to connect with their audience. Additionally, the Wave 3 microphone offers compatibility with both PC and Mac, ensuring that it can cater to a wide range of users.
The Elgato Wave 3 microphone also excels in its ease of use. It features an intuitive and user-friendly design that allows for quick and hassle-free setup. With its plug-and-play functionality, users can simply connect the microphone to their computer via a USB-C cable and start recording or streaming right away. The microphone also comes with an adjustable desktop stand, allowing users to position it at the optimal angle for capturing their voice.
Furthermore, the Elgato Wave 3 microphone boasts a sleek and professional aesthetic. Its compact and modern design makes it an attractive addition to any setup. The microphone is also equipped with an LED ring that provides visual feedback, indicating the microphone’s status at a glance.
In conclusion, the Elgato Wave 3 microphone offers a range of features that cater to the needs of content creators, streamers, and gamers alike. Its exceptional audio quality, versatility, ease of use, and sleek design make it a top choice for those looking to take their audio performance to the next level. Whether you are a professional streamer or a budding content creator, the Elgato Wave 3 microphone is a must-have tool for enhancing your audio experience.
Frequently Asked Questions:
How do I connect my Elgato Wave 3 microphone to my computer for audio recording?
To connect your Elgato Wave 3 microphone to your computer for audio recording, follow these steps:
1. Plug the USB-C end of the included cable into the bottom of the microphone. Make sure it is securely connected.
2. Connect the other end of the cable to a USB Type-C port on your computer. If your computer does not have a USB Type-C port, you can use a USB-A to USB-C adapter or a USB hub that has a USB-C port.
3. Turn on your microphone by pressing the power button located at the bottom of the microphone. The LED ring will light up and show different colors indicating the connection status. If it's not connected, try reconnecting the cable or using a different USB port.
4. Your computer should automatically detect the Elgato Wave 3 microphone and install the necessary drivers. However, if this does not happen, you can download the latest drivers from the Elgato website (https://www.elgato.com/en/support) and follow the installation instructions.
5. Once connected and installed, open any audio recording software such as Audacity or OBS Studio to test your microphone settings. Adjust the input source to "Elgato Wave 3" or a similar name depending on your computer's sound settings.
6. Test your audio by speaking into the microphone and checking the sound levels in your recording software. You can adjust the sensitivity of the microphone using the side dial located at the bottom of the microphone.
7. If you're having trouble with audio quality or noise, try experimenting with different settings such as equalizer, compression, and noise reduction within your recording software. You may also need to adjust the position of the microphone to find the optimal pickup distance and angle for your voice.
8. When you finish recording, make sure to turn off your microphone by pressing the power button again.
Remember that the Elgato Wave 3 is a plug-and-play device, so most of the time, it should work without any additional setup or configuration. If you're experiencing issues with your connection or audio quality, try troubleshooting by checking your cable connections, USB ports, and software settings.
"How do I connect my Elgato Wave 3 microphone to my computer for use with voice recording software?"
To connect your Elgato Wave 3 microphone to your computer, follow these steps:
1. Plug the USB-C cable provided with your mic into the USB-C port on your computer. If you don't have a USB-C port, use a USB Type-C to USB A adapter (sold separately).
2. After plugging in the microphone, it should automatically be recognized by your operating system. If not, check for any updates or drivers needed for your specific model of computer.
3. Open your preferred voice recording software, such as Audacity or Adobe Audition.
4. Select your Elgato Wave 3 microphone as the input source within the software settings.
5. Test your audio by speaking into the mic and checking if sound is picked up correctly in the recording software.
6. Adjust any necessary settings like gain, equalization, or noise cancellation through either the software itself or using Elgato's Wave Link software (available for free download).
Remember that it may take some time to find the perfect settings for your voice recording, but following these steps should help you get started with connecting and using your Elgato Wave 3 microphone.
How do I properly connect my Elgato Wave 3 microphone to my computer for optimal audio quality during streaming and voice recording sessions?
To connect your Elgato Wave 3 microphone to your computer, follow these steps:
1. Connect the USB-C (Type C) cable from the Elgato Wave 3 microphone to an available USB-C port on your computer. If you do not have a USB-C port, use the included USB-A adapter to connect the microphone to a standard USB-A port. Turn on the Elgato Wave 3 microphone by pressing and holding the Mute button until the LED ring around the base of the microphone turns green. This indicates that the microphone is in standby mode and ready for use. If this is your first time using the Elgato Wave 3 microphone, connect it to a compatible device via Bluetooth by pressing and holding the Bluetooth button on the back of the base until the LED ring flashes blue rapidly. Then, select "Elgato Wave:3 USB" from the list of available devices in your computer's Bluetooth settings. This will establish a wireless connection between the microphone and your computer for added convenience. Adjust the volume and sensitivity of the microphone using the Volume and Sensitivity buttons on the back of the base. You may need to experiment with these settings depending on your specific setup and preferences. To ensure optimal audio quality during streaming and voice recording sessions, it's recommended that you use a dedicated digital audio interface (DAI) between your Elgato Wave 3 microphone and your computer's motherboard or soundcard. This will bypass any potential interference or degradation in the audio signal caused by USB-based connections. To connect the microphone to a DAI, use a 3. TRS cable (such as a standard headphone jack) to connect the Line Out port on the back of the Elgato Wave 3 base to the Line In or Mic In port on your DAI. Make sure that the correct input is selected in your streaming software or recording software for optimal results. Alternatively, if you do not have a dedicated DAI, you can use the USB-C (Type C) cable to connect the Elgato Wave 3 microphone directly to your computer's motherboard or soundcard via an available USB-C port. In this case, make sure that the correct input is selected in your streaming software or recording software for optimal results. Finally, test your audio setup by playing back a sample of audio and monitoring it through your preferred headphones or speakers. Adjust the volume and sensitivity settings as necessary to achieve clear, crisp audio. By following these steps, you should be able to connect your Elgato Wave 3 microphone to your computer for optimal audio quality during streaming and voice recording sessions. If you encounter any issues or have further questions, refer to the user manual that came with your Elgato Wave 3 microphone or contact Elgato support for assistance.
How do I properly connect my Elgato Wave 3 microphone to my computer for use in streaming and recording?
Here are the steps to properly connect your Elgato Wave 3 microphone to your computer for use in streaming and recording:
1. Make sure your Elgato Wave 3 microphone is fully charged or connected to a power source using the included USB-C cable. Connect the microphone to your computer using the included USB-C to USB-A cable. The USB-C end should be plugged into the back of the microphone and the USB-A end should be inserted into an available USB port on your computer. If you are using a Mac computer with a Thunderbolt 3 (USB-C) port, you may need to use an additional USB hub or adapter to connect the microphone as Thunderbolt ports cannot provide enough power for the Wave 3 to charge properly. Download and install the Elgato Wave Link software from the official website (https://www. This software is required to use the microphone's advanced features, such as noise cancellation and voice equalization. Launch the Wave Link software and follow the on-screen instructions to connect your Elgato Wave 3 microphone. Make sure the correct input device (Wave 3) is selected in the software. Adjust the settings in the Wave Link software to suit your preferences, such as noise cancellation level and voice equalization curves. Test the microphone's audio output by speaking into it and checking the sound levels on your computer or streaming software (such as OBS). Make any necessary adjustments to the microphone's gain or other settings until you achieve a clear, consistent sound. If you are using the microphone for streaming, make sure to configure your streaming software (such as OBS) to use the Wave 3 as the input device and select the appropriate output device (such as your computer's speakers or headphones). You can also connect an external audio interface (such as a Focusrite Scarlett) to the Wave Link software for additional audio inputs or outputs, but this is optional. Remember to regularly clean the microphone's capsule and grille to prevent buildup of dust or debris that could affect sound quality or sensitivity.
3 with my computer, what settings should I adjust to eliminate this echo?"
1. Audio Input Settings**: Open the Sound settings on your computer (this can usually be found by right-clicking on the speaker icon in the system tray at the bottom right corner of your screen). Ensure that your microphone is set as the default device. If you have multiple microphones, try switching to a different one to see if it improves the situation. Audio Output Settings**: Sometimes, an echo can occur because sound from your computer's speakers is being picked up by your microphone. To fix this, mute the speakers or adjust their volume so that they're not too loud. You might need to go into your audio software (like Discord or Skype) and mute your speakers while you're on a call. Voice Modulation**: If using voice chat services like Discord or TeamSpeak, you can usually find an option in settings called "voice modulation" or "echo cancellation. This feature is designed to reduce echo and improve sound quality. Try enabling it if it's not already enabled. Software Settings**: Depending on your software (like Skype, Zoom, etc. Look for options related to echo cancellation or noise reduction. Hardware Issues**: In some cases, the issue might be due to a hardware problem with your microphone or speakers. If adjusting these settings doesn't help, it might be worth checking if either of these components are faulty. Environmental Factors**: Sometimes, the environment itself can cause echo issues. Try moving to a different room or reducing background noise levels. Remember, the effectiveness of these steps may vary depending on your specific setup and the nature of the echo you're experiencing.
Before you buy Elgato Wave 3


Reviews
There are no reviews yet.