RØDE NT1 Kit
Rated 4.33 out of 5 based on 3 customer ratings
$152.99
Get the ultimate in sound quality with the RØDE NT1 Kit, delivering studio-grade clarity and warmth for all your recording needs.
Description
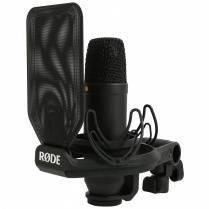
The RØDE NT1 Kit microphone is a high-quality microphone that is designed for studio recording. This microphone is perfect for recording vocals, acoustic guitars, and other instruments that require a clear and crisp sound. The RØDE NT1 Kit microphone comes with a cardioid condenser microphone, shock mount, pop shield, cable, and dust cover.
The capsule of the RØDE NT1 Kit microphone is made from a gold-plated diaphragm, which allows for a smooth high-frequency response. The microphone also features a low noise floor, which means that it can record clear sound without picking up unwanted background noise. The microphone has a frequency response of 20 Hz to 20 kHz, which is ideal for recording a wide range of instruments and vocals.
One of the standout features of the RØDE NT1 Kit microphone is its shock mount. The shock mount helps to isolate the microphone from any vibrations or knocks that may be present in the recording space. This feature ensures that the microphone captures the purest sound possible.
Additionally, the RØDE NT1 Kit microphone comes with a pop shield. A pop shield is essentially a filter that helps to reduce any popping sounds that may be present in vocals. This is useful for recording vocals, as it ensures that the recorded track is clear and free from any unwanted noise.
When it comes to setup, the RØDE NT1 Kit microphone is incredibly easy to use. The microphone connects to your recording equipment through an XLR cable, which is included in the kit. The shock mount is also easy to set up and can be attached to a microphone stand or boom arm.
The RØDE NT1 Kit microphone is a popular choice for many professional studios and recording artists. It offers a high-quality recording experience at an affordable price, which makes it an excellent choice for anyone who is serious about recording music or podcasts.
In conclusion, the RØDE NT1 Kit microphone is a high-quality microphone that offers excellent sound quality and a range of features that make it easy to use. The shock mount and pop shield are useful additions that help to ensure that the recorded sound is as pure as possible. If you are looking for a reliable and high-quality microphone for your home studio, the RØDE NT1 Kit microphone is definitely worth considering.
Microphones for Holders
RØDE NT1 Kit properties
| Product name |
NT1 Kit |
| Type |
Microphone |
| Placement for Microphone |
Microphones for Holders |
| Polar Patterns |
Cardioid |
| Microphone Type |
Condenser |
| Wireless |
No |
| XLR |
Yes |
| Colour |
Black |
| Height |
19.0 cm |
| Width |
5.0 cm |
| Weight |
395.0 g |
Frequently Asked Questions:
What are the recommended settings for recording voiceovers using the RØDE NT1 Kit?
Here are the recommended settings for recording high-quality voiceovers with the RØDE NT1 Kit:
1. Microphone Selection: Use the RØDE NT1 large diaphragm condenser microphone that comes with the kit. It's designed to capture a full frequency range and reproduce natural, warm sounding vocals.
2. Microphone Placement: Position the microphone within 3-6 inches from your mouth. This distance will ensure you get clear audio without excessive pop or sibilance.
3. Microphone Positioning: Place the mic in a position where it's aimed directly at your mouth, and avoid side angles. Ideally, the diaphragm should be centered between your lips to capture the most accurate sound possible.
4. Audio Interface/Preamp: Connect the NT1 to an audio interface or preamp with high-quality components, like the included RØDE AI-1, which offers a robust and clean gain structure for capturing rich vocal performances.
5. Gain Settings: Adjust the gain on your preamp so that your voice peaks around -12dB to -6dB on a digital recording meter. This ensures optimal levels without clipping or distortion while leaving room for further processing in post-production.
6. Sampling Rate: Set your recording software to record at a sample rate of 48kHz. This provides a good balance between file size and audio quality.
7. Bit Depth: Record in 24-bit or 16-bit resolution. While 24-bit offers higher quality, many professional engineers prefer the slightly more "gritty" sound of 16-bit for voiceovers due to its lower noise floor.
8. Monitoring Volume: Keep your headphone/speaker volume at a comfortable level while recording. Avoid cranking the volume too high as this can cause hearing damage and distract you from delivering a quality performance.
Remember, practice makes perfect! Even with ideal settings, your voiceover will only sound as good as your skills as a performer. Keep working on your technique to achieve professional-sounding results.
How do I properly set up and use the RØDE NT1 microphone for recording vocals or instruments?
Setting up and using the RØDE NT1 microphone involves a few steps to ensure optimal sound quality for recording vocals or instruments. Here's a step-by-step guide on how to do it:
1. Choose the right positioning: Place the microphone in a suitable position. For vocals, place it about 6 inches away from your mouth. For instruments, adjust the distance based on the sound you want to capture. A rule of thumb is to keep a distance of 1-3 inches for small instruments like a guitar amp or 6-12 inches for larger ones like a drum set.
2. Mount the mic: Use a shockmount or a pop filter, depending on your recording setup. The shockmount helps reduce vibration and handling noise, while the pop filter eliminates plosive sounds caused by strong breaths or consonants.
3. Set up the stand: Use a sturdy microphone stand to securely hold the mic in place. Ensure that it's stable enough to avoid any movement during recording.
4. Connect the mic to the interface/mixer: Plug one end of the XLR cable into the microphone and the other end into your audio interface or mixer. Make sure the connections are securely tightened.
5. Set up levels: Use the gain control on your audio interface or mixer to set the input level for the NT1. Aim for a peak level of around -6dB to -12dB during recording, but this can vary depending on your recording software and personal preference. Remember that it's better to have a lower initial level with room for gain adjustments later rather than dealing with clipping or distortion.
6. Record: Start the recording software, press the record button, and speak or play an instrument into the microphone. Make any necessary adjustments in your software such as EQ, compression, or reverb to enhance the sound quality as needed.
7. Monitor the audio: Listen to the recorded audio using headphones or studio monitors to ensure that the sound is clear and free from any unwanted noise or distortion. Make adjustments as necessary and repeat until you're satisfied with the results.
What type of microphone does the NT1 Kit include, and how can I use it effectively for recording vocals or instruments in various environments?
The NT1 Kit includes a large-diaphragm condenser microphone. This type of microphone is well-suited for capturing detailed sonic information, making it ideal for recording vocals and instruments in various environments. To use the microphone effectively:
1. Position the microphone correctly: Place the microphone about 6 to 8 inches away from the sound source (e. Experiment with different distances to find the optimal position for your recording setup. Use an audio interface and digital recording software: The NT1 Kit requires an audio interface to connect to your computer and capture the microphone's signal digitally. Once connected, use a digital audio workstation (DAW) like Audacity or GarageBand to record and edit your tracks. Consider acoustic treatment: If recording in a noisy environment, consider using acoustic foam or blankets to absorb unwanted sounds and improve the overall sound quality of your recordings. Experiment with mic placement: Try positioning the microphone at different angles (e. Pay attention to how the sound changes as you move the microphone and adjust accordingly. Use a pop filter: A pop filter helps reduce unwanted "p" and "b" sounds that can occur when recording vocals, especially in close proximity to the microphone. This will improve the overall clarity of your recordings. By following these tips, you should be able to effectively use the NT1 Kit's large-diaphragm condenser microphone for various vocal and instrumental recordings.
My NT1-A microphone keeps producing an excessive amount of hiss, even when I'm not using it; is this normal or is there something wrong with the mic?
1. Gain Setting**: The NT1-A has a relatively high sensitivity, which means it can pick up even slight variations in audio levels. If your gain setting is too high, it may be amplifying background noise and introducing hiss into your recordings. Try reducing the gain to see if this resolves the issue. Ground Loops or Hum**: Ground loops occur when there's an electrical difference between two devices connected by a common ground wire. This can cause hum or hiss in your audio signal. Check for any ground loops by disconnecting the microphone from your recording equipment and trying it with a different setup. If the issue persists, you might want to try using an isolation transformer or a grounding device like a Ground-It. Electromagnetic Interference (EMI)**: EMI can cause hissing or humming in your audio signal, especially if you're recording near strong electrical sources like computers or fluorescent lights. Try moving the microphone away from potential sources of EMI and see if this resolves the issue. Capacitor or Component Failure**: Over time, capacitors or other components within the microphone can deteriorate or fail, leading to hissing issues. If you suspect a component failure, it's worth checking the manufacturer's documentation for troubleshooting steps or considering contacting a professional repair service. As for whether this is normal behavior for an NT1-A microphone, I'd say it's not typical. The NT1-A is known for its high-quality and low-noise design. However, individual units can exhibit unique characteristics due to manufacturing variations or environmental factors. To further diagnose the issue, could you provide more details about your setup and environment? For instance:
* Are you recording in a quiet room or near noisy sources?
* Have you tried using different cables or connectors with the microphone?
* Have you checked for any software settings that might be contributing to the hiss?
With more information, we can work together to pinpoint the cause of the issue and find a solution.
Before you buy RØDE NT1 Kit


Colin Grave –
Just great. Price / quality – a revelation. I don’t know if there are any disadvantages. Although it is a microphone used by famous artists and enjoys a reputation, the price does not knock down, and it is known that when there is demand for a product, the price is higher. Anyway, a great microphone with amazing recording and performance quality.
Tom Haynes –
The sound quality is very good. I bought a microphone to record audio for videos and you can hear the big difference between the microphone built into the headphones. Another big advantage of the product is the attached stand, it allows you to precisely position the microphone to get the best sound.
Best of all, it is really cheap for a studio microphone and works for me even in my room with echoes (I cannot hear it, or other noises.) I recommend it to anyone who, like me, is looking for their first studio microphone.
Thomas Davidson –
I bought the RØDE NT1 Kit a few days ago with high expectations since it has been hyped up in the market. Upon receiving the microphone, I was impressed by its sleek and subtle design and appreciated the 19.0 cm height of the mic. However, I was disappointed with the overall performance of the mic. The cardioid polar pattern was good but not exceptional. I felt it didn’t really stand out compared to other microphones in the market.
Even though the RØDE NT1 kit is relatively affordable compared to other microphones that are in the same range, I feel it could’ve delivered better quality sound. It could’ve been better in terms of minimizing background noise. But I suppose that’s the tradeoff you make at such a reasonable price.
As for the delivery, it was prompt and arrived on time in San Jose. Overall, it’s a decent microphone kit, but it doesn’t quite live up to the praise it’s been getting. I would give it a 3 out of 5 rating.
Santiago Lane –
As a customer advisor in Sacramento, I recently purchased the RØDE NT1 Kit for personal use and have been using it for a few weeks. The microphone is a condenser microphone type, known for its sensitivity and crisp sound quality. The kit includes a shock mount, pop filter, and a protective pouch for storage.
While the microphone product type is good, I found that the sound quality didn’t exceed my expectations. Compared to other known microphones, such as the Shure SM7B or the Audio-Technica AT4053B, the RØDE NT1 Kit falls short in terms of depth and warmth.
In terms of delivery, I received the kit on time and in good condition. I purchased the microphone in February and it was promptly shipped to Sacramento without any issues.
Overall, I would rate the RØDE NT1 Kit a 3 out of 5 stars for its decent quality and convenient package, but it doesn’t quite match up to the sound quality of other high-end microphones.