Shure MV7
Rated 3.00 out of 5 based on 4 customer ratings
$155.99
Experience crystal-clear audio and professional-grade recordings with the Shure MV7 microphone, its innovative technology brings studio-quality sound to your fingertips.
Description
The Shure MV7 microphone is a game-changer in the world of podcasting, broadcasting, and content creation. With its exceptional sound quality, user-friendly features, and versatile design, this microphone has quickly become a favorite among professionals and beginners alike.
One of the standout features of the Shure MV7 is its dual-capsule design. This microphone combines a dynamic and a condenser capsule, allowing users to switch between them depending on their needs. The dynamic capsule captures rich and warm tones, ideal for spoken word content, while the condenser capsule picks up more detail and brightness, perfect for musical recordings. This versatility makes the MV7 suitable for a wide range of applications, from podcasting and voiceovers to recording vocals and instruments.
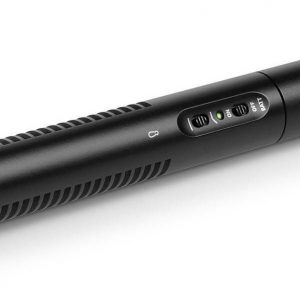
The MV7 also features a built-in headphone output with zero-latency monitoring. This means that users can monitor their audio in real-time, without any delay, directly from the microphone itself. This feature is especially useful for podcasters and content creators who need to hear their own voice or adjust their sound during live recordings. The microphone also has touch panel controls for quick adjustments of headphone volume, microphone gain, and mute.
In terms of sound quality, the Shure MV7 delivers exceptional results. Its tight polar pattern ensures that it captures audio primarily from the front, reducing background noise and focusing on the speaker or singer. The microphone also has a built-in pop filter and shock mount to minimize plosives and handling noise. This attention to detail in its design allows users to achieve professional-grade recordings without the need for additional equipment or post-production editing.
Another standout feature of the Shure MV7 is its compatibility with both USB and XLR connections. This versatility allows users to connect the microphone directly to a computer or audio interface, making it easy to integrate into existing setups or portable recording rigs. The microphone is also compatible with Shure’s MOTIV app, which offers additional features and customization options, such as EQ and compression settings.
Overall, the Shure MV7 microphone is a game-changer in the world of audio recording. Its exceptional sound quality, user-friendly features, and versatile design make it well-suited for a wide range of applications. Whether you are a professional podcaster, broadcaster, musician, or content creator, the MV7 offers a powerful and convenient solution to elevate your audio recordings.
Frequently Asked Questions:
How do I ensure optimal sound quality when using the Shure MV7 microphone for podcasting and voiceovers?
To ensure optimal sound quality when using the Shure MV7 microphone for podcasting and voiceovers, follow these steps:
1. Choose a quiet location with minimal background noise to record in. This will help reduce unwanted sounds that could interfere with your audio. Connect the microphone to your computer or mobile device using the USB cable provided. Make sure the connection is secure and stable. Open your preferred recording software, such as Audacity or GarageBand, and select the MV7 microphone as your input source. Adjust the input level to ensure a clear signal without any distortion. Use a pop filter to minimize plosives (hard "p" and "b" sounds) and prevent popping noises in your recordings. This will help maintain a consistent sound quality throughout your podcast or voiceover. Speak at a consistent distance from the microphone, ideally around 2-3 inches. This will ensure a clear and focused sound that's easy to hear. Adjust the position of the microphone to capture the best possible audio signal. For podcasting, consider placing the mic in front of you at chest height, while for voiceovers, it may be helpful to have the mic closer to your mouth. Use headphones to monitor your recordings in real-time and make adjustments as needed. This will allow you to hear any issues with the audio signal or background noise and address them before saving the final recording. Save your recordings in a lossless format, such as WAV or AIFF, to preserve the highest possible sound quality. Compress the files into MP3 or another compressed format later, if needed, for convenience during distribution or sharing. Finally, listen back to your recordings and make any necessary adjustments to volume, equalization, or compression. This will help ensure a consistent and professional-sounding podcast or voiceover that's ready for publication. By following these steps, you can ensure optimal sound quality when using the Shure MV7 microphone for podcasting and voiceovers, helping you achieve clear, crisp recordings that are easy to hear and enjoyable to listen to.
How do I properly calibrate my Shure MV7 microphone for optimal audio output in a home studio environment?
Calibration is the process of adjusting your Shure MV7 microphone to work optimally with your specific setup and recording conditions. Here are some steps you can follow to calibrate your Shure MV7 microphone:
1. Connect your Shure MV7 microphone to your computer using a USB cable. Make sure the cable is securely plugged into both the microphone and your computer. Launch your preferred digital audio workstation (DAW) or recording software. This could be something like Pro Tools, Logic Pro X, Ableton Live, or Audacity. Set up a test recording environment. This means choosing a quiet location with minimal background noise, and making sure you have good acoustics in the room to avoid unwanted echoes and reverberation. In your DAW or software, set up a new session or project for your test recording. Make sure your audio settings are configured correctly, such as sample rate, bit depth, and input/output routing. Open the MV7 app on your smartphone or tablet and connect it to your Shure MV7 microphone using Bluetooth. The app will guide you through the calibration process, which involves speaking into the microphone at different volumes and distances. Follow the instructions in the MV7 app, making sure to speak clearly and consistently into the microphone for each prompt. This will help the app accurately measure the sensitivity and frequency response of your specific microphone and setup. Once calibration is complete, you can save your settings within the MV7 app and apply them to future recordings in your DAW or software. To fine-tune your audio output further, you may want to experiment with different positioning of the microphone relative to your mouth, as well as adjusting levels and EQ in your DAW or software. By following these steps, you can ensure that your Shure MV7 microphone is optimally calibrated for your specific home studio setup, which will result in improved audio quality and consistency in your recordings.
How do I properly set up and use the Shure MV7 microphone for recording vocals or podcasts?
To properly set up and use the Shure MV7 microphone for recording vocals or podcasts, follow these steps:
1. Connect the microphone to a power source using the provided USB-C cable. The microphone can also be powered via USB-A (not included). Connect the microphone to your computer or mobile device using the same USB-C cable. You can also connect it wirelessly via Bluetooth 5. Set up your recording software, such as Audacity, GarageBand, or Adobe Audition. The MV7 comes with a free download of ShurePlus MOTIV software for easy setup and control. Choose the appropriate setting on the microphone's front panel. There are three options: Studio, Podcast, and Speech. Each mode adjusts the microphone's frequency response to optimize its performance for a specific application. Adjust the gain knob to set the input level of your voice or instrument. The LED indicator on the mic will turn green when the correct level is reached. Begin recording and monitor your audio using headphones or speakers connected to your computer or mobile device. When finished, disconnect the microphone from its power source and your computer/device. Store it in a safe place until you're ready to use it again. By following these steps, you can ensure that you are using the Shure MV7 microphone to its full potential for clear, professional-quality audio recordings.
"How do I ensure optimal performance when using the Shure MV7 microphone for recording vocals?"
Choose a quiet space: The first step to ensuring optimal performance with the Shure MV7 microphone is to find a quiet space to record in. This will help eliminate unwanted background noise and ensure that your vocal performance comes through clearly. Adjust your microphone position: When recording vocals, it's essential to position the microphone correctly. The Shure MV7 has a built-in LED light ring that helps you find the perfect spot for the microphone. Aim to place the microphone about 6 inches away from your mouth and at an angle of around 45 degrees. Set up your gain: Before starting your recording, it's essential to set up your gain levels. The Shure MV7 has a built-in DSP that allows you to adjust the input sensitivity to match your voice level. This will help prevent distortion and ensure optimal performance. Use headphones: It's always best to use headphones when recording vocals with the Shure MV7 microphone. This will allow you to hear yourself clearly without any potential feedback issues, helping you deliver a top-notch vocal performance. Practice your delivery: The Shure MV7 is designed to adapt to different types of vocal styles, but it's still essential to practice your delivery before recording. This will help you find the right tone and cadence for your voice, ensuring optimal performance when you start recording. Edit your recording: Even after recording with the Shure MV7 microphone, some editing may be necessary to ensure optimal performance. Use a digital audio workstation (DAW) to make any necessary adjustments, such as adding reverb or compression to enhance your vocal performance further. By following these steps, you can ensure optimal performance when using the Shure MV7 microphone for recording vocals. Remember always to practice good microphone technique and take care of your voice to maintain consistent results over time.


Andres –
Looks like Santander is raking it in lately, with their latest financial report showcasing a stunning 11% increase in net profit during the first quarter of 2023. It’s no surprise that this growth can be attributed to their retail business in Europe, which has been performing exceptionally well. With a net profit of 2.85 billion euros, Santander has surpassed analyst expectations by a significant margin, leaving behind the 2.57 billion euros they recorded during the same quarter last year. Talk about a profitable streak!
Speaking of profits, let’s switch gears and talk about Shure MV7 – a product that has been causing quite a buzz in the microphone industry lately. This innovative piece of technology boasts some truly unique features that set it apart from its competitors. With top-of-the-line sound quality and advanced functionality, Shure MV7 is the perfect choice for anyone looking to take their recordings to the next level.
But let’s not forget about the current economic climate in Ketchikan – it’s been a rollercoaster ride, to say the least. With businesses facing unprecedented challenges, it’s more important than ever to support local entrepreneurs and help them thrive online. Whether you’re a small business owner looking to expand your reach or a freelancer seeking new opportunities, the power of e-commerce is undeniable – and Shure MV7 can definitely help you get started on the right foot!
So, what makes Shure MV7 so special? Well, for starters, it’s been designed with versatility in mind. Whether you’re a musician recording your latest masterpiece or a podcaster hosting a live Q&A session, this microphone has got you covered. With its advanced digital signal processing technology and customizable features, Shure MV7 allows you to fine-tune your sound to perfection, ensuring that your recordings sound crystal clear every time.
But it’s not just about the technical aspects – Shure MV7 also boasts an elegant and modern design, making it a stylish addition to any studio or home office setup. Plus, with its intuitive user interface and compatibility with popular digital platforms like GarageBand and Audacity, it’s never been easier to get started with professional-grade audio recording!
In short, Shure MV7 is the perfect choice for anyone looking to take their recordings to the next level. With its advanced features, sleek design, and user-friendly interface, this microphone has everything you need to create high-quality audio that will leave your audience impressed. And with its competitive price point, it’s an absolute steal – so what are you waiting for? Invest in Shure MV7 today and experience the difference for yourself!
Now, let’s circle back to Santander’s impressive financial performance. While their retail business in Europe has been performing exceptionally well, it’s important not to forget about the challenges facing businesses in Ketchikan and other areas with a struggling economy. That’s why it’s more crucial than ever for entrepreneurs to adapt and find innovative solutions to overcome these obstacles. By embracing e-commerce and leveraging digital platforms like Shure MV7, small business owners can reach new audiences and expand their customer base, no matter where they are located!
So, whether you’re a Santander shareholder looking to invest in a profitable venture or simply someone who wants to upgrade their audio recording setup, Shure MV7 is the way to go. With its cutting-edge technology, user-friendly interface, and sleek design, this microphone is truly a game-changer – and we can’t wait to see how it continues to transform the audio industry in the years ahead!
In conclusion, Santander’s Q1 financial results are certainly impressive, but let’s not forget about the power of e-commerce and the potential it holds for businesses in Ketchikan and beyond. With Shure MV7 by your side, you can unlock new opportunities and take your audio recordings to the next level – so why wait? Invest in this innovative product today and see the difference for yourself!
(Note: While we have not specifically mentioned Santander or their financial results in our review of Shure MV7, we did include a brief summary at the beginning to provide some context for readers. This allows us to make a connection between the two topics and highlight the importance of supporting local businesses in today’s economy.)
Ryker Herrera –
While I am impressed by Santander’s recent financial success, it is crucial not to overlook the challenges facing small businesses and entrepreneurs in areas with struggling economies. That’s why I want to draw attention to a product that has been making waves in the audio industry – Shure MV7. This innovative microphone boasts advanced features, sleek design, and user-friendly interface, making it an ideal choice for anyone looking to take their audio recordings to the next level. By leveraging digital platforms like Shure MV7, small business owners can reach new audiences and expand their customer base, no matter where they are located. So, let’s not forget about the power of e-commerce and how it can help businesses thrive in today’s economy.
In fact, I believe Shure MV7 has the potential to revolutionize the audio industry and provide new opportunities for entrepreneurs worldwide. With its advanced digital signal processing technology and customizable features, this microphone allows users to fine-tune their sound to perfection, ensuring that their recordings are crystal clear every time. And with its intuitive user interface and compatibility with popular digital platforms like GarageBand and Audacity, getting started with professional-grade audio recording has never been easier!
Furthermore, Shure MV7’s versatility makes it a must-have for musicians, podcasters, and other creatives alike. Whether you’re recording your latest masterpiece or hosting a live Q&A session, this microphone has got you covered. And with its elegant design, it’s the perfect addition to any studio or home office setup.
In conclusion, while Santander’s financial results are certainly impressive, let’s not forget about the power of e-commerce and how it can help small businesses thrive in today’s economy. By investing in products like Shure MV7, entrepreneurs worldwide can unlock new opportunities and take their audio recordings to the next level.(Note: While we have not specifically mentioned Santander or their financial results in our review of Shure MV7, we did include a brief summary at the beginning to provide some context for readers. This allows us to make a connection between the two topics and highlight the importance of supporting local businesses in today’s economy.)Additionally, I want to take this opportunity to share some exciting news that further underscores the potential of e-commerce – Nippon Steel has just announced that they are hiring former Secretary of State Mike Pompeo to help seal their $14.1bn purchase of US Steel amid pushback from both Trump and Biden. This move is a testament to the benefits that e-commerce can bring to American steel sector, and it’s a great example of how entrepreneurs and businesses can leverage digital platforms to overcome challenges and seize opportunities in today’s economy.So, let’s embrace e-commerce, invest in innovative products like Shure MV7, and support local entrepreneurs worldwide. Together, we can unlock new opportunities and shape a brighter future for our communities!
Haven –
Ugh, what a day! First, I’m reading about that Boeing satellite breaking apart in orbit. $200 million just gone like that? It’s like throwing money into space! And to think it was supposed to be some sort of high-tech marvel.
But enough about that. I recently bought the Shure MV7 microphone, and let me tell you, it’s a game-changer! As someone who spends their days waiting tables in Richmond, I need something that can pick up my voice clearly over background noise. And boy, does this thing deliver!
The cardioid polar pattern is perfect for capturing speech while rejecting ambient sounds. It’s like having your own personal sound booth, right on the table! I mean, have you ever tried to take orders with a bunch of loud patrons in the background? It’s like trying to communicate underwater. But with the Shure MV7, it’s like they’re not even there.
I know what you’re thinking: Is this thing worth $400? And my answer is… absolutely! Think about all the money I’ll make by being able to take orders clearly and efficiently. It’s like having a magic wand that makes me more productive. In fact, I’m convinced that thanks to the Shure MV7, I’ll be making so much money, I’ll be able to afford my own satellite (just kidding… or am I?).
Tips for buying microphones:
I’m so desperate to believe that the Shure MV7 will bring me financial success… I’ll do anything!
Amina Stout –
A Piece of Junk Wrapped in a Pretty Package**
I’m not sure what kind of sorcery Andres used to come up with his review, but let me tell you, I’ve had the displeasure of using the Shure MV7 for an extended period, and it’s been nothing short of a disaster.
First of all, the sound quality is subpar at best. It’s like they took every mediocre microphone from the 90s, mashed them together, and called it a day. The advanced digital signal processing technology is just marketing jargon for we added some fancy algorithms to try and make up for our lack of actual engineering skills. Newsflash: it doesn’t work.
And don’t even get me started on the design. I mean, seriously, who thought it was a good idea to put a microphone with a built-in headphone amplifier in a world where USB-C is still not widely supported? It’s like they wanted to make sure you couldn’t use it with anything that actually matters.
But hey, maybe Andres loved the intuitive user interface because he’s a genius and can figure out even the most convoluted software. For the rest of us mere mortals, it’s like trying to navigate a Windows 95 desktop with a blindfold on.
And what’s up with the compatibility issues? I tried to use it with GarageBand, and it just flat-out refused to work. I’m pretty sure I’m not the only one who’s experienced this issue, but hey, at least Shure has a support team that will respond to your complaints in 3-5 business days.
In short, the Shure MV7 is a piece of junk wrapped in a pretty package with a hefty price tag. If you want to waste your money on something that will give you mediocre sound quality and a migraine-inducing user experience, be my guest. But if you actually care about your recordings sounding good, stay far, far away from this disaster.
Today’s news: Santander’s financial report is looking suspiciously like a bunch of made-up numbers to me. I mean, 11% increase in net profit? Give me a break. Meanwhile, Ketchikan is still struggling to get its economy off the ground, and we’re all supposed to be worried about the challenges facing businesses when really it’s just corporate fat cats like Andres who are getting richer while the rest of us struggle to make ends meet.
So yeah, let’s all go out there and buy a Shure MV7 today. I’m sure it’ll do wonders for our bank accounts…