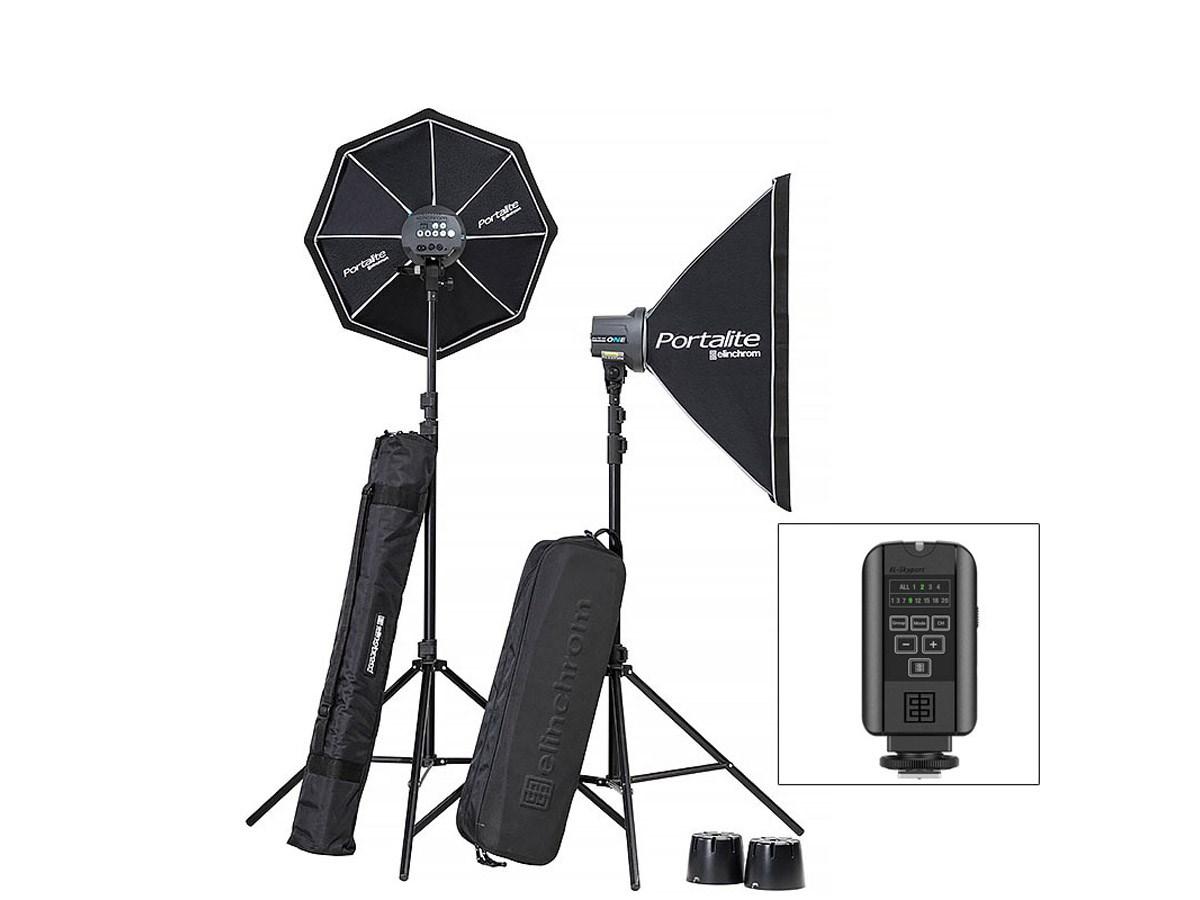
Elinchrom D-Lite RX One Softbox To Go set
Rated 5.00 out of 5 based on 1 customer rating
$416.99
Description
Elinchrom D-Lite RX One Softbox To Go set properties
| Product name |
D-Lite RX One Softbox To Go set |
| Type |
Studio Lightning |
| Softbox |
Yes |
| Lamp Socket |
E27 |
| Effect |
100.0 W |
| Stand Included |
Yes |
| Temperature (K) |
5600.0 |
| Type of Lighting |
Halogen |
| Weight |
0.9 kg |
Frequently Asked Questions:
What is the recommended setup for using the Elihcrom D-Lite RX One Softbox To Go Set in a studio environment?
The Elihcrom D-Lite RX One Softbox To Go Set is designed to be portable and versatile, making it ideal for use in both studio and on-location environments. Here are some recommended setups for using this softbox kit in a studio setting:
1. Single Light Setup: For a simple setup, position the D-Lite RX One Softbox To Go at a 45-degree angle to your subject, with the light source facing them. This will provide a flattering, soft light that wraps around their face and body.
2. Two Lights Setup: To create a more dramatic look, add another D-Lite RX One Softbox To Go on the opposite side of the subject, positioned at a 45-degree angle as well. This will create a contrast between the lit side and the shadow side, adding depth and dimension to your images.
3. Three Lights Setup: For an even more dramatic effect, add a third D-Lite RX One Softbox To Go as a rim light behind your subject. Position it at a 90-degree angle and adjust the height so that the light wraps around your subject's hair or edges of their body.
4. High/Low Key Setup: For a high key look, position one D-Lite RX One Softbox To Go above your subject, pointing downwards. Place a reflector underneath to bounce some light back up onto their face. For a low key look, place the softbox behind your subject and use a black or dark background to create a dramatic silhouette effect.
Remember that lighting is all about experimentation, so don't be afraid to try different setups and angles until you find what works best for your specific shot!
How do I properly attach and detach the Elinchrom D-Lite RX One Softbox To Go from my lighting setup?
To properly attach and detach the Elinchrom D-Lite RX One Softbox To Go from your lighting setup, follow these steps:
Attaching:
1. Unfold the softbox to its full size (80 x 60cm) and ensure that it is evenly spread out without any folds or creases. Insert the included speedring into the mounting bracket on your Elinchrom light head, making sure it is seated securely. Slide the softbox onto the speedring, making sure it is centered and evenly spaced around the circumference of the head. Secure the softbox in place by tightening the knob on the mounting bracket until the softbox is snug against the light head. Check that the softbox is properly positioned and angled to direct light where you need it, and adjust as necessary. Detaching:
1. Release the knob on the mounting bracket to loosen the grip of the speedring on the softbox. Carefully slide the softbox off the speedring, making sure not to let it collapse or crumple during removal. Fold the softbox back into its compact carrying case, being careful not to crease or wrinkle the fabric. Store the softbox and speedring in a safe and easily accessible location for future use. Remember to always handle the softbox with care and avoid pulling or tugging on it, as this can damage the fabric or the seams. With proper care and handling, your Elinchrom D-Lite RX One Softbox To Go should provide you with many years of reliable service.
How do I properly attach and use the Elinchrom D-Lite RX One Softbox To Go set for my studio photography shoots as a beginner user?
As a beginner user, attaching and using the Elinchrom D-Lite RX One Softbox To Go set requires some basic steps to ensure proper use and optimal results. Here's how to do it:
1. Unpacking and Preparation
Firstly, unpack the softbox kit from the package carefully. Check if all the accessories are included such as the softbox, diffuser, speedring, and mounting bracket. Make sure that they are clean, undamaged, and free from any manufacturing defects before starting your photography session. Assembling the Softbox
To assemble the softbox, follow these steps:
a) Attach the diffuser to the inside of the softbox using the speedring provided. Make sure that it is secured tightly. Insert the mounting bracket into the softbox's base, ensuring that it is aligned correctly. Securely attach the softbox to your Elinchrom D-Lite RX One flash head using the supplied mounting adapter. Tighten it firmly to prevent any movement during the shoot. Positioning and Adjustment
Position the softbox at an optimal distance from your subject, ensuring that it's perpendicular to the subject's face or body part being photographed. The recommended distance for portrait photography is around 1-2 meters (3-6 feet). You can also use a light stand to hold the softbox in place. Adjust the angle of the softbox to direct the light towards your desired area of your subject. Use the diffuser to soften and spread the light, providing an even and flattering illumination for your subject. If required, adjust the brightness level of your flash head using the Elinchrom D-Lite RX One's controls to fine-tune your lighting setup. Cleaning and Maintenance
After completing your photography session, clean the softbox, diffuser, and mounting bracket with a soft cloth or brush to remove any dust or debris that may have accumulated during use. Store them in their original packaging or a protective case when not in use. By following these simple steps, you'll be able to attach and utilize the Elinchrom D-Lite RX One Softbox To Go set with ease, delivering professional-quality results for your studio photography shoots as a beginner user.
How do I properly attach the Elinchrom D-Lite RX One Softbox To Go set to my studio lighting equipment for optimal performance and results?
To attach the Elinchrom D-Lite RX One Softbox To Go set to your studio lighting equipment, follow these steps:
1. First, make sure that your Elinchrom RX Speed modules are compatible with the softbox. The D-Lite RX One Softbox To Go is designed for use with Elinchrom's RX Speed modules, which can be connected via a special connector at the back of the softbox. Next, connect the RX Speed module to your studio lighting equipment using the appropriate cables and accessories. The Elinchrom D-Lite RX One Softbox To Go comes with a power cable (150 cm / 5') that can be attached to the RX Speed module's power port. Once your RX Speed module is connected, slide the softbox onto the accessory's shaft. The softbox's front diffuser will automatically align itself with the speed ring. Adjust the softbox's position and angle as needed to achieve the desired lighting effect. The softbox's shaft can be rotated 360 degrees, allowing for a variety of positioning options. To ensure optimal performance and results, make sure that your studio lighting equipment is set up correctly and that your Elinchrom RX Speed modules are configured to deliver the desired level of light output. The D-Lite RX One Softbox To Go's diffuser provides soft, even lighting, making it ideal for portrait photography and other applications where a natural, flattering look is desired. Finally, perform some test shots to ensure that your lighting setup is delivering the desired results. Make any necessary adjustments to your equipment or shooting technique as needed to achieve the best possible outcome. Remember to always prioritize safety and proper usage guidelines when working with studio lighting equipment.
My softbox's reflector is broken and it doesn't open anymore, can I replace just the reflector or do I need to buy a whole new Softbox?
A broken reflector on a softbox can be frustrating. Replacing just the reflector might seem like an easy fix, but it depends on the design of your specific softbox. If you have a standard softbox with a removable reflector panel, you should be able to replace just the reflector without needing to buy a new softbox. These panels are usually held in place by clips or Velcro, and they're designed to be easily interchangeable. However, some softboxes have a more integrated design, where the reflector is molded into the housing of the softbox itself. In this case, it's unlikely that you'll be able to replace just the reflector without buying a new softbox. Another possibility is that your reflector might be attached to a spring-loaded mechanism or a hinge that allows it to open and close. If that's the case, replacing just the reflector might not be feasible without also replacing this mechanism. To determine whether you can replace just the reflector, take a closer look at your softbox and see how the reflector is attached. If it's held in place by removable clips or Velcro, it's probably safe to try and replace just the reflector. But if it's more integrated into the housing of the softbox, you might need to bite the bullet and buy a new one. It's worth noting that even if replacing just the reflector is possible, you'll still need to make sure that the new reflector is compatible with your existing softbox. So, before you go shopping for a replacement reflector, double-check the specifications of your softbox to ensure that the new reflector will fit properly.
How do I adjust the flash duration for optimal sync with my camera's shutter speed when using the D-Lite RX One's built-in high-speed sync (HSS) feature?
1. Set your camera to a high-speed sync compatible mode (usually denoted by a "HS" or "HSS" symbol). This will allow the camera and flash to communicate with each other and adjust their timing accordingly. On the Godox D-Lite RX One, go into its menu system and select the "HSS" option. This will enable HSS mode on the flash. Use the flash's control panel to adjust the "Flash Duration" setting. This is usually a numerical value (in milliseconds) that controls how long the flash fires for each time it goes off. Experiment with different flash duration settings to find the optimal one for your camera and shutter speed combination. A good starting point is to set the flash duration to 1/1000th of a second or less. Now, let's talk about how to adjust the camera's shutter speed to match the flash duration. To do this:
1. Set your camera to manual mode (M) and adjust its shutter speed until you find one that matches the flash duration. If your camera has an "EC" or "Exposure Compensation" setting, use it to fine-tune the exposure compensation to match the flash duration. For example, if you're using a 1/1000th of a second flash duration and a 1/125th of a second shutter speed, you'll need to adjust the camera's exposure compensation to +2 stops (since 1/1000th of a second is twice as fast as 1/125th of a second). By adjusting both the flash duration and the camera's shutter speed, you should be able to achieve optimal sync between the two devices. Keep in mind that HSS can be more challenging than traditional sync modes because it requires precise control over the timing of both the flash and the camera. However, with practice, you'll get a feel for how to adjust these settings to achieve perfect sync.
I've experienced issues with the flash head sometimes not being recognized by the control unit, what is causing this and how can I troubleshoot it?
1. Loose Connections**: Check that all connections between the flash head and the control unit are secure. Make sure that none of the cables or connectors are damaged or loose. Faulty Flash Head Cable**: Try swapping the flash head cable with a known good one to isolate the issue. If the problem persists, it's likely a fault in the original cable. Dirty Contacts**: Dirt and corrosion on the contact points between the flash head and the control unit can prevent communication. Clean the contacts carefully with a soft brush or cloth to see if that resolves the issue. Faulty Flash Head**: It's possible that the flash head itself is faulty. Try testing it separately from the control unit to see if it works properly. Control Unit Settings**: Check the control unit settings to ensure that they are set correctly for your flash head. Some flashes may require specific settings or configurations. Power Issues**: Ensure that the power supply to both the control unit and the flash head is stable and not causing any issues. Compatibility Issues**: If you're using a third-party flash head, it's possible that there are compatibility issues with your control unit. Check the manufacturer's documentation or contact their support for assistance. To troubleshoot the issue, try the following steps:
* Disconnect the flash head cable from the control unit and reconnect it to see if that resolves the issue. Swap the flash head cable with a known good one to isolate the issue. Clean the contacts between the flash head and the control unit carefully. Test the flash head separately from the control unit. Check the control unit settings for any configuration issues. If none of these steps resolve the issue, it's possible that there is a fault in either the control unit or the flash head, and you may need to contact the manufacturer's support for further assistance.
Before you buy Elinchrom D-Lite RX One Softbox To Go set

Barnaba –
I must say that this is a very professional kit from SOFTBOX. Great soft light, great synchronization and control. Perfect for a professional studio, it doesn’t necessarily have to be for amateurs.
Hope Stout –
As a photographer based in Manassas, I recently invested in the Elinchrom D-Lite RX One Softbox To Go set, and I must say, I am thoroughly impressed with its performance. While I have used other Studio Lighting setups before, this one has surpassed my expectations.
One common problem that people often face when setting up studio lighting is the difficulty of moving the equipment around. This can be particularly challenging in smaller studios or outdoor shoots where space is limited. However, Elinchrom D-Lite RX One Softbox To Go set solves this issue by being incredibly portable and easy to carry around. Its compact design allows for quick setup and tear down, making it an ideal choice for photographers who are always on the go.
Comparing Elinchrom D-Lite RX One Softbox To Go set to other popular Studio Lighting options, I would say that its versatility and convenience stand out. Its battery-powered functionality eliminates the need for bulky power cords or generators, making it a great choice for location shoots where access to electricity may not be readily available. Additionally, the softbox included in this set ensures even lighting and reduces harsh shadows, which is essential for capturing natural-looking images.
Here are some tips for people interested in buying Studio Lighting:
1. Consider the size and portability of the equipment. If you frequently shoot on location or have limited space, choose a lightweight and compact setup like Elinchrom D-Lite RX One Softbox To Go set.
2. Look for features that enhance your shooting experience. For example, battery power can make it easier to move around and avoid tangled cords, while softbox attachments provide even lighting and reduce harsh shadows.
3. Read reviews from other photographers to get an idea of the product’s performance and reliability. This will help you make an informed decision before making a purchase.
In conclusion, I would highly recommend the Elinchrom D-Lite RX One Softbox To Go set to any photographer looking for a versatile, portable, and high-performing Studio Lighting solution. Its ease of use, softbox attachment, and battery power make it an ideal choice for anyone who values convenience and versatility in their equipment. While there may be other popular options on the market, I believe that this set stands out in its ability to combine portability with powerful lighting capabilities. Whether you’re shooting indoors or outdoors, Elinchrom D-Lite RX One Softbox To Go set is a reliable and convenient choice for capturing stunning images.