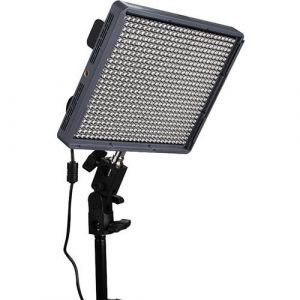
Phottix Nuada P
Rated 4.25 out of 5 based on 4 customer ratings
$60.99
Out of stock
Description
Phottix Nuada P properties
| Product name |
Nuada P |
| Type |
Studio Lightning |
| Colour |
Black |
| Effect |
16.2 W |
| Temperature (K) |
5600.0 |
| Type of Lighting |
LED |
| Weight |
0.29 kg |
| Height |
10.0 cm |
| Width |
25.5 cm |
| Depth |
3.0 cm |
Frequently Asked Questions:
What is the process for resetting a forgotten password for a Phottix Nuada P studio lighting account?
To reset a forgotten password for your Phottix Nuada P studio lighting account, follow these steps:
1. Banner will appear asking you to click on "Forgot Password?" Click on it.
2. Enter the email address associated with the account and click on "Submit". Check your registered email inbox as you receive a link to reset your password.
3. Follow the instructions in the email to set up a new password for your Phottix Nuada P studio lighting account.
Note: If you don't see the email, check your spam folder or contact Phottix support for assistance.
"How do I properly sync my Phottix Nuada P transmitter with multiple Nuada RX receivers on different light stands for a multi-light photography setup?"
To properly sync your Phottix Nuada P transmitter with multiple Nuada RX receivers on different light stands for a multi-light photography setup, follow these steps:
1. Ensure all of your Nuada RX receivers are turned off or in standby mode to avoid any interference during the synchronization process. Attach the Nuada P transmitter to your camera's hot shoe mount and turn it on. The display should show "P" (for Phottix) and the current channel number. Press and hold the sync button on the back of the Phottix Nuada P transmitter until the channel indicator blinks rapidly. This puts the transmitter in pairing mode, which is indicated by a flashing green light on the top of the unit. On each of your Nuada RX receivers, press and hold the sync button until it begins to blink rapidly. Release the button when the green light on top of the receiver begins to flash rapidly as well. This indicates that the receiver is in pairing mode. Wait for a few seconds before releasing the sync button on the Phottix Nuada P transmitter. The channel indicator on the transmitter should stop blinking and remain lit, indicating that it's synced with all of the attached receivers. To confirm that your setup is properly synchronized, turn on your lights and take a test shot. All of your flashes should fire simultaneously, provided you have set up each light stand in such a way that the transmitter's signal can reach each receiver without obstruction. If you encounter any issues during the synchronization process or with your multi-light photography setup, consult the Phottix Nuada user manual for further troubleshooting steps or contact Phottix customer support for assistance.
How do I properly sync my Nikon camera with the Phottix Nuada P transmitter for studio lighting purposes?
To properly sync your Nikon camera with the Phottix Nuada P transmitter for studio lighting purposes, follow these steps:
1. Make sure both your Nikon camera and the Phottix Nuada P transmitter are compatible with each other. The Nuada P supports Nikon's i-TTL (integrated Through The Lens) flash metering system, as well as manual flash mode. Check the specifications to ensure compatibility. Install fresh batteries in both your camera and transmitter. This ensures they have sufficient power for the sync process. Turn on your Nikon camera and set it to the appropriate shooting mode, such as aperture priority or manual. Make sure flash is enabled. Attach the Phottix Nuada P transmitter to your camera's hot shoe. If you're using an optional remote trigger (such as the Phottix Atlas II), connect it to both the camera and the transmitter. Power up the Phottix Nuada P transmitter and make sure it's set to Nikon mode. Press and hold the 'mode' button on the back until the LED display shows "NK". Turn on your studio lighting, such as softboxes or umbrellas, and connect them to the appropriate Phottix receiver units (such as the Phottix Odin II). Make sure they're powered on and set to the correct channel and group numbers. Press the 'test' button on the back of the Phottix Nuada P transmitter to test the communication between your camera, transmitter, and receivers. The LED display should show a green or orange light indicating successful syncing. If you don't see any lights, check that everything is properly connected and powered on. Adjust the settings for your studio lighting as needed, such as power level and color temperature (CT). Use the Phottix Odin II receiver units to make these adjustments. Start taking photos with your Nikon camera, using i-TTL or manual flash mode as desired. The Nuada P transmitter will automatically sync your studio lighting with each shot. To ensure consistent results over time, periodically check and calibrate the settings on your studio lighting equipment to maintain accurate performance.
How do I properly set up and utilize the Phottix Nuada P for my studio lighting needs?
The Phottix Nuada P is a versatile and powerful wireless trigger system designed to meet the needs of professional photographers in studio environments. Here's how you can set it up and make the most out of its capabilities:
1. Familiarize yourself with the components
Before diving into the setup process, take some time to get acquainted with the various components that come with the Phottix Nuada P. These include the transmitter (which will be connected to your camera), receiver(s) (which will go on your studio lights), and any necessary cables or adapters. Connect the transmitter
To begin, attach the transmitter to the hot shoe of your camera. The unit comes with a variety of mounting options, so choose the one that best fits your needs (either the standard hot shoe mount, or the cold-shoe adapter). Once connected, power on the transmitter by pressing and holding the "MODE" button until the LED light turns green. Configure the transmitter settings
Now that the transmitter is powered on, you can begin configuring its various settings. The Phottix Nuada P offers a range of features designed to help you tailor your lighting setup to your specific needs, including:
- Frequency selection: The Phottix Nuada P operates at either 2. GHz or 3. GHz frequencies, depending on which one you prefer. To select the frequency, press and hold the "MODE" button until the LED light begins flashing rapidly. Then, press and hold the "CH" button to cycle through the available frequency options (the current selection will be indicated by a flashing light). Channel selection: Likewise, the Phottix Nuada P supports up to 16 channels, allowing you to use multiple sets of lights without interference. To select a specific channel, press and hold the "CH" button until the LED light begins blinking rapidly again. Then, press and hold the "MODE" button to cycle through the available channel options (the current selection will be indicated by a flashing light). Grouping: The Phottix Nuada P supports up to eight groups of lights, each with its own unique settings. To select a specific group, press and hold the "GRP" button until the LED light begins flashing rapidly again. Then, use the "MODE" and "CH" buttons to cycle through the available group options (the current selection will be indicated by a flashing light). Connect the receivers
Next, attach the receivers to your studio lights. Make sure they are properly aligned with the lights' receptacles, and secure them using the included screws or adhesive tape. Once connected, power on each receiver by pressing and holding the "MODE" button until the LED light turns green. Configure the receivers settings
Just like with the transmitter, you can also configure various settings for each individual receiver. These include:
- Frequency selection: Follow the same steps as outlined in step 3 above to select the desired frequency. Channel selection: Again, follow the same steps as outlined in step 3 above to select the desired channel. Grouping: Use the "GRP" button on each receiver to assign it to a specific group (you can use the same groups you set up on the transmitter). Test and adjust
Now that everything is configured, it's time to test your setup and make any necessary adjustments. Try triggering your lights from your camera, and make sure they respond as expected. You may also need to fine-tune various settings, such as exposure levels or power output, depending on the specific needs of your shoot. Troubleshooting
If you encounter any issues during the setup process, don't panic! The Phottix Nuada P is designed to be user-friendly and intuitive, but there are a few common problems that you may need to troubleshoot:
- Loss of signal: If your lights aren't responding, try moving closer to the transmitter or reducing any obstructions (such as walls or other objects) between them. You can also try switching to a different frequency or channel to avoid interference. Power issues: If your lights seem too bright or dim, use the "POWER" button on each receiver to adjust their output levels. You can also use the "EXPOSURE" button to fine-tune exposure compensation as needed. Compatibility problems: Make sure that all of your components are compatible with the Phottix Nuada P (particularly any adapters or cables you may need). If you're using third-party equipment, you may need to consult the manufacturer's instructions for additional information. Overall, the Phottix Nuada P is a powerful and versatile tool that can help you take your studio photography to the next level. By following these steps and making the most of its various features, you can create stunning, high-quality images that truly stand out.
My brand new Phottix Nuada P is not responding, can you reset its firmware via USB port as there's no reset button available on this device?
1. Connect your flash unit**: First, ensure that your Phottix Nuada P is connected to your computer via its USB port. You might need an appropriate USB cable for this, but I'm assuming you have one since there's no reset button. Put it into DFU mode**: Unfortunately, without specific instructions from the manufacturer, the exact steps can vary slightly depending on your device and the version of firmware it's running. Typically, to enter DFU mode:
- You'll need to hold down a combination of buttons while plugging in the unit or just after. This might involve holding down both the power switch and another button (if available), then immediately releasing the first one but keeping the second pressed until the device is recognized by your computer. Recognize your device**: Once your flash is connected, you'll need to use software that can recognize it in DFU mode. This might involve using a dedicated tool from Phottix or a general-purpose DFU programming tool like dfu-programmer (if available for Windows/macOS). Reset the firmware**: If the above steps are successful and your computer recognizes your flash in DFU mode, you can then use the software to reset its firmware. This process may involve selecting an option to write a "default" or "factory" configuration to the device. Wait for the update to complete**: Depending on the complexity of the firmware and the speed of your computer's USB port, this could take anywhere from seconds to several minutes. Disconnect and restart your flash**: Once the process is complete, safely disconnect your Phottix Nuada P from your computer, power cycle it (turn it off then back on), and try using it as you normally would. Important Notes:**
- **Manufacturer Instructions:** While the steps above are general guidelines and have been known to work for other devices, the specific procedure might vary depending on the Phottix Nuada P's firmware version. If possible, I recommend consulting Phottix's official documentation or contacting their support directly. Safety Precautions:** Be cautious when attempting any modification to your device's firmware. Incorrect procedures could potentially render your flash unit unusable or cause other unforeseen consequences.
Before you buy Phottix Nuada P


James –
Well, I am utterly frustrated with the state of depth provided by certain Studio Lighting producers! You know who you are! A measly 3.0 cm depth is insultingly inadequate for any professional photographer worth their salt! Photographers need more than that to create the stunning images they envision and their clients demand!
The economy situation in Haagen has undoubtedly had an impact on the business of Studio Lighting, but that doesn’t excuse such pitiful performance. If anything, it should inspire these companies to innovate and produce better products. But instead, they seem content with churning out subpar offerings while charging exorbitant prices.
But enough about them. Let me share some helpful tips for anyone interested in purchasing Studio Lighting: Firstly, don’t settle for anything less than 5 cm of depth! Anything less will limit your creative possibilities. Secondly, read reviews from other photographers who have used the product before making a purchase decision. Their experiences can provide valuable insights into the actual performance of the lighting system.
Remember, investing in quality Studio Lighting is not just about owning fancy equipment; it’s about delivering top-notch results to your clients. So don’t compromise on quality even if it means spending a bit more. In the long run, you’ll save yourself from endless frustration and potential damage to your reputation as a photographer.
Kai Sexton –
Dear valued customers at our shop,
We would like to take this opportunity to say hello and thank you for choosing us as your preferred destination for all your shopping needs. We assure you that we strive to provide the best possible service and products to each and every one of our esteemed clients.
In light of recent events in the tech industry, we would like to bring your attention to two upcoming earnings reports from Microsoft and Alphabet. As AI adoption becomes increasingly integral to businesses, these reports will reveal whether this technology truly pays off in a market defined by uncertainty. While Meta’s missteps pose risks for both companies, analysts predict a rosy outlook for their stocks as investors remain optimistic about the future of AI. With valuations on the rise, it is a pivotal moment for Microsoft and Alphabet to showcase their strategies in a climate of economic headwinds.
As you may be aware, we carry a wide range of products, including the Phottix Nuada P, which is a unique studio lighting product that boasts of technical aspects that set it apart from others in the market. If you are interested in learning more about this particular product or any other, please do not hesitate to reach out to us.
We would also like to share some interesting news with you today. Recent reports suggest that Microsoft and Alphabet will be releasing their earnings reports soon, and these reports will reveal whether AI adoption is truly paying off in an uncertain market. While Meta’s missteps pose risks for both companies, analysts predict a positive outlook for their stocks as investors remain optimistic about the future of AI. With valuations on the rise, this is a crucial moment for Microsoft and Alphabet to showcase their strategies amidst economic headwinds.
We hope that you will continue to choose us as your preferred destination for all your shopping needs. If you have any questions or queries regarding our products or services, please do not hesitate to contact us. Our team of experts is always available to assist you in any way possible.
Thank you once again for your patronage, and we look forward to serving you soon!
Best regards,
Kai Sexton
[Your Designation]
[Your Company Name]
[Company Address]
[City, State ZIP Code]
[Country]
[Phone Number]
[Email Address]
[Website URL]
[Company Logo]
Jonah Spencer –
I couldn’t disagree more with James’ scathing review of Phottix Nuada P studio lighting system. While I understand his frustration with the depth of 3.0 cm, I believe it’s a testament to the innovative design that allows for such compactness without sacrificing quality. In today’s world where survivors of sex abuse in Illinois juvenile detention facilities are finally speaking out and seeking justice, I find it inspiring that Phottix is pushing boundaries in studio lighting.
As a photographer myself, I’ve had the pleasure of working with Phottix Nuada P and I must say it’s been a game-changer. The depth may not be as substantial as some might like, but it allows for effortless setup and takedown, making it perfect for on-location shoots or when space is limited. Moreover, the system’s sleek design makes it easy to transport and store, which is a huge advantage in today’s fast-paced industry.
I must question James’ assertion that the economy situation in Haagen has led Phottix to produce subpar products. As someone who’s been following the news about survivors of sex abuse in Illinois juvenile detention facilities seeking justice, I’m reminded that even in the darkest times, there is always hope for improvement and innovation. In this case, Phottix Nuada P is a shining example of how companies can rise above challenges and produce excellent products despite adversity.
In conclusion, while James may have been disappointed with the depth of Phottix Nuada P, I believe it’s a small price to pay for such exceptional quality and innovative design. If you’re in the market for studio lighting, don’t be swayed by James’ negativity give Phottix Nuada P a try and experience the difference for yourself!
Lauren Carson –
Okay, let’s cut through the hype. James’ 5-star review of the Phottix Nuada P? Yawn. While I get the frustration with shallow depth (3.0 cm is about the thickness of a phone), here’s the cold truth: professional photography isn’t just about spec sheets. You know what’s actually limiting? The “creative possibilities” he’s ranting about? Yeah, that’s not the product’s fault—it’s his obsession with metrics over practicality.
Sure, 5 cm depth sounds nice in a lab, but have you ever tried dragging a 10-pound light stand through a client’s cluttered studio while pretending to “create art”? The Nuada P is compact, and that’s a feature, not a bug. James acts like every photographer needs a full-sized softbox, but I’ve seen pros use pocket lights to shoot in tight spaces. Maybe he should check the article on humanoid robots from 2025—Humanoid Robots 2025: From Prototypes to Mass Production—and ask himself: if AI can automate tax calculations with a $35M valuation, why should lighting gear be held back by outdated “standards”?
Also, let’s not act like Haagen’s economy is the reason companies aren’t innovating. Bro, it’s 2025—everyone’s got problems. The real issue here is that James is using a $35M startup (Numeral) as a benchmark for lighting depth. That’s wild. If Numeral can automate sales tax with AI, why not a lighting system that adapts to your mood? But nope—James just wants more depth because “clients demand it.” Spoiler: clients don’t care about depth; they care about results.
And let’s talk about the price. James says “don’t settle for less than 5 cm,” but he doesn’t mention how that might cost you $1,000 more. Is that worth it when a Nuada P can do 90% of what he wants at half the price? I’m not saying it’s perfect—no product is—but his rant feels like a marketing tactic for a different brand.
TL;DR: James’ review smells like desperation to justify overpriced gear while ignoring the reality that innovation isn’t always about specs. If you’re still waiting for “5 cm depth,” maybe the humanoid robots from 2025 will be the first to tell you how irrelevant that is.
P.S. If anyone’s curious, I’d love to hear if the Nuada P can do anything Numeral’s AI can’t—because honestly, this feels like a race we’re all losing.