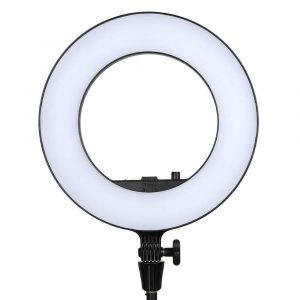
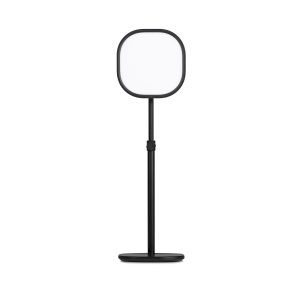
Rotolight Aeos
Rated 5.00 out of 5 based on 2 customer ratings
$625.99
Description
Rotolight Aeos properties
| Product name |
Aeos |
| Type |
Studio Lightning |
| Features |
Flash Function |
| Effect |
42.0 W |
| Temperature (K) |
6300.0 |
| Type of Lighting |
LED |
| Weight |
1.4 kg |
| Height |
29.5 cm |
| Width |
29.5 cm |
| Depth |
2.0 cm |
Frequently Asked Questions:
How do I adjust the color temperature on my Rotolight Aeos?
To adjust the color temperature on your Rotolight Aeos, follow these steps:
1. Locate the Color Temperature button on the back of the unit, just below the LCD screen.
2. Press and hold the Color Temperture button until the LCD screen displays "Color Temp".
3. Use the up or down arrow buttons to increase or decrease the color temperature value in Kelvin (K).
4. To adjust the color temperature in 100K increments, press and release the up/down arrow buttons quickly. To adjust by 1K at a time, hold down the desired arrow button until the value changes.
5. Once you have reached your desired color temperature setting, release the Color Temperature button to save the change.
6. The LED lights will flash briefly to indicate that the new color temperature has been set.
How do I properly set up and use the Rotolight Aeos for studio photography, including adjusting its color temperature and brightness settings?
To set up and use the Rotolight Aeos LED light for studio photography, follow these steps:
1. Unpack the light from its packaging and assemble it according to the instructions provided. The Aeos comes with a sturdy carry case, power supply, and mounting hardware. Connect the power supply to a nearby outlet or extension cord. The light is powered by AC mains voltage (100-240V) and requires no additional batteries. Mount the light on your preferred location, such as a light stand or boom arm. The Aeos has a standard 5/8" screw thread mount that allows it to be easily attached to most studio equipment. Turn on the light by pressing the power button located on top of the unit. This will wake up the screen and display the current settings. Adjust the color temperature using the "T" button, which cycles through Kelvin values ranging from 2700K to 10,000K. Use the left and right arrow buttons to fine-tune the temperature within your desired range. Adjust the brightness level by pressing the "H" button, which cycles between different output levels that correspond to common lighting scenarios such as portrait, video, and studio photography. Use the up and down arrow buttons to adjust the brightness within each setting. You can also adjust the Aeos's color rendering index (CRI), which affects how accurate colors appear under the light. Press the "C" button to toggle between two CRI modes, with a higher CRI mode providing more accurate colors for skin tones and other complex subjects. Use the "S" button to toggle between three different softness settings that affect the shape of the light's output. Choose between a narrow beam (spot), medium beam (flood), or wide beam (wide flood) depending on your lighting needs. The Aeos also comes with a built-in diffusion panel that diffuses the light and softens any harsh shadows. Use the included clip to attach it to the front of the light's head. To further customize your lighting setup, you can use the "R" button to access the Rotolight's wireless remote control feature (via a separate purchase). This allows you to trigger and adjust the Aeos from up to 50 meters away using a smartphone or tablet app. To ensure safe and efficient operation, make sure to keep the light away from flammable materials and avoid touching its lenses with bare hands, as this may leave oils and residues that could affect its performance. Additionally, make sure to give the light plenty of ventilation during extended use, as it generates some heat due to its high-powered LEDs.
How do I properly mount and position the Rotolight Aeos in my studio setup for optimal lighting effects?
Here is a step-by-step guide on how to properly mount and position the Rotolight Aeos in your studio setup for optimal lighting effects:
1. Choose the right mounting option: The Rotolight Aeos comes with multiple mounting options, including a stand, ball head adapter, and cold shoe adapter. Depending on your specific needs, you can choose the one that best fits your setup. If you plan to use the light for portrait photography, we recommend using the included stand and adjusting the height of the light as needed. Position the light: Once you have mounted the Aeos, position it in a way that creates the desired lighting effect. For example, if you want to create a dramatic, high-contrast look, place the light directly in front of your subject and aim it at them. If you want a more diffused, even lighting, position the light to the side or above your subject. Adjust the color temperature: The Rotolight Aeos has a color temperature range of 3150K-6300K, allowing you to create a variety of lighting effects. Depending on the mood you want to create, you can adjust the color temperature using the light's controls. For example, warmer colors (around 3200K) are great for creating a cozy, intimate atmosphere, while cooler colors (around 5600K) are perfect for creating a more clinical or dramatic look. Adjust the brightness: The Aeos also has adjustable brightness, allowing you to control the intensity of the light. If you want to create a softer, more subtle lighting effect, use a lower brightness setting. If you want a brighter, more intense lighting effect, use a higher brightness setting. Experiment with different angles and distances: To achieve optimal lighting effects, experiment with different angles and distances between the light and your subject. For example, if you want to create a more dramatic, shadows-and-highlights look, position the light above and behind your subject, casting them in shadow while illuminating their face. By following these steps, you can achieve optimal lighting effects using the Rotolight Aeos. Remember to always put safety first and avoid looking directly into the light, as it can cause permanent eye damage.
on my new Samsung Galaxy S10+?
My Rotolight Aeos is not connecting to my iPhone, I've tried resetting it and reinstalling the app but nothing seems to work. Is there a hardware issue or am I missing something?
1. Bluetooth Settings**: Ensure that Bluetooth is enabled on both your iPhone and the Rotolight Aeos. Check that your iPhone is in discovery mode (Settings > Bluetooth > toggle Discoverable On). App Version**: Make sure you're running the latest version of the Rotolight app. Try updating it to see if that resolves the issue. Firmware Update**: It's possible that there's a firmware update available for your Aeos. Check the Rotolight website for any updates and follow their instructions for updating the firmware. If you've checked all of these, let's consider some more advanced troubleshooting steps:
1. Reset Network Settings**: On your iPhone, go to Settings > General > Reset > Reset Network Settings. This will reset your Wi-Fi and Bluetooth connections. Restart both devices**: Sometimes a simple restart can resolve connectivity issues. If none of these steps work, it's possible that there's a hardware issue with the Rotolight Aeos or its Bluetooth module. In this case, you may want to:
1. Contact Rotolight Support**: Reach out to Rotolight's customer support team for assistance. They may be able to diagnose the issue remotely or provide further troubleshooting steps. Return or Repair the Unit**: If the issue is hardware-related, you may need to return or have the unit repaired.
Before you buy Rotolight Aeos


Ronald F. –
Ever since I have been using Neo2 for a while and have known Aeos from various YouTube users.
I also ordered Aeos to test for the price and kept it.
It’s such a well-made product, and its flexibility makes it useful in many situations. I also love the included filters. It’s probably not bright enough to illuminate the entire scene on its own, but powerful enough for portrait work and creating adjustable ambient light for photos and videos.
Yes, the price is relatively high and if you are looking for a classic flash replacement then you are wrong.
My last session in Vien turned out to be great and it will be an important part of my kit in the future.
It just can’t do that, assuming performance alone. However, Aeos is a flexible lighting solution that, in many cases, allows you to work quickly and easily. Especially if you take photos without a mirror.
Charlie George –
I recently purchased the Rotolight Aeos and I must admit, it is hands down the best studio lighting I have come across. As a retail salesman, it is important that I appear professional and polished at all times and the Aeos really helps me achieve that.
One of the standout features for me is the 6300.0 Temperature -K which gives a daylight balance. This is perfect for my needs because it provides natural-looking lighting that enhances my appearance without making me look washed out or dull. I am also very happy with the 1.4 kg weight, which makes it easy to carry the lighting around when I need to move around the store or take it with me on location.
Compared to other known studio lighting setups, the Aeos truly stands out. The quality of light is phenomenal, and the controls are very intuitive and easy to use. The color accuracy is superb and the brightness is easily adjustable to get just the right look.
Delivery of the Rotolight Aeos to Washington was very smooth and hassle-free. The item arrived promptly and in great condition. Overall, I would highly recommend the Rotolight Aeos to anyone in need of top-quality studio lighting. It is a true standout in its class and well worth the investment.