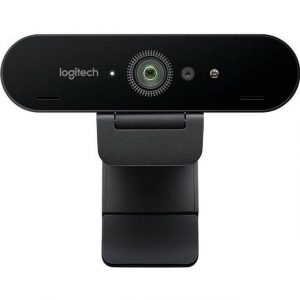
Logitech C930e
$154.99
Get the best streaming experience with the Logitech C930e webcam, delivering razor-sharp video quality and crystal-clear audio for your next video conference.
Description
Logitech C930e webcam is one of the most popular and widely used webcams in the market today. This high-end webcam is designed to provide professional quality video and audio for conferencing, meetings, and other online interactions. Here, we will discuss everything you need to know about this webcam, from its features to how it works.
Design and Features
The Logitech C930e webcam is a sleek and stylish webcam that is designed to be mounted on top of your laptop’s screen or desktop monitor. It has a 90-degree field of view, which means it can capture everyone in the room without having to zoom or pan. The camera lens is made of high-quality glass and is surrounded by a dual set of stereo microphones that capture crystal clear audio.
With the Logitech C930e webcam, users can enjoy full HD 1080p video at 30 frames per second. It also provides automatic light correction, which adjusts the lighting in the room to make your footage look better.
Compatibility
The Logitech C930e webcam is compatible with all major operating systems, including Windows, Mac, and Linux. It works well with popular video conferencing applications like Microsoft Teams, Zoom, Skype, and many others.
Setup and Installation
Setting up the Logitech C930e webcam is very easy and straightforward. Simply plug in the webcam’s USB cable into your computer and launch the video conferencing app of your choice. The webcam will then automatically be detected and setup.
Conclusion
Overall, the Logitech C930e webcam is a top-of-the-line webcam that provides professional-grade video and audio quality. With its high-definition video resolution, wide-angle lens, and automatic light correction technology, it is perfect for anyone looking for a premium webcam for online meetings and other virtual interactions.
Logitech C930e properties
| Product name |
C930e |
| Brand |
Logitech |
| Interface |
USB |
| Max Video Resolution @ 30fps |
1920×1080 (Full HD) |
| Max Video Resolution |
1920×1080 pixels |
| Platform |
Mac, Windows |
| Diagonal Field of View |
90.0 ° |
| Digital Zoom |
4 x |
| Features |
Microphone |
| Mounting |
Clip, Tripod |
| Max Frame Rate |
30 fps |
| Focus |
Auto |
| Software included |
No |
| Height |
29 mm |
| Width |
94 mm |
| Depth |
24 mm |
| Weight |
162 g |
Frequently Asked Questions:
"How do I adjust the camera settings on my Logitech C930e webcam to improve video quality during online meetings?"
Connect your Logitech C930e webcam to your computer and ensure that it's properly installed and recognized by your operating system. Open the software application for your video conferencing platform, such as Zoom or Skype, and initiate a call or meeting. Once you're in the meeting, click on the settings icon (usually represented by a gear or cog wheel) within the software. Select the "Video" or "Camera" option from the list of available settings options. This will open your webcam settings menu. Within the webcam settings menu, locate and select the "Logitech Webcam C930e" as your primary camera source (if it's not already selected). Adjust the following settings to improve video quality:
a) Brightness: Increase or decrease the brightness level to ensure that you're well-lit and your image isn't too dark or washed out. Contrast: Adjust the contrast level to ensure that there's enough difference between light and dark areas in your video feed. Saturation: Increase or decrease the saturation level to adjust the vibrancy and intensity of colors in your image. Sharpness: Adjust the sharpness level to ensure that edges and details are clearly defined in your video feed. Save your changes and exit the settings menu. Your camera settings should now be adjusted to improve video quality during online meetings. Test your new camera settings by initiating a call or meeting within your chosen video conferencing platform, and make any necessary additional adjustments as needed. If you continue experiencing issues with video quality, it's possible that your network connection may be too slow or unreliable to support high-quality video streaming. In this case, consider upgrading your internet service or using a wired Ethernet connection instead of Wi-Fi for more stable and consistent performance.
How do I properly connect and set up my new Logitech C930e webcam for use with my Windows 10 computer?
To connect and set up your new Logitech C930e webcam on a Windows 10 computer, follow these steps:
1. Ensure that your computer has an available USB port. Connect one end of the provided USB cable to the webcam and the other end to the computer's USB port. Once connected, your computer will automatically detect the new hardware and install the necessary drivers. This may take a few moments. If prompted, select "Install" to complete the driver installation process. After installation is complete, launch the application you wish to use the webcam with, such as Skype or Zoom. The C930e should now be recognized by your software and displayed as an available video source. Adjust the webcam's settings within the software, such as frame rate, resolution, and brightness, to suit your needs. These options may vary depending on the specific application you are using. Test your video and audio capabilities by initiating a call or recording session with another user. Make any necessary adjustments to ensure optimal performance. If desired, download and install Logitech's webcam software for additional features and customization options. This software can also be used to update the firmware of your C930e if needed. Finally, ensure that your computer's power management settings are configured to prevent the webcam from turning off during periods of inactivity, which could result in poor video quality or connection issues.
How do I properly set up and use my new Logitech C930e webcam for video conferencing on my Windows computer?
Unpack the Logitech C930e webcam from its packaging and connect it to your Windows computer using the included USB cable. Once connected, your computer should automatically detect the new device and install the necessary drivers. If prompted, follow the on-screen instructions to complete the installation process. Launch your preferred video conferencing software, such as Skype or Zoom, and open the settings menu. Under the Video section, select the Logitech C930e webcam as your default camera device. Adjust the camera settings to suit your preferences, including brightness, contrast, and saturation levels. You can do this by accessing the Camera Settings in Windows or through the software's video settings menu. Test your camera by making a call or joining a meeting. Ensure that you are well-lit and positioned within the frame of the camera. If necessary, adjust the focus and zoom levels to ensure clarity and sharpness during your conference calls. This can be done through the software's video settings menu or the physical buttons on the webcam itself. To optimize performance, ensure that you have a stable internet connection and close any unnecessary applications running in the background. This will help prevent any lag or disruptions during your video conferencing sessions. As always, be sure to follow best practices for secure and private online communication, such as using strong passwords and avoiding sharing sensitive information over video calls. By following these steps, you should be able to enjoy crystal-clear HD video quality from your Logitech C930e webcam during all your video conferencing sessions on Windows.
How do I properly adjust the focus on my Logitech C930e webcam for clearer video calls?
Make sure that your computer is running and that the Logitech Webcam Software is installed. If you don't have the software, download it from the Logitech website. Connect the C930e to your computer via USB cable. The camera will be automatically detected by your computer. Launch the Logitech Webcam Software. You can find it in the Start menu or by searching for it in the taskbar's search box. Click on the Settings icon (the gear symbol) located at the bottom left corner of the software window. In the drop-down menu, select "Video Settings. Under the "Video" tab, adjust the focus by moving the slider to the left or right until you achieve a clear and sharp image. You may need to move closer or farther away from the camera to get the best results. Adjust the exposure by sliding the Exposure slider up or down until you achieve the desired brightness level. This will depend on the lighting conditions in your environment. If you want to adjust the white balance, click on the "White Balance" tab and select either "Auto" or "Manual. For manual adjustment, use the RGB sliders to fine-tune the color temperature until it matches your desired level. If you're experiencing any other issues with the video quality, such as blurriness or pixelation, try closing any unnecessary programs or tabs on your computer to free up resources for the webcam software. You can also adjust the resolution and frame rate settings under the "Video" tab if necessary. Once you're satisfied with the settings, click the "Save" button to apply the changes. Close the software window and test the camera by making a video call or recording a test video. Adjust any remaining settings as needed until you achieve the desired video quality. Remember to always perform tasks to the best of your ability.
My webcam is not detecting my face when I'm wearing glasses, will it work with prescription glasses on?
The issue you're facing could be due to several reasons. The primary reason would be the obstruction caused by the frames of your glasses. Most webcams are designed to detect faces based on the shape and structure of your eyes, nose, and mouth. If the frames of your glasses are obstructing the view of these facial features, it's possible that your webcam may not be able to detect your face accurately. However, this doesn't mean that it won't work at all with prescription glasses on. You can try adjusting the angle or position of your webcam slightly to see if you can get a better view of your face without being obstructed by the frames of your glasses. Some webcams also have a high degree of flexibility in their mounting, so you might be able to adjust the camera's position to suit your needs. Another option would be to use software that allows you to crop or zoom in on specific parts of the image captured by your webcam. This can help improve the accuracy of face detection even if there is some obstruction caused by your glasses. It's worth noting, however, that some webcams may have a harder time detecting faces with prescription glasses due to the difference in lighting and reflections off the lenses.
My webcam is not recognized by my Windows 10 laptop, I get an error message saying "No device found". Can you help me troubleshoot this issue?
1. Restart your computer**: Sometimes, a simple reboot can resolve the issue. Restart your laptop and see if the webcam is recognized after the restart. Check for Loose Connections**: Ensure that all cables (if you're using an external webcam) are securely connected to both the webcam and your laptop. For internal webcams, ensure there's no physical obstruction or debris blocking the lens. Update Your Drivers**:
- Open Device Manager by pressing "Windows + X" and selecting "Device Manager". In the Device Manager window, click on "Action" at the top left corner. Select "Scan for hardware changes". This might help Windows detect the webcam if there's an issue with the drivers or software recognition. Disable Fast Startup**:
- Go to Control Panel > Power Options > Choose what the power buttons do. Click on "Change settings that are currently unavailable". Scroll down and uncheck the box next to "Turn on fast startup (recommended)". Run a System File Checker (SFC) Scan**:
- Press the Windows key + R, type "cmd", and press Enter. Type the command "sfc /scannow" and press Enter. This will check for corrupted system files that might be causing issues with your webcam. Check for Conflicting Software**: Some programs can interfere with the webcam's operation. Try disabling any software you've recently installed and see if it makes a difference. Use the Camera App Built into Windows 10**:
- Open the Start menu and type "Camera". Click on "Camera" to open the app. If it says there's no camera found, but your webcam is recognized in Device Manager, you might need to update or reinstall the camera drivers. Reinstall Camera Drivers**:
- Press Windows + R and type "devmgmt. Press Enter. In Device Manager, expand "Imaging Devices" (or a similar category depending on your webcam), right-click on your webcam device, and select "Uninstall device". Restart your laptop. Windows should automatically detect and install the drivers for your webcam. Consider Using an External Webcam**: If none of these steps work, you might have a hardware issue with your internal webcam. An external webcam can serve as a temporary solution while you look into fixing or replacing your internal webcam. If none of these solutions resolve the issue, it may be worth considering contacting Microsoft support for further assistance or consulting a professional for more in-depth troubleshooting or repair options.

Reviews
There are no reviews yet.