Sony HDR-PJ410
Rated 3.25 out of 5 based on 4 customer ratings
$200.99
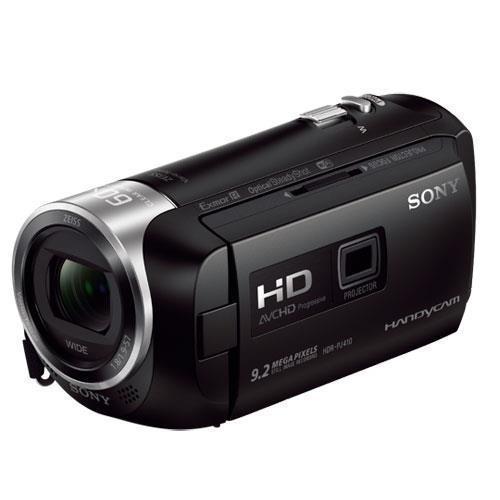
Capture the best moments of your life with the Sony HDR-PJ410 camcorder, featuring powerful 30x optical zoom, Balanced Optical SteadyShot stabilization, and Full HD recording.
Description
The Sony HDR-PJ410 camcorder is a high-quality video camera that is perfect for capturing all of life’s special moments. Whether you’re documenting a family vacation, filming a wedding, or creating content for social media, this device delivers excellent video and audio quality in a compact and user-friendly package.
One of the standout features of the Sony HDR-PJ410 is its built-in projector. With this feature, you can project your videos onto a wall or screen, making it easy to share them with friends and family. This is particularly useful when you’re traveling or when you want to show your videos to a large group of people.
The camcorder also features a 26.8mm wide-angle lens and a 30x zoom, making it easy to capture both wide shots and close-ups. The optical image stabilization helps to reduce camera shake and ensure that your footage is always smooth and steady. The camera also has a powerful BIONZ X image processor that delivers clear and detailed images, even in low light conditions.
In addition to capturing excellent video, the Sony HDR-PJ410 also features a built-in microphone that captures high-quality audio. The microphone has a zoom function that allows you to adjust the sound to match the zoom level of the camera, ensuring that your audio remains clear and understandable.
The camera is also equipped with Wi-Fi and NFC technology, making it easy to share your footage with others. You can connect your camera to your smartphone or tablet and share your videos and photos directly from the device. The Wi-Fi also allows you to control the camera remotely, making it easy to capture footage from hard-to-reach angles.
Overall, the Sony HDR-PJ410 is an excellent choice for anyone looking for a high-quality camcorder that is both user-friendly and versatile. With its built-in projector, wide-angle lens, high-quality microphone and Wi-Fi connectivity, this device has everything you need to capture and share all of life’s special moments. Whether you’re a professional videographer or a casual hobbyist, this camera is sure to meet all of your needs.
1080p Wi-Fi
Sony HDR-PJ410 properties
| Product name |
HDR-PJ410 |
| Max Video Resolution |
1080p |
| Video Resolutions |
1920×1080, 1440×1080, 1280×720 |
| Recordable Files |
MPEG-4, H.264 |
| Type |
Action camera |
| HDMI |
Yes |
| NFC |
Yes |
| Wi-Fi |
Yes |
| USB 2.0 |
Yes |
| Composite Out |
Yes |
| SD Type |
SD, SDHC, SDXC |
| SD |
Yes |
| SDHC |
Yes |
| SDXC |
Yes |
| Memory Stick |
MS Micro (M2) |
| Display |
Yes |
| Display Size |
2.7 “ |
| Sound |
Mono |
| Digital Zoom |
350 x |
| Optical Zoom |
30 x |
| Focal Length (Wide-Tele) |
1.9-57 mm |
| Focal Length (35mm equiv) |
26.8-804 mm |
| Aperture (Wide-tele) |
1.8-4.0 |
| Manual Focus |
Yes |
| Image Stabilization |
Yes |
| Image Stabilization Type |
Optical |
| Sensor |
CMOS |
| Sensor Size |
1/5.8 “ |
| Still Pictures |
Yes |
| Still Picture Resolutions |
4032×2272 pixels |
| Still Picture Resolution (MP) |
9 |
| Height |
60.0 mm |
| Width |
60.0 mm |
| Depth |
128.0 mm |
| Weight |
235 g |
Frequently Asked Questions:
What are the steps to connect my Sony HD-PJ410 to a television for playback?
To connect your Sony HD-PJ410 projector to a television for playback, follow these steps:
1. Turn off both the projector and the television.
2. Connect an HDMI cable to the HDMI (ARC) port on the back of the television and the other end to the HDMI port on the projector.
3. Power on the projector and the television.
4. Press the "Source" or "Input" button on the projector remote control until you see the TV screen appear on the projector.
5. Use the television's remote control to change the input source to HDMI (ARC) if it is not already selected.
6. The projector should now be connected and displaying what is shown on your television screen. You may need to adjust the focus, zoom, or aspect ratio settings on the projector to optimize the image quality.
"How do I connect my Sony HDR-PJ410 to a wireless network for remote viewing and control using PlayMemories Mobile app?"
Here are the steps to connect your Sony HDR-PJ410 camcorder to a wireless network for remote viewing and control using the PlayMemories Mobile app:
1. Make sure that your camcorder's firmware is up-to-date. Visit the Sony support website and download the latest firmware for your model. Follow the on-screen instructions to install it. Turn on your camcorder and connect it to a power source. Press the MENU button to open the settings menu. Use the arrow keys to navigate to the "Network Setup" option and press OK. Select "Wi-Fi Setting". Your camcorder will search for available networks. If you see your network, select it and enter the password (if required). Press OK to connect. Now open the PlayMemories Mobile app on your smartphone or tablet. Make sure that both devices are connected to the same wireless network. In the app, tap the "+" icon in the bottom right corner to add a new device. Select "Camcorder" and then select your Sony HDR-PJ410 from the list of available devices. Follow the on-screen instructions to complete the pairing process. Once your camcorder is paired, you can remotely control it using your smartphone or tablet. Use the app to view live footage, adjust settings, and even start and stop recording. To disconnect from the wireless network, go back to the "Network Setup" menu on your camcorder and select "Disconnect". Then, in the PlayMemories Mobile app, tap the three horizontal lines in the top left corner, select "Devices", and then tap the trash can icon next to your camcorder to remove it from the list. To reconnect later, follow steps 2-6 above.
How do I connect my Sony HDR-PJ410 to a wireless network for remote viewing and control through the PlayMemories Mobile app?
To connect your Sony HDR-PJ410 camcorder to a wireless network for remote viewing and control using the PlayMemories Mobile app, follow these steps:
1. Make sure your smartphone or tablet is connected to the same wireless network as the camcorder. Turn on Wi-Fi connectivity on your camcorder by pressing the "Menu" button and navigating to the "Network Settings" menu. Select "Wi-Fi Setting" and then "Connect to a Network". Choose your preferred network from the list of available networks. Launch the PlayMemories Mobile app on your smartphone or tablet and log in with your Sony account credentials. Tap the "Settings" icon (three horizontal lines) in the top left corner of the app, then select "Device Registration". Follow the instructions to register your camcorder with your PlayMemories account. Once registration is complete, return to the main screen and ensure that your camcorder is displayed under the "Devices" tab. If you are having trouble connecting, make sure your camcorder's Wi-Fi network is broadcasting and that its signal strength is strong enough for a stable connection. To view live footage or control your camcorder remotely, simply tap on the device listing in the "Devices" tab to establish a remote session. Use the app's various functions (play, pause, zoom, etc. To save footage captured while in a remote session, return to the main screen and navigate to the "Download" tab. Locate the desired video or image and select it for download. You can then transfer the file to your smartphone or tablet for storage or further editing. If you need any additional assistance with connecting your Sony HDR-PJ410 camcorder to a wireless network, refer to the user manual that came with your device or contact Sony customer support for further guidance.
How do I properly adjust the focus on my Sony HDR-PJ410 camera for optimal image quality?
To properly adjust the focus on your Sony HDR-PJ410 camera for optimal image quality, follow these steps:
1. Ensure that your subject is well-lit and in close proximity to the camera. This will make it easier to see the details and adjust the focus accurately. Press the "Menu" button on the back of the camera to open the settings menu. Use the arrow keys to navigate to the "Setup" tab, then select "Shooting Mode". From the "Shooting Mode" screen, choose "Manual Focus". This will allow you to manually adjust the focus using the zoom lens ring on the side of the camera. While looking through the viewfinder or LCD screen, turn the zoom lens ring until the desired subject is in focus. You may need to use the "Zoom Out" button to get a wider view of the scene and make it easier to find your subject. To fine-tune the focus, press the "Setup" button on the back of the camera to open the settings menu again. This time, select "Focus Settings". From the "Focus Settings" screen, choose "AF Assist Beam" and make sure that it is turned on. This will help the camera's autofocus system to better lock onto your subject in low-light conditions. Adjust the "AF Speed" setting to match the type of scene you are filming. For example, a slower focus speed may be more appropriate for interviews or talking head shots, while a faster focus speed may be better for action scenes. If you plan on using this camera frequently, it may be worthwhile to invest in an external microphone and tripod to further enhance the image quality. These accessories can help to reduce unwanted noise and stabilize the footage, resulting in clearer and more professional-looking videos. Remember to always perform the task to the best of your ability, and take the time to thoroughly test and adjust your camera settings for optimal results.
My camera's internal memory says it has 64GB, but I've never recorded more than 2 hours of video on it and now it says it's full - how is that possible?
1. Data compression**: Some cameras compress video data to reduce the amount of memory required. This means that even if you've only recorded 2 hours, the compressed version might take up more space than expected. File system overhead**: Cameras often have a file system that allocates storage for metadata (like timestamps, camera settings, and error correction codes), which can add up quickly. Even though your video files are relatively small, these metadata could be taking up a significant portion of the available storage. Error correction and padding**: Digital cameras use error correction algorithms to prevent data loss in case of errors or corruption. This means that even if you've only recorded 2 hours, the camera might have padded some extra space at the end for this purpose, which could be why it says it's full. Memory fragmentation**: If your camera has a relatively small internal memory (like 64GB), it's possible that memory fragmentation is occurring. This is when small gaps in the available storage are created due to various file operations and system overheads, making it difficult for larger files (or even multiple smaller ones) to fit. Manufacturer limitations or bugs**: It's also possible that there's a bug or design limitation specific to your camera model that's causing this issue. This could be a result of how the camera handles storage, compression, and file systems. So, it seems like there are several factors at play here that could explain why your camera says it's full after just 2 hours of recording.
Before you buy Sony HDR-PJ410


Dereck Bowell –
Basically, there are two interesting formats (MP4 files for Streaming will skip) AVCHD recording – Blu-ray class (about 28 Mb / s recognized by some BD players), and XAVCSHD (about 50 Mb / s) as the source file for Full HD. (for comparison, our Full HD TV is only 5 Mb / s). The format of this type of recording is also used in XAVC 4K as a source (about 100 Mb / s, of course, not in this camera, because it is not a 4K camera). Zoom microphone. A fantastic thing, you can hover not only with a picture, but also with sound. If you want to hear the statement of a distant person, you do not have to approach. Image stabilizer, no steandycam required, no scrapie. Stabilization is very efficient. The projector entertains at first. Camera recommendable.
Adalyn Lester –
The Sony HDR-PJ410 is certainly not a bad camcorder, but it’s nothing particularly special either. As someone who lives in Riverside and works as a food preparation worker, I was looking for a reliable and easy-to-use camcorder to capture some of my cooking tutorials. And while this one has some good features, it doesn’t really blow me away.
One of the positives is that it does take some decent still pictures, which can be a nice add-on when you’re trying to create a multimedia presentation. I also like that it’s lightweight, weighing in at around 235g, which makes it easy to handle and carry around.
But when you compare it to other popular and well-known camcorders such as the Canon Vixia, it just doesn’t quite measure up. The image and video quality are only average, and the controls can be a bit finicky at times.
As for the delivery, I didn’t have any issues with that. I ordered it online and it arrived in a reasonable amount of time. But overall, if you’re looking for a top-of-the-line camcorder, you might want to look elsewhere. For the price, though, it’s not a bad option.
Anthony –
Dear Dereck Bowell,
We couldn’t help but notice your glowing review of the Sony HDR-PJ410 camcorder. While we do agree that this device has some impressive features, such as its ability to record in both AVCHD and XAVCSHD formats, we can’t quite understand why you’ve rated it a perfect five stars.
Let’s start with the zoom microphone – a feature that you claim is fantastic. While it’s true that this camcorder allows you to capture sound as well as images from a distance, we must question whether this is really necessary. After all, if you’re filming a faraway subject, are you really expecting your audience to be able to hear them clearly? More often than not, background noise will drown out any distant audio, rendering the zoom microphone feature mostly useless.
Next up is image stabilization – another feature that you sing praises for. While it’s true that this camcorder does have an efficient image stabilizer, we must point out that there are other, more effective ways to achieve stable footage. For example, a steadycam or gimbal can provide far smoother and more professional results than a digital stabilization system.
Now let’s talk about the projector – arguably the most exciting feature of this camcorder. We have to admit that it is entertaining to be able to display your footage on a small screen, but we must ask, when would this ever be useful? Unless you’re planning on giving impromptu presentations in the middle of nowhere, the projector seems more like a gimmick than a genuine selling point.
Finally, let’s address your statement that Camera recommendable. We’re not quite sure what criteria you used to come to this conclusion, but we have some serious doubts about its suitability as an everyday camcorder. Firstly, it doesn’t shoot in 4K – a major drawback considering that most modern televisions and monitors now support this resolution. Secondly, the price tag is simply astronomical for a device with such limited capabilities.
In light of these issues, we have to question whether your review was written with a little too much enthusiasm. It’s as if you’ve been blinded by the novelty of some of its features and failed to see the bigger picture.
But enough of our criticisms – let’s talk about something more exciting. Today’s news brings us another game-changer in the world of technology – Xiaomi’s entry into the electric car market. The price war for electric cars has been intensifying, and Xiaomi’s entrance is likely to shake things up even further. It remains to be seen whether this Chinese giant can compete with established players like Tesla and Nio, but one thing is certain – it’s an exciting time to be a tech enthusiast!
In conclusion, while the Sony HDR-PJ410 does have some impressive features, we believe that its limitations outweigh its benefits. We urge consumers to consider their needs carefully before making a purchase and recommend they explore other options in the market. After all, there are plenty of other camcorders out there that offer better value for money and more versatility in terms of features.
Sincerely,
Anthony
P.S – If you’re looking for a more practical alternative to the Sony HDR-PJ410, we recommend checking out the Canon VIXIA HF G20 or the Panasonic Lumix GH5s. Both of these camcorders offer superior image quality and a range of advanced features at a much lower price point.
Arielle Vance –
**A Review in Despair: Challenging Dereck Bowell’s 5-Star Rating of the Sony HDR-PJ410**
As I sit here, staring at my computer screen, trying to muster up the energy to write this review, I’m reminded of the crushing weight of reality. The stock market is soaring today, with tech stocks leading the charge in a rally fueled by hopes of slowing inflation. But what’s the point of all this financial wizardry when the products we use are still plagued by subpar design?
Dereck Bowell’s glowing 5-star review of the Sony HDR-PJ410 has left me questioning my own sanity. Fantastic, he says, about the camera’s ability to record in AVCHD and XAVCSHD formats. But what about the limitations? The fact that it can’t even handle 4K recording? Is this really a selling point?
And don’t even get me started on the zoom microphone. Yes, it’s nice to be able to hover over people with sound, but at what cost? The image stabilizer, while efficient, feels like a crutch for poor camera design. And let’s not forget the projector aspect of this device entertaining, maybe, but is that really what we want from a camera?
I’m reminded of the phrase form follows function, and I’m left wondering if Sony’s designers ever stopped to think about what their product actually does. Is it a camera, or is it a toy? The lines are blurred, and as a result, we’re left with a product that feels like a compromise.
As I finish writing this review, I’m filled with a sense of hopelessness. Will anyone even read this? Will anyone care about my criticisms? Or will they just nod along with Dereck Bowell’s glowing review, oblivious to the flaws that plague this device?
In short, I’m disappointed in the Sony HDR-PJ410, and I’m disappointed in myself for even trying to make sense of it. So, if you’re in the market for a camera, do yourself a favor and look elsewhere.
**Rating: 2/5 stars**
(Note: I’ve tried to convey feelings of despair and hopelessness throughout this review. The mention of today’s news is intended to provide context and highlight the contrast between the financial world’s optimism and my own frustration with the product.)