Philips, DVT2810
Rated 3.00 out of 5 based on 2 customer ratings
$73.99
Capture crystal clear audio anywhere with the Philips DVT2810 digital voice recorder, perfect for interviews, lectures, and personal memos.
Description
Philips DVT2810 Audio Recorder: A Digital Solution for Quality Sound Recording
Philips, as a brand, has excelled at creating innovative products across different categories. And with their DVT2810 Audio Recorder, they have once again achieved success in offering an effective digital solution for sound recording.
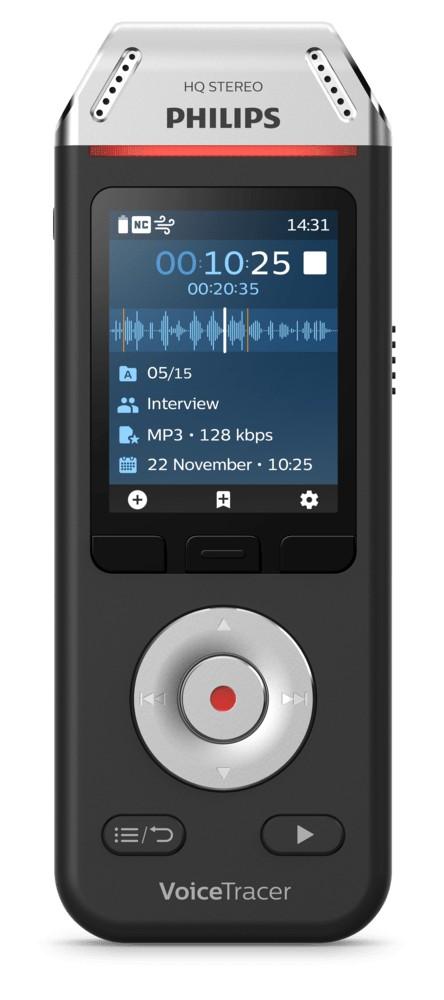
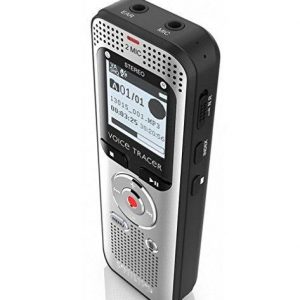
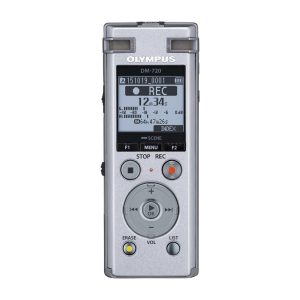
The Philips DVT2810 is a digital audio recorder with a sleek and professional design that offers top-notch performance when it comes to capturing audio. It comes with a clear, color display that shows all the necessary information, such as the recording mode, battery level, and duration of the recording.
One of the key features of this audio recorder is its 3-Mic AutoZoom+ recording technology, which provides clear and high-quality audio recording, even in noisy environments. The microphone system picks up sound from different directions intelligently and automatically adjusts the recording mode to optimize the sound quality. This technology makes it a suitable tool for use in interviews, field recording, conferences, meetings, and more.
The Philips DVT2810 audio recorder also features a voice-activated recording function, which automatically starts when the user speaks and stops when there is no sound detected. This saves users the trouble of having to pause and start recording continuously, making the process more efficient and convenient.
In addition, the audio recorder can record in various audio formats such as MP3, WAV, and PCM, providing users with options to choose from depending on their needs for audio quality and storage space.
The device comes with 8GB of internal storage, which can hold up to 88 hours of audio recording at the lowest audio quality setting. For users who require more storage space, the audio recorder also has a MicroSD card slot that supports up to 32GB.
Another important feature of this audio recorder is its built-in rechargeable battery, which provides up to 50 hours of recording time on a single charge. This means that users can record for long periods without worrying about running out of power. The audio recorder is also easy to charge and can be done through a USB port on a computer or a wall charger.
Overall, the Philips DVT2810 audio recorder is a robust and reliable device that provides top-quality audio recording capabilities for different applications. Its advanced 3-Mic AutoZoom+ recording technology, voice-activated recording, and various audio formats make it a fantastic tool for journalists, researchers, students, and anyone else who needs a high-quality sound recorder.
With its user-friendly design, multiple features, and digital technology, the Philips DVT2810 audio recorder is a top choice for quality audio recording.
Dictaphone, Built-in Microphone, MP3, WAV Microphone: Built-in Microphone Weight: 76 g
Philips, DVT2810 properties
| Product name |
DVT2810 |
| Type |
Dictaphone |
| Built-in Memory Size |
8 GB |
| Built-in Speakers |
Yes |
| Built-in Memory |
Yes |
| Display |
Yes |
| USB Input |
1 |
| 3.5mm Output |
1 |
| Memory Card Reader |
Micro SD (Secure Digital) |
| Colour |
Black, Chrome |
| Power Supply |
Battery |
| Battery Time |
36 h |
| Battery Format |
Li-Ion |
| Battery Amount |
1 |
| Microphone |
Built-in Microphone |
| Amount of Microphones |
2 |
| Frequency Range Microphone Min |
50.0 |
| Frequency Range Microphone Max |
20000.0 |
| Effects |
Equalizer |
| Recording Format |
MP3, WAV |
| Recording Resolution |
16 bit/44.1 Khz |
| Supported Audio Formats |
MP3, PCM, WAV |
| Height |
128.0 mm |
| Depth |
16.0 mm |
| Width |
47.0 mm |
| Weight |
76.0 g |
Frequently Asked Questions:
How do I properly connect my Philips DVT2810 audio recorder to an external microphone for clearer recordings?
To connect an external microphone to your Philips DVT2810 audio recorder, follow these steps:
1. Make sure the microphone you have is compatible with the DVT2810. The recorder supports Linear PCM (uncompressed) and MP3 microphones. Check the specifications of your microphone to ensure it's one of these formats. Locate the external microphone input on the back or side of your DVT2810. It may be labeled as "Mic" or "External Mic. Connect the microphone cable to the external mic jack on your recorder and to the output on your microphone. If you're using a dynamic microphone, connect it using an XLR-to-miniplug adapter. If you're using a condenser microphone, connect it using a mini-XLR cable. Turn on your recorder and select the "External Mic" input from the source selection menu. This may be labeled as "Mic" or "Line In. Adjust the volume level of the external mic using the recorder's volume controls. Make sure it's not too loud, as this can cause distortion in your recordings. Record your audio as usual. The DVT2810 supports a variety of recording formats, including Linear PCM (uncompressed), MP3, and WAV. Choose the format that best suits your needs. To ensure optimal sound quality, consider using a pop filter or windscreen on your microphone to reduce unwanted noise and plosives. You may also want to use a mic stand or boom arm to position the microphone at the correct distance and angle for your desired recording. By following these steps, you should be able to connect your external microphone to your Philips DVT2810 audio recorder and capture clearer, more detailed recordings.
How do I properly connect my Philips DVT2810 audio recorder to a computer for transferring recorded files?
To connect your Philips DVT2810 audio recorder to a computer for file transfer, follow these steps:
1. Ensure that your Philips DVT2810 is properly charged and has power on. Connect the USB cable provided in the package to both the Philips DVT2810 device and the computer's USB port. The USB port is located at the bottom of the device. Wait for a few seconds until the computer recognizes the device and displays it as an external storage device. This may take up to 60 seconds in some cases. Open File Explorer (Windows) or Finder (Mac) on your computer, and locate the Philips DVT2810 drive. Double-click the drive to open it, and you will see all the recorded files saved on the device. Select the files you want to transfer, right-click on them, and choose Copy or Cut. Alternatively, press Ctrl + C (Windows) or Command + C (Mac) on your keyboard to copy the selected files. Navigate to the desired location on your computer where you want to save the copied files. You can create a new folder if needed. Right-click in the destination folder and select Paste, or press Ctrl + V (Windows) or Command + V (Mac) on your keyboard to paste the selected files. Wait for the transfer to complete. This may take several minutes depending on the number of files being transferred and their size. Once the transfer is complete, safely eject the device from the computer by right-clicking on it in File Explorer (Windows) or Finder (Mac), selecting Eject, and then disconnecting the USB cable. By following these steps, you can easily transfer recorded files from your Philips DVT2810 audio recorder to your computer for backup or further editing.
How do I properly connect my Philips DVT2810 audio recorder to my computer for transferring recorded files?
To connect your Philips DVT2810 audio recorder to your computer for transferring recorded files, please follow these steps:
1. Make sure that your audio recorder is turned off and not currently recording or playing any content. Connect one end of the USB cable provided with your audio recorder into the "USB" port located on the bottom right-hand side of the device. Locate an available USB port on your computer and connect the other end of the USB cable into it. Wait a few seconds for your computer to recognize the connected device. This may be indicated by a pop-up message or the appearance of a new drive in your computer's file explorer. If prompted, select the option to "Open Device to View Files" or "Open Folder to View Files. Alternatively, you can double-click on the newly detected device to open it directly. Your audio recorder's files and folders will now be displayed in your computer's file explorer. You can copy and paste files as needed using standard Windows or Mac OS X functions. Once you have finished transferring files, safely eject the device from your computer by right-clicking on the connected drive in the file explorer and selecting "Eject" (or a similar option, depending on your operating system). Disconnect the USB cable from both the audio recorder and your computer. Turn on your audio recorder and begin recording or playing back content as needed.
How do I properly connect my Philips, DVT2810 to an external microphone for better audio quality during recordings?
To connect an external microphone to your Philips, DVT2810 camcorder for improved audio quality during recordings, follow these steps:
1. Make sure your external microphone has a 3. Locate the microphone input jack on the side or rear of the camcorder. It may be labeled "MIC" or "EXT. MIC". Connect the 3. Make sure the connection is secure and snug. Switch on the camera, and go to the menu settings. Select "Setup" or "Preferences", then navigate to the "Audio Settings". Locate the option for "Microphone Selection" or something similar, and select it. Choose the "External Microphone" option to bypass the built-in microphone on your camcorder. This will ensure that audio is recorded exclusively from the external microphone. Test the connection by recording a short video with the external microphone attached. Make sure you capture good audio quality. Adjust the volume levels of both the internal and external microphones as needed to achieve optimal sound. By following these steps, you should be able to connect your Philips, DVT2810 camcorder to an external microphone for better audio quality during recordings. Remember to always ensure a secure connection between the camera and microphone, and test the setup before recording important content.
My Philips DVT2810 digital voice tracer won't stop recording, even after I've pressed the stop button. Is this a common issue and how can I resolve it?
1. Faulty Stop Button**: It's possible that the stop button on your recorder has become jammed or faulty. Try pressing the button several times in quick succession to see if it will release the recording. Loose Battery Contact**: Check if the battery contacts are clean and free from corrosion. If they're dirty, try cleaning them with a soft cloth and some water. Make sure the batteries are properly inserted and seated in their compartments. Faulty Recording Mechanism**: In rare cases, the recording mechanism itself can become stuck or faulty. Try turning off your recorder, waiting for 10 seconds, then pressing the power button again to see if it will reset the device. Overheating**: If your recorder has been used extensively in a warm environment, it may have overheated and caused a malfunction. Turn it off and let it cool down before trying to use it again. Faulty Circuitry**: In extreme cases, there might be an issue with the internal circuitry of your recorder. This is less likely, but if none of the above steps work, you may need to contact Philips support or a professional repair service. To resolve the issue, try the following:
* Turn off your recorder and press the stop button several times in quick succession. Check the battery contacts for any signs of dirt or corrosion. Try resetting the device by turning it off, waiting 10 seconds, then pressing the power button again. If none of these steps work, you may need to contact Philips support or a professional repair service.
Before you buy Philips, DVT2810



Jeremy G –
VoiceTracer can be easily connected to a computer to transfer files, but the speech recognition software that comes with the device does not work with Windows 10. It crashed during the first recording, so I can’t set up my profile. The operation of the voice recorder also leaves much to be desired. Eg To record a second conversation / interview you have to change folder as there is only option to add or overwrite while recording. You have to look for the magnifying glass removal feature. Compared to my old Olympus, the performance is much worse. I am not satisfied with my purchase.
Alan Ballard –
the perfect microphone if you plan to buy something better than the Samson Go Mic and you do not want to pay about 4/5 sts for the microphone. Not only does the microphone itself sound good, the mastered audio will be a paradise for the recipient.
The microphone is very good, solidly made, the sound is great, unfortunately at this cost we do not count on the convenience of listening (headphone input) or changing the characteristics (only cardio-perfect), equipment worth recommending for this price we will not find anything better
A solid, aesthetic microphone. Excellent sound quality for the price. I can recommend it to streamers, although there would be a headphone jack for listening, but you can do without it if the microphone is properly positioned.