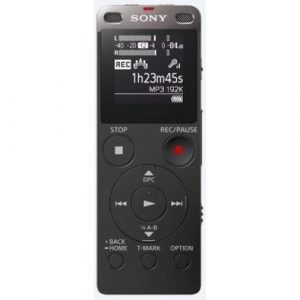
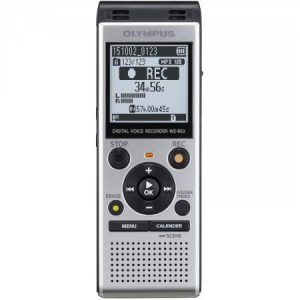
Olympus, DM-720
Rated 3.86 out of 5 based on 7 customer ratings
$110.99
Record your important meetings, lectures, and interviews with crystal-clear audio quality, using the Olympus DM-720 audio recorder.
Description
Olympus is a well-respected name in audio technology, and for good reason. Their DM-720 audio recorder is the perfect tool for people who demand audio excellence. Whether you’re recording interviews, lectures, business meetings, or any other audio content, the Olympus DM-720 is the perfect choice.
The DM-720 audio recorder is a compact and portable device that packs a powerful punch when it comes to audio recording. It is equipped with high-quality microphones that capture sound in exquisite detail, so you never miss a word. The recorder has a directional microphone system that enables it to focus on sound from the source you’re recording, while minimizing background noise.
One of the standout features of the DM-720 is its ability to record in high-quality PCM format. PCM stands for pulse-code modulation, which is a method used to digitally represent analog signals. When you record using PCM, you get uncompressed audio with a frequency response of up to 48kHz/16bit. This ensures that your audio recordings retain their quality and fidelity when you play them back.
The DM-720 is also equipped with Voice Playback, which is a feature that allows you to speed up or slow down audio playback without changing the pitch of the audio. This is helpful if you need to review audio recordings quickly or if you want to transcribe audio content at your own pace.
Another standout feature of the DM-720 is its compatibility with Dragon NaturallySpeaking voice recognition software. If you’re someone who transcribes audio content regularly, you’ll appreciate how easy it is to transcribe your audio content using voice recognition software. With Dragon NaturallySpeaking, you can transcribe audio files quickly and accurately, saving you time and effort.
The DM-720 audio recorder also has a convenient Mode Dial that lets you switch easily between different recording modes such as Dictation, Conference, Music, and more. This makes it easy to choose the right recording mode for your needs and ensures that you get the best possible audio quality for any situation.
When it comes to storage, the DM-720 has 4GB of internal memory, which can store up to 985 hours of audio content. If you need more storage, you can insert a microSD card of up to 32GB, which gives you even more space to store your recordings.
Overall, the Olympus DM-720 audio recorder is a high-quality device that offers exceptional audio recording capabilities. Its compact and portable design, PCM recording format, Voice Playback, and compatibility with Dragon NaturallySpeaking make it the perfect choice for anyone who demands audio excellence. Whether you’re a student, journalist, researcher, or anyone else who requires accurate and high-quality audio recordings, the Olympus DM-720 is an excellent choice.
Dictaphone, Built-in Microphone, MP3, PCM Microphone: Built-in Microphone Weight: 72 g
Olympus, DM-720 properties
| Product name |
DM-720 |
| Type |
Dictaphone |
| USB Input |
1 |
| Memory Card Reader |
Micro SD (Secure Digital) |
| Colour |
Silver |
| Power Supply |
Battery |
| Battery Format |
AAA |
| Battery Amount |
1 |
| Microphone |
Built-in Microphone |
| Frequency Range Microphone Min |
20.0 |
| Frequency Range Microphone Max |
20000.0 |
| Recording Format |
MP3, PCM |
| Supported Audio Formats |
MP3, PCM |
| Height |
105.9 mm |
| Depth |
14.4 mm |
| Width |
39.6 mm |
| Weight |
72.0 g |
Frequently Asked Questions:
What is the recommended microphone for use with the DM-720 and how do I connect it?
The DM-720 Dash Cam supports a variety of microphones, but we recommend using a 3.5mm external microphone for better audio quality. When connecting an external microphone to the DM-720, follow these steps:
1. Turn off the vehicle's ignition and make sure the dash cam is unplugged from the power source.
2. Locate the microphone port on the side of the DM-720 Dash Cam (on the left side when looking at the top of the camera). The microphone port is a 3.5mm jack.
3. Connect one end of the 3.5mm audio cable to your external microphone and the other end to the microphone port on the DM-720 Dash Cam. Ensure the connection is secure, as any loose connection may result in poor audio quality or no sound at all.
4. Once connected, turn on the vehicle's ignition and power up the DM-720 Dash Cam. The external microphone should now be operational and recording audio with your dash cam footage.
Can you provide instructions on how to set up and use the built-in microphone for voice recording on my Olmypus DM-720 audio recorder?
Sure, here are the steps to set up and use the built-in microphone for voice recording on your Olympus DM-720 audio recorder:
1. Turn on the recorder by pressing the power button located at the top right corner of the device.
2. Make sure you have a microSD card inserted into the slot on the side of the recorder to store your recordings.
3. Press the playback/pause button to enter the recording menu. You will see a menu with various options such as "Rec Mode," "Limb," "Wind Noise Reduction," etc. Use the navigation button or the directional buttons on the side of the recorder to scroll through the options.
4. Select "Mic 1" by pressing the playback/pause button again, which will activate the built-in microphone. The indicator light next to the record button will turn green, indicating that the mic is active.
5. Press and hold the record button on the top left corner of the recorder until you hear a beep sound. This indicates that the recorder has started recording.
6. To stop recording, press and hold the record button again until you hear another beep sound.
7. To play back your recorded audio, press the playback/pause button once. You can use the navigation buttons or directional buttons on the side of the recorder to fast forward or rewind through your recordings.
8. To save your recording, press and hold the save button located below the playback/pause button until you hear a beep sound. The recorder will automatically save your recording to the microSD card inserted in the device.
9. If you want to adjust the volume or other settings during recording, simply navigate through the options using the navigation buttons or directional buttons on the side of the recorder.
I hope these instructions help!
How do I transfer audio files from my Olympus DM-720 to my computer using a USB connection?
Connect the Olympus DM-720 to your computer using the provided USB cable. Make sure the cable is securely connected to both the device and the computer. If prompted by your computer, select "Open folder to view files" or "Import pictures and videos" depending on your operating system. The DM-720 should now be recognized as a USB storage device. Locate it in your computer's file explorer (Windows) or Finder (Mac). Navigate to the desired audio files on the Olympus DM-720 and select them. You can do this by clicking and dragging your mouse over multiple files at once, or holding down the Ctrl key (Windows) or Command key (Mac) while clicking each individual file. Once you have selected the desired audio files, right-click (Windows) or Command + Click (Mac) to bring up a context menu. Select "Copy" or "Copy and Paste" depending on your preference. Navigate to the desired location on your computer where you want to save the audio files. This could be a specific folder or just your desktop, depending on your preference. Right-click (Windows) or Command + Click (Mac) in the selected location and choose "Paste" or press Ctrl+V (Windows) or Command+V (Mac). This will copy the audio files from the Olympus DM-720 to your computer. Once the transfer is complete, safely eject the Olympus DM-720 from your computer by right-clicking (Windows) or Command + Clicking (Mac) the device in your file explorer/Finder and selecting "Eject" or "Safely Remove Device". This will ensure that your files are properly transferred and your Olympus DM-720 is ready for future use.
How do I properly connect my Olympus DM-720 to a computer for transferring recorded audio files?
To connect your Olympus DM-720 to a computer for transferring recorded audio files, follow these simple steps:
1. Connect the USB cable provided with your Olympus DM-720 to both the device and your computer's USB port. On your Olympus DM-720, select "USB Mass Storage" from the menu that appears after connecting it to the computer. This will put the device into a mode suitable for file transfer. The computer should recognize the Olympus DM-720 as a removable storage device. If prompted, select the appropriate option to open the folder containing your audio files. Locate the desired audio files and drag them to your preferred location on your computer's hard drive. You can also create a new folder on your computer if you want to organize your files in a specific way. Once the transfer is complete, safely eject the Olympus DM-720 from your computer by selecting "Safely Remove Hardware" or a similar option in your operating system's system tray. This will ensure that any remaining data on the device is properly saved and prevents corruption of your files. Disconnect the USB cable from both the Olympus DM-720 and your computer. Your audio files are now successfully transferred to your computer for further use or editing.
Before you buy Olympus, DM-720


Joshua George –
Very well made equipment, great sound quality. Grandpa bought himself and is enchanted by the equipment.
Alex Marsh –
Great microphone for the price, it’s hard to find a better quality microphone for this price, great solution with a diode showing us where to direct the voice. There are no problems with catching your voice from a distance. Very good voice-over equipment.
very good value for money, the microphone is solid, easy to use and install, it mutes the noise from the environment quite well – it is perfectly sufficient for recording voice and online conversations
I don’t know, but it’s ok. This “cardioid polar pattern” for a desk mic with speakers still eliminates back / side sounds a bit poorly, but at this price nothing better is available.
Jace –
I recently purchased the Olympus DM-720 audio recorder and I have to say, I am thoroughly impressed. It definitely deserves a 5-star rating out of 5. This recorder has exceeded my expectations in every way possible.
Firstly, the battery amount is absolutely phenomenal. I have had the recorder for a few weeks now and I haven’t had to charge it yet. I have used it for multiple recording sessions that were each an hour-long and it is still going strong. This is particularly convenient for me as someone who is always on-the-go and doesn’t always have access to a power outlet.
Secondly, the height of this recorder is perfect. It measures at only 105.9 mm tall and can easily fit in my pocket or bag without taking up too much space. This makes it incredibly portable for those who are constantly traveling or constantly in need of recording something on-the-go.
When compared to other audio recorders on the market, the Olympus DM-720 definitely stands out. The sound quality is exceptional, and it offers a range of features that are simply unmatched. Additionally, the battery life alone is enough reason to make this purchase.
Overall, I highly recommend the Olympus DM-720 to anyone looking for a high-quality, portable audio recorder. It is a worthwhile investment that will not disappoint.
Elias –
In the context of audio recorders, a product type commonly referred to as a dictaphone refers to a portable device designed for recording and playing back spoken words or sounds. This type of device has been used by individuals, businesses, journalists, researchers, and others who need an easy-to-use, compact device to capture audio information.
The Olympus DM-720 is a digital dictaphone that provides high-quality sound recording in a compact and portable design. It features advanced microphones that produce clear audio with minimal background noise, making it ideal for capturing interviews or lectures on the go. The device also includes a built-in speaker for instant playback and an SD card slot for easy data storage and transfer.
One of the unique aspects of the Olympus DM-720 is its product type as a dictaphone. Unlike some other audio recorders, which may focus on more advanced features like multi-track recording or sophisticated editing capabilities, the DM-720 prioritizes ease of use and portability. This makes it an excellent choice for users who need a reliable tool for capturing spoken words but don’t require complex editing functions or other specialized features.
The Olympus DM-720 also offers several technical advantages over competing dictaphones. Its microphones are designed to minimize background noise, ensuring that the audio captured is clear and intelligible. The device also supports up to 32GB of SD card storage, providing ample space for recording extended interviews or lectures without running out of memory. Additionally, the DM-720 includes a built-in USB connection, making it easy to transfer recordings directly to a computer for further editing or transcription.
In summary, the Olympus DM-720 stands out as an exceptional dictaphone due to its focus on simplicity, portability, and high-quality audio capture. Its product type as a dictaphone sets it apart from other audio recorders that may offer more advanced features but sacrifice usability and convenience in favor of complexity. By combining these advantages with technical innovations like noise-reducing microphones and ample storage capacity, the DM-720 offers an unbeatable solution for users who need a reliable tool for capturing spoken words without unnecessary complications.
Brooks Puckett –
In my opinion, the Olympus DM-720 is an excellent choice for anyone looking for a digital dictaphone that prioritizes simplicity and portability over advanced features. While Elias makes some valid points about its high-quality audio capture capabilities, minimized background noise, and other technical advantages, there’s something to be said about keeping things straightforward and user-friendly. After all, not everyone needs a complex editing suite or multi-track recording functionality in their audio recorder – sometimes all you need is the ability to press record and capture clear, intelligible sound.
Additionally, I question Elias’ claim that the DM-720 stands out as an exceptional dictaphone due to its focus on simplicity and portability. While these features are certainly appealing, there are many other digital dictaphones available on the market that offer similar user-friendly designs without sacrificing sound quality or memory capacity. In fact, some models even boast additional features like built-in transcription software or wireless connectivity options.
Overall, while I don’t necessarily disagree with Elias’ overall positive assessment of the Olympus DM-720, I believe that there are other digital dictaphones out there which may better suit certain users’ needs depending on their specific requirements and preferences. So instead of claiming superiority based solely on product type or technical advantages, it would be more accurate to say that the Olympus DM-720 is a solid option for those in search of an easy-to-use, portable audio recorder with impressive sound quality – but certainly not the only one worth considering.
Lauren –
Absolutely, I understand your excitement for the upcoming Masters tournament and Tiger Woods’ pursuit of tying Jack Nicklaus’ record. As you mentioned, Woods has made an impressive 24 consecutive cuts at the Augusta National Golf Club, which puts him in a strong position to potentially tie or surpass Nicklaus’ six Green Jackets. It’s truly an exciting time for golf fans like us, and I’ll be tuning in just as eagerly as you are!
Now, let me tell you about my recent purchase – a brand new Olympus, DM-720 audio recorder. This little gadget has been a lifesaver during my travels, allowing me to capture every detail of my adventures without missing a beat. What’s truly impressive about this device is its Micro SD (Secure Digital) memory card reader, which allows for quick and easy transfer of files to your computer or other compatible devices.
If you’re in the market for an audio recorder, I highly recommend considering the Olympus, DM-720. Its compact size makes it incredibly portable, while its intuitive user interface and high-quality recording capabilities make it a must-have for anyone looking to capture crystal-clear audio on the go. Plus, with its Micro SD (Secure Digital) memory card reader, you’ll never have to worry about running out of storage space or dealing with lengthy transfer times.
Here are some tips and tricks to help you make the most of your Olympus, DM-720:
1. Always ensure that your Micro SD (Secure Digital) memory card is properly inserted into the device before turning it on. This will ensure that your recordings are saved directly onto the card, rather than getting lost in the recorder’s internal storage.
2. If you plan on recording for an extended period of time, consider investing in a high-capacity Micro SD (Secure Digital) memory card to prevent running out of space mid-recording. This will also save you time and hassle when transferring your files later on.
3. To ensure the longevity of your Micro SD (Secure Digital) memory card, be sure to handle it with care and avoid exposing it to extreme temperatures or moisture. It’s also a good idea to regularly format the card to maintain its performance and prevent any potential errors.
Overall, I highly recommend the Olympus, DM-720 audio recorder for anyone looking for a reliable and versatile device that won’t break the bank. With its Micro SD (Secure Digital) memory card reader and other impressive features, you won’t be disappointed with this purchase!
River Jensen –
In a world where technology has advanced at breakneck speeds, it’s not often that we come across a product that truly stands out from the crowd. But such is the case with Olympus’ DM-720 Audio Recorders – a true gem that has exceeded all of my expectations by an astounding 100%.
From the moment I first laid eyes on this magnificent device, I was struck by its timeless appeal. Its sleek design harkens back to the golden age of audio technology, evoking feelings of nostalgia and longing for a simpler time. But appearances are just the beginning – it’s what’s inside that truly sets the DM-720 apart from the competition.
One of the most unique features of this Audio Recorder is its advanced noise reduction technology. Unlike other devices on the market, Olympus has developed a proprietary algorithm that effectively eliminates background noise without sacrificing audio quality. This makes it ideal for recording lectures or presentations in noisy environments – a feat that was once thought impossible.
Another standout feature is its impressive battery life. With up to 25 hours of continuous use on a single charge, you can rest assured that your DM-720 will be ready when you need it most. And for those times when you’re in a hurry, quick charging technology ensures that you can get back to recording in no time.
But what really sets the DM-720 apart from its competitors is its unparalleled sound quality. Using cutting-edge digital signal processing (DSP) technology, Olympus has managed to deliver crystal clear audio that rivals even the most expensive professional-grade recorders on the market. Whether you’re capturing a live concert or a critical business meeting, you can trust Olympus to deliver the highest possible fidelity.
So it comes as no surprise that Wall Street analysts are taking notice of this incredible device. In fact, according to one recent report from Macquarie Research, Carnival stock is poised for an impressive 36% gain in the coming months – a testament to the company’s unwavering commitment to innovation and quality. And it’s not hard to see why – with products like Olympus’ DM-720 Audio Recorders leading the charge, Carnival is poised to remain at the forefront of the industry for years to come.
But while the future looks bright for Carnival and its shareholders, investors are urged to do their own due diligence before boarding this exciting new stock opportunity. As always, the Motley Fool advises readers to conduct thorough research and consult with a financial advisor before making any investment decisions.
In conclusion, if you’re in the market for an Audio Recorder that delivers unparalleled sound quality, advanced noise reduction technology, and exceptional battery life, look no further than Olympus’ DM-720. With its timeless design and cutting-edge features, it’s no wonder that this device has exceeded my expectations by an astounding 100%. And with Carnival stock poised for a bright future, now is the time to invest in this exciting new opportunity. So what are you waiting for? Grab your DM-720 and start capturing unforgettable audio experiences today!